We’re all familiar with supply chain issues as they relate to chips and DIPs, but anyone who has requested an estimate for home improvements lately knows that the problems extend to things like plywood, and probably tile, marble, and Formica. Faced with adversity when it came to renovating the kitchen, [3DPC] decided to have a go at 3D printing custom countertops instead of buying tile.
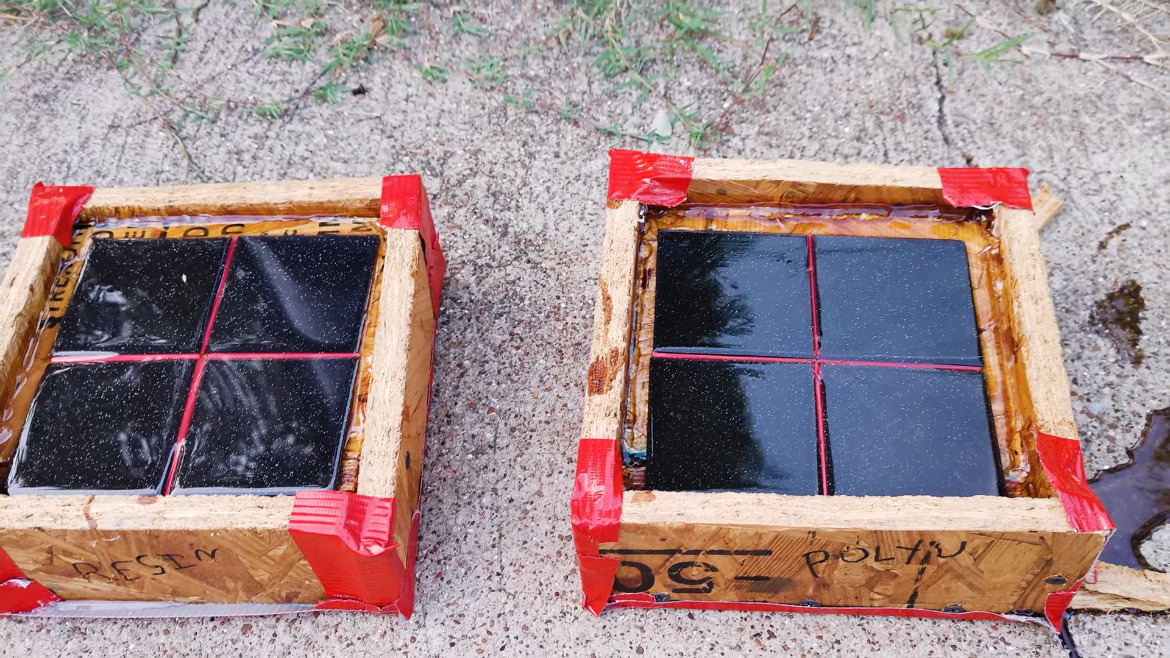
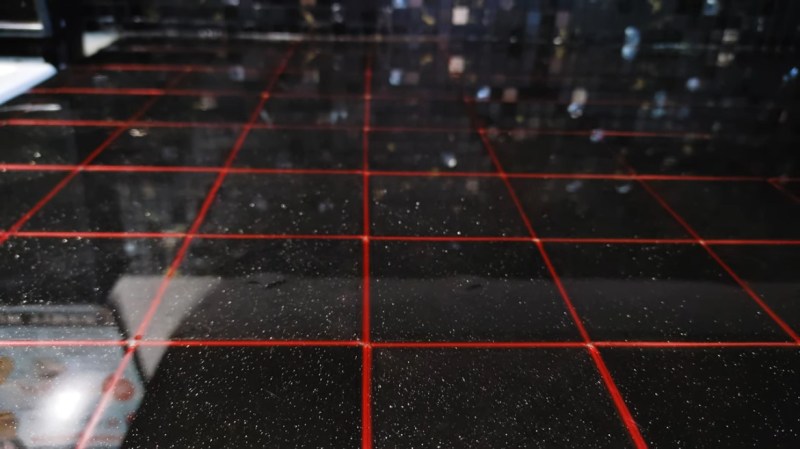
Since grout isn’t required here but is ultimately expected, [3DPC] beveled the edges of the tiles in order to allow for decorative ‘grout’ filler pieces that provide a nice contrast. That high-gloss shine comes from a combination of printing onto glass, the direction of the layer lines, and the resin sealer that [3DPC] hired a professional to pour. Because of these factors, the tiles have an increased transparency that makes them look super cool. Be sure to check out the brief build video after the break.
To be fair, this is not [3DPC]’s first 3D-printed home-improvement rodeo — he has already saved tens of thousands of dollars by printing instead of purchasing. For this particular project, [3DPC] calculated a total cost under $400 — a fraction of what a professionally installed countertop would have cost. We wonder how much he’ll save on tiling the bathroom, which is already in progress. We can’t wait to see it!
Are you still without a printer? Might as well make one that can use trash. Or if you already have a printer, just make filament from recycled plastic. It’s all here among the 2022 Hackaday Prize Round 2 winners; just let your imagination wander.


I am unconvinced anything effects the glossy surface more than the final pour of resin. I really like the idea of printing decorative parts for home projects like this. Imagine instead of printing just square tiles you did something more novel, like an inlay. Measurement rings embedded in the work surface would be excellent for rolling dough. While you’re at it, put some holes under the tiles so you can install LEDs for soft, diffused lighting at night! That’d be excellent for a bathroom.
Just don’t put a hot pan on it! I can’t live without heat resistant countertops.
I can’t imagine putting a hot anything on a countertop. That’s like fingernails on a chalk board.
I can’t imagine working in a kitchen so delicate that i can’t briefly set a hot pan on any given surface. It’s like having a garage that can’t take a drip of oil or a bathroom that can’t take a splash of water.
I’m a little surprised that waterglass isn’t more common for countertops for that reason
hahaha i’m so upset about this
it’s just a resin countertop…my friend and i made one out of beer bottle caps once. i don’t see how this is in any way better than anything else and it’s not even the cheapest way to make a decorative resin countertop.
i couldn’t tell what kind of filament they used but it will surely cause the resin to delaminate as it adjusts its shape according to the heat / light / humidity in its environment???
i guess i don’t like seeing 3d printing used on something it’s not good at, and i don’t like seeing a job done with a tool that isn’t good at it :)
it’s so hard to beat formica for a countertop.
I suspect this is better because the person who did it thinks it looks nicer than beer bottle caps?
> i guess i don’t like seeing 3d printing used on something it’s not good at, and i don’t like seeing a job done with a tool that isn’t good at it :)
TBF you’re using advanced modern computing hardware to whine about someone accomplishing something that you don’t like. I’d say that computers are much better at facilitating meaningful communication instead.
“it’s so hard to beat formica for a countertop.”
You mean when price is an issue right? Because nothing beats Quartzs/Granite/Marble countertops.
yeah because price is an issue :)
As I understand it, marble stains easily and doesn’t work well with acidic foodstuffs. Granite can also stain, or crack if hot utensils are set on it.
The advantage of glazed tile is that it won’t easily scratch … but resin certainly will. A sheet of tempered glass over the printed tiles (sealed at the edges) would have made more sense to me.
Is this a paid post? What is this diwhy project doing here?
Come back in five years and let us know how this works out. Unless he treats his kitchen like a museum piece, I really don’t see how a resin kitchen countertop is going avoid getting scratched, chipped, stained and burned.
There’s a reason people pay serious $$$ for bombproof materials like granite and quartzite. We have a granite countertop. We’ve taken no special care of it, and it still looks great after nearly 30 years.
People take heat resistance for granite.
Good one! Got a solid nose-huff out of me
Much of that is status and to increase their home sale value. Most people treat their home like an investment.
Concrete countertops are both cheap and can be pretty heat resistant if sealed correctly they won’t stain either. The only issue really lies in the fact that they are labor intensive. and nobody wants to do work. and even though concrete takes a lot of energy to make with lots of heat loss, it’s still less than the cost of shipping exotic stones from half way across the world.
TBH, wood countertops with a proper seal can be very awesome as well. Even without much sealing, they’re heat resistant and if they get messed up, just plane it down a bit with a hand plane, re-sand it, re-seal it, will last many lifetimes. wood is also renewable if we replant our forests. pine or spruce works just fine, but bamboo or other woods will work and sometimes ‘look better’ depending on your subjective opinion.
For the amount of work and cost, almost anyone can do wood with simple tools they either already have, or can obtain for very little money.
Actually the idea is very nice, but the place he put it is very wrong. A kitchen countertop is heavily used with lots of different tools, which will create easily scratches and other damages in this very soft material.
Maybe the walls in the kitchen and/or bathroom could work.
Resin has its place.
My father in law was a custom cabinet maker, and once built a countertop for a bar out of old broken skis (he sourced them cheaply from a local ski repair shop.) He cut the undamaged parts of the skis into slices so that the logos were visible, planed them flat, assembled them on a base, then poured resin to finish the top. Heat wasn’t a problem as a bar usually doesn’t see the same heat that a kitchen countertop does (except for forgotten cigarettes.)
Tip for anyone wanting to try this at home: make sure there are no metal parts remaining in the ski before sending it through the planer. One of the ski slices still had a metal piece in it, and the planer blade caught it. It embedded itself in the wall across the shop.