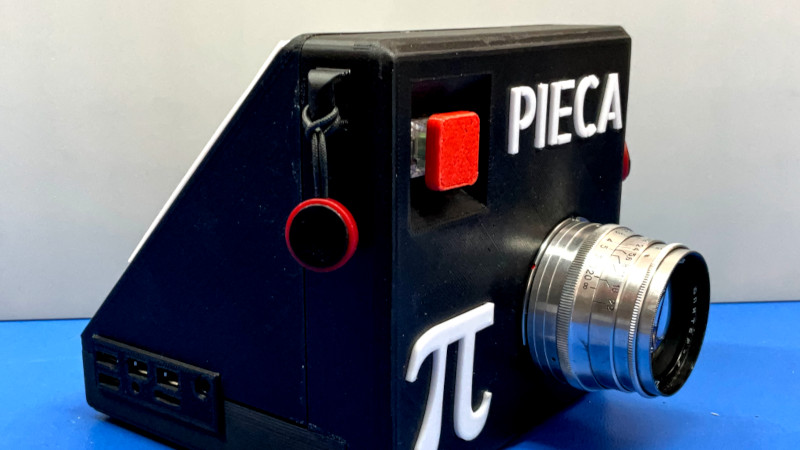
The advent of the high-quality version of the Raspberry Pi camera has given experimenters a good-enough quality camera system that they can use it to create better devices than mere snapshot cameras. It’s been used by experimenters for some exciting projects, but so far, very few of them have broken away from the Pi camera’s C-mount lens system. [Tom Schucker]’s Pieca is an interesting departure then, because it takes the Pi HQ camera into new territory by using Leica rangefinder lenses.
There are enough Pi camera projects that by now the process of setting one up should be pretty well known. This one is a bit different in its use of a focal length reducer, mounted inside a 3D-printed Leica lens mounting plate. The result is that the Leica lens is better matched to the much smaller size of the Pi camera sensor compared to a 35mm frame.
The camera’s aesthetic design is on the chunky side, probably because of the choice of a Pi 4 rather than a Pi Zero. It remains very usable though, and produces photographs with a distinctive feel. You can see more in the video below the break. Meanwhile if you aren’t lucky enough to own a stable of Leica lenses, perhaps you could think about adapting more common optics? We’ve seen it before with the original Pi camera.


I really like the simplicity of the design (big triangle) it seems really usable and well thought out. For example the USB stick located in the cover and the way the display is tilted. The explanation of the focal length reducer / speedbooster was very well explained (thanks for that). Fun project!
Got a bit of a Polaroid SX-70 vibe to it…
(wish I still had mine…kids busted it because they couldn’t figure out how to close it)
Okay. Here we go.
1. Great project.
2. Focal-reducing lens. We kind of need a little more, there. Like, what resources are available, or at least what he actually used.
3. When .. people .. explain .. things .. really .. slowly, it irritates the hell out of me. If someone isn’t going to understand, saying it slower isn’t going to help. If you need help on this, refer to any of Ben Eater’s videos. He talks at a normal pace, with the full understanding that anyone watching can stop, back up, and re-watch something as many times as necessary, without forcing the people who DID understand it the first time to twiddle their thumbs.
4. “distinctive look” is just code for “something not right here”. But I would attribute at least as much of this to the photographer as to the camera. People have been known to take pictures with both Holgas and Polaroids, that don’t include those “distinctive” looks.
4. Great project.
5. Flame on.
You know that you can increase playback speed in YouTube? ;-)
I watch a lot of youtube at double-speed and if I want it faster, I download the video to my computer and let VLC tear it up. I personally like slow explanations because it matches my mental speed and I love to know every minute detail so as to better understand the project.
So will using one of these cameras create an insatiable desire to eat paint chips and dirt?
Jeez you sound like my wife except she’s given up on the compliment sandwich by now.
An alternative word to replace the phrase “distinctive look” is the word “rustic”. I am a function before form kind of guy, but I appreciate good looks as well.
As for playback speed, slow wins over fast every time for me. I think this is a matter of taste. The main thing is to speak clearly and have a decent microphone. I’ll agree though that this fellow does take pains to speak a little too slowly and clearly.
A fun and frankly nicely done project. Nice to see it featured here.
.5x is a commonly available spec for a telescope reducer, and puts you in the ball park. As he said, it’s not the perfect match, and your camera lens/sensor pair may cause variance. Unless you’re planning on grinding the lens yourself, any other specs are pretty superfluous.
Align your camera lens and sensor at the camera bodies prescribed distance, on some sort of rail if you don’t have a light bench, place the reducer in between and position it while observing your sensors output to determine a satisfactory position, 3D print or machine a carrier to hold it in that position in the camera body. Preferably, with an adjustable thread to account for any errors.
If you want an exact match, The math gets hard, and if you ask an expert what you need to get from X to X, he’s either going to give you the same ballpark answer, or he’ll get frustrated with you for expecting him to design your optical system for you. On the rare occasion you find someone who wants to teach you, expect to have a good bit of spare time and some spare memory cells to store the formulas, he’ll expect you to remember them, and never ask again.
Optical systems is an amazing field, but there’s quite a learning curve. My brain doesn’t process math in the classic, formulaic regime that’s generally taught, and formulas themselves are not retained unless used on a daily basis. So I have to have a physical reference on hand to get anything done, and this is a multi dimensional design space that’s layered in wavelength, spherical, and chromatic aberration, and polarization. I’m just thankful that I live in a time where ray tracing capable GPUs and software are available to help out.
regarding #3
Tell them what your going to tell them.
Tell it to them.
Tell them what you told them.
Also owns Leica rangefinder lenses. Likely unfuzzy little foreigner.
Regarding point #2: the project write up even gives you an Amazon link, what more do you really need?
Gee. Guess I should’ve read the write-up instead of just watching the video! There was even a nice white paper on speed boosters. Thanks.
I’ve learned a couple of foreign languages.
There is nothing more helpful to following what someone is saying in a language you barely understand, as putting enough pauses between words that people can hear individual words rather than having to parse them out of a stream of phonemes.
Speaking… very… slowly… is almost the single best thing you can do in your videos if you want your work to be accessible to people for whom your language is a second/third/fourth language. The best is of course providing subtitles or native language narration, but the latter is nearly impossibly onerous and the former makes a lot of assumptions about how people view videos.
Hmmm. Looking at the Leica M series lenses brings quite a shock. The Cheapest Leica branded one from B&H Photo is $2795 USD. Whew! Nose bleed territory. There are a few used ones in M mount but they are fairly pricey too. Why not use an SLR Canon or Nikon mount? Both have broad availability of new and used lenses for a fraction (often a very small fraction) of that.
A quick web search throws up plenty of examples where other people have used Canon or other lens brands with the R’Pi – as with this project, they appear to just be using whatever manual lenses they happen to have around the house already.
If you don’t have M mount lenses to hand, his mount design looks to be quite crude, really, more a throat to grip the lens than a full bayonet, so you shouldn’t have too much trouble tweaking it to match your choice. Although, given that all the classic old lens mounts have a long flange distance, you could get a cheap macro tube from Ebay and use the metal mounting plate from that.
As you’re still going from 35mm coverage, you can use the same focal reducer as the Pieca does. This reducer does seem to the USP for this project, as most of the other write ups I spotted seem to quite like the effect “cheap telephoto” effect of the smaller sensors reduced field of view.
Buy new. Search for TTArtisan 50mm f1. 2 in M mount. It’s about $80. It’s 99.5% optically of a 50mm Summilux but at 1/100th of the price.
Frankly, if you’re spending the bucks on Leica optics, the last thing you’re doing is to place a crappy magnifying lens in the light path.
If you want a high quality, modern rangefinder experience, go research the Pixii. For lenses, Voigtlander is quite good. The Chinese makes like Laowa, TTArtisan, 7Artisan, etc. Can be good too.
Yup. Using Leica lenses on that body is putting platinum-flake lipstick on a pig that won the World’s Ugliest Pig contest and that breaks out in hives when you pit lipstick on it. A nonsense project.
I kind of agree
When everyone switched to digital photography I went the medium format route (I had a decent kamiya RZ kit by then) and got a couple leaf backs (at which point Canon and Nikon promptly made the improvements that I needed to really regret my decision) Most of the backs then and now can be triggered by a pc connection, which is the little round pin/sleeve socket that is usually used for external flash sync. I got an old large format shutter (copal) without the lens elements, one of the bigger sizes, and made dozens of camera configurations that would take any lens you could find a mount for, which usually for me came from an extender tube, junked body, teleconverter, and so on. I’d take the mount part off, grind the back flat, hot-glue it to the copal shutter and mount the lens. Sometimes I’d have to find the mechanism that stops the lens down when a shot is taken, and either make it easy to operate manually or disable it so that the lens would remain stopped down while it was on the mount. Bodies were anything from a foam core and gaffer tape box, to a short length of vacuum cleaner hose, which would allow free-range shifts and tilts. You could also use any number of single elements or no lens at all, just a pinhole. Point I suppose is that this concept is very rich with possibility and there are mountains of cheap used gear out there to make it happen.
I need a sky camera that doesn’t cost 3 grand, can pi camera do that??!
Not quite sure what you mean by “sky camera”, but if you mean a camera that can capture an entire hemisphere, that’s more about the lens than the camera. But also, https://www.amazon.com/KODAK-PIXPRO-ORBIT360-Camera-Satellite/dp/B0752NQMP2/ref=asc_df_B0752NQMP2/?tag=hyprod-20&linkCode=df0&hvadid=241975648489&hvpos=&hvnetw=g&hvrand=5287216772099588048&hvpone=&hvptwo=&hvqmt=&hvdev=c&hvdvcmdl=&hvlocint=&hvlocphy=9061081&hvtargid=pla-439006604136&psc=1 Cameras like this do it by taking two separate cameras that have slightly more than 180 degree angle of view, then stitching the two together. If you can find such a lens, put it in front of your Pi camera, and you’ve got it. Note that it the image will only cover part of the sensor, which limits your resolution.
Does the Pi camera sensor have an IR filter on it?
I have a Samsung NX500 camera that I use with old Canon FD macro lenses that were designed for 35 mm film use (you can buy them cheaply on ebay). In those lenses (and the Leica lenses used in this project) there is no IR cut filter, as there is in modern lenses made for digital photography. As a result, the IR getting through the lens to the sensor affects the exposure and color balance slightly.
But… is there any way to get a RasPi nowadays?
I have 5 PiCams and 3 OpenCV ideas I want to try… but no brains for the beasies…
You spend 60€ for the HQ camera, 90€ for the Raspberry PI and again at least 50€ for the display, battery, charging electronics, etc. Then you get a camera with incredibly limited capabilities that has a crop factor of 5.5. This means that a 50 mm lens becomes a 275 mm telephoto. I’d rather go to a photo shop and buy a used Canon-M or Sony-a for around €100 to which you can also adapt vintage lenses and have all the advanced photo/video functions with a crop factor of 1.5 or 1.6. Ok, that doesn’t look so crappy then…