As an amateur astrophotographer will tell you, you just don’t get to capture the really interesting objects without spending a ton of money on some decent pieces of kit. Telescope aside, there really is a surprising amount of complexity, weight, and associated costs with the telescope mount alone, let alone one that is capable of any sort of programmable tracking. [Alan (Jialiang) Zhao] clearly wanted to up their game, and having suffered some of the shortcomings of their Sky-Watcher HEQ-5 pro Equatorial mount decided to go ahead and build an open-source mount, Alkaid, which hopefully works a bit better for them.
In simple terms, the difficulty of photographing an extremely dim, distant object (or one that is larger but diffuse) is that the camera sensor needs to spend a significant amount of time signal-averaging, to gather enough light for anything to be seen at all, through the noise. But, this ball of rock we sit on is rotating constantly, so the only solution is to track the object of interest, to compensate. This is referred to as equatorial tracking, and allows the rotation of the Earth to be compensated for during a long exposure.
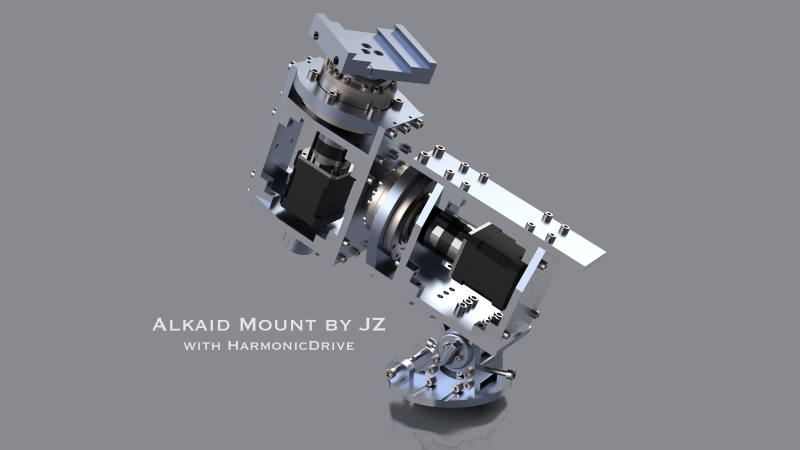
The design of each of the two axes revolves (sorry!) around the use of a NEMA-17 stepper motor with a 27:1 planetary gearbox, driving into a harmonic reducer gearbox. Harmonic drives (aka strain wave drives) are pretty neat, working on the principle of a fixed, but circularly distorting ring gear that transmits torque from the inside surface to the outside, with almost no backlash. They are expensive parts, but for a super smooth movement, this is what you want. The huge output torque they allow, meant that [Alan] was able to build a mount for a heavy telescope without any counterbalances. Structurally, the whole thing is constructed from 10 mm thick aluminium plates that were cut with a waterjet and subsequently milled to finish.
On the electronics side, a custom PCB was produced, with a pair of TMC2130-based stepper drivers, controlled by a teensy 4.0. The simple design was constructed with Eagle PCB, and can be found on the Alkaid project GitHub, together with details of the frame and a suitable copy of the OnStep telescope controller firmware. Some 3D-printed side panels hold the electronics in place and box-in the internals giving the mount a tidy. kind of industrial look. One important metric for any such mount, is the total weight, which [Alan] reports as being around 5.5 kg which is less than half that of an HEQ-5 mount, without its counterbalances. Hopefully, it is heavy enough to dampen out any vibrations transmitted from the tripod, but testing will prove that one way or the other.
Too complex? Not enough time to build? How about a barn-door tracking mount? We’ve also seen a Raspberry Pi-based star tracker featured as part of the 2016 Hackaday Prize.
Thanks to [Buckarooooo] for the tip!


Cool. Some counterweights might keep them happy.
I have some old Vexta harmonic drives. 50,000 steps/rev. I am not wanting to let them go, at all cost. Also seen here: https://youtu.be/Lm8oprDhAnQ?t=1897
Most harmonic EQ mounts can handle up to 20kg of payload without issue. After that counterweights are recommended.
as a tripod mount,I think that this will be a fail
the center of mass must be over the center of the
tripod,might be fine for taking pictures inside the solar system,or if it is mounted on a piece of construction
equipment it would possible work for dimmer more distant objects
Where the fail? Seems there’s already some decent results in the video…
I’d like to have the mount center balanced too, but it’s not necessary. I use a ZWO-AM5 harmonic drive equatorial mount with a 20 pound telescope+camera. It’s not well centered on the tripod. I add a 10 pound counterweight because I work at a 2 meter focal length (101 arcsec/mm plate scale) and I thought even just partially balancing it might improve guiding performance. (Never used an unbalanced mount before – seemed crazy.) With a focal plane guide camera (OAG) on a decent night, I get rms guiding error of 0.5 arcsec. It’s great.
Neat. I have a few authentic harmonic drives from Harmonic Drive Systems. Super expensive, over $2k each new. You can get cheaper Chinese made ones too. They are 80:1 mounted to Teknic Brushless servo motors for cnc 4/5th axis. He also uses a 27:1 planetary gear head. That’s a lot of reduction and torque!
one note – strain-wave drives (and in particular, the Harmonic Drives products) are great, but their operation does eventually come down to fairly small gear teeth, so you have to be careful to use them within their torque specs.
Especially in the smaller sizes, if you overtorque them you can quickly strip the teeth right off the wave gear
Look up Keen-One on printable, it’s a fantastic 3D printed harmonic EQ drive. It has no problem moving 10kg telescopes.
Pentax has some cool technology that sidesteps the need for an equatorial mount: https://www.ricoh-imaging.co.jp/english/explore/astro/
You don’t actually need an eq .oint for astrophotography. With some math an alt-az will do for sole shots, and adding rotation at the eyepiece can extend that further.
You are right but we want to have astrophotography more comfortable and less complicated so AltAz is definitely not a favorite choice to go for long time deep sky exposures where you need to deploy separate de-rotator to your DSO rig. This harmonic drive german eq mounts are the next level of astrophotography and they operate counterweightless which makes them incredibly robosexy ;-p
That’s a pretty interesting approach (using the camera’s built-in shake reduction to physically move the image sensor to compensate for earth’s rotation). As they point out, it only works for shots up to 90 seconds, though one can also composite multiple shots together for somewhat longer effective exposures.
It depends on the lens you’re using. I have taken 3 minute single exposures with my Pentax K-1and Astrotracer on a regular tripod.
That’s fine but it’s a replacement for people who don’t want to invest in astronomy. 3min doesn’t get you close to being long enough for any serious amateur astrophotography. Also stacking exposures has a limited return, at some point you actually do need up the exposure time. i.e. if you take 180x 3min exposures the result won’t look anywhere near as good as 36x15min exposures. Returns beyond 50 subframes are quite limiting.
But mind you when you’re doing this you want a cooled sensor as well. Bottom line is Pentax isn’t making an EQ mount obsolete.
Interesting, but 135mm focal length lens is somewhat limiting.
I have an equatorial mount, and I’ve used it with a 300mm lens. I can achieve decent images up to ~4 minute exposures.
Pentax has a fancy toy for people who aren’t serious astronomy hobbyist and want to point their camera at the sky, nothing more. Their technology is limited by both maximum focal length and maximum exposure to borderline unusable lengths.
For reference, the story is someone who is trying to address shortcomings of the Skywatcher HEQ5 mount, a mount which I regularly use for 10-15min exposures with a 2000mm focal length.
So why does it need two motors? To compensate for earth’s rotation, you just need one if you’ve got a polar/equatorial mount. I suppose a second motor can help you programmatically aim at different points in space. But you could also use it to do azimuth/elevation tracking and avoid the polar alignment setup, right?
Once it is aligned to the polar axis and pointed at the object it only moves to the west (directly opposite of the rotation of the earth)… the other motor is for positioning the telescope to point at the object in the first place… there are also minor guiding motions to account for slight imperfections in alignment, backlash, etc… but mostly you’re right, just one motor.
One axis is aligned with north so yea, only one axis needs to move when imaging (or just looking) but in order to see anything that isn’t on the North-South line you need the other axis. FWIW a one-axis telescope aligned on the meridian was what was used for timing objects and setting clocks for a long time till the digital age.
The ra axis is the only one that needs to be driven constantly yes, but without a motorised dec axis you’ll have to aim manually.
If you skip the polar alignment and use the dec axis to stay on target you’ll get field rotation of the object in the field of view. This isn’t such a problem for visual use but is very limiting for photography.
Typically you’ll align the polar axis as accurately as possible and then use an auto guider to nudge the scope back on target in both directions. This is to allow for minor imperfections in the mount etc.
Ah, that makes sense. So you’d need 3 motors to keep proper alignment if you skip polar alignment.
By auto-guider, are you referring to something that looks at the star-field image, uses image processing to determine if/how things have shifted, and adjusts the positioning system to compensate?
Basically correct. Although the 3rd motor is really necessary when you’re not polar aligned at all. If you are a near enough – good enough kind of guy then 2 motors will get you very far indeed. This can be achieved by a spirit level, a compass and gauge on the side of the mount where you dial in your current latitude so most serious astronomy gear will only have 2 motors.
To get the polar alignment spot on we do drift alignment, that is point at stars in specific areas of the sky and watch how they drift out of view, then make minor adjustments until they stay roughly put. But this is iterative and to do it really accurately can take a good hour+.
You assessed the word auto-guider correctly. It’s effectively a second telescope mounted next to the first taking photos of a target object one a second and measuring any drift. If it senses drift it sends small alignment pulses to the mount. This isn’t just important for poor polar alignment but is critical for things such as imperfect machine in the gears of the mount itself.
If you’re interested here’s an example of my scope from 10 years ago:
https://imgur.com/a/Snhzj81 The auto-guider is the small scope behind the main telescope, and for shits and giggles I had my DSLR sitting on top of the scope as well (won’t do that again, the shutter caused the main 2m scope image to blur a bit).
It comes into play for more than just pointing. There will be errors/flex in polar alignment, and it can correct for that. Atmospheric refraction causes object to appear to appear higher in the sky than geometry would predict, so it’s needed to correct for that. Also comets, astroids, and satellites need to be tracked due to their own motion.
>you just don’t get to capture the really interesting objects without spending a ton of money on some decent pieces of kit.
Not true. For an amateur like me a dslr and metal hinge was good enough to get started.
I thought that when I started as well. But unlike regular photography where there are really diminishing returns once you get a DSLR, and by that I mean you can take pretty damn stunning photos on a $1000 camera these days and not much better on a $4000 camera, … the sky is the limit (pun intended) for astronomy.
The jump from DSLR to $3000 for me was mind blowing.
The jump from $3000 to $10000 for me was mind blowing.
And that’s where I stopped but I also know people who have spent upwards of $100k on their equipment and the resulting images they produce are proportionally mind blowing and couldn’t possibly be achieved on cheaper gear.
I should also mention that last example was under controlled conditions. We both went to the same event we both shot the same target by fluke and we both had very similar amount of data (I actually had 12hours worth and he had 9hours). He can definitely took photos of interesting objects which just didn’t even show up in my frame.
About time! Do you have any idea how long I have been educating people on the capabilities of Harmonic Science? The applications of which go beyond! Great job on your future and many applications!
That’s lovely, particularly if intended for eventual use with a (concrete) pedestal rather than a tripod and with something batter than what appears to be a stock jackscrew to adjust the polar angle.
However I’d be happier if there were much less overhang, not just to further improve rigidity but to optimise the alignment of the RA relative to the optical centre of the ‘scope. Once that’s set up, appropriate counterweights could be added to minimise sag during the motion implicit in a long exposure.
Hi . Can you show guiding graphic ?
what is the gear ratio of the strain wave gear?
I am building one with 2 strain wave gears per axis with 1:30 gear ratio each ending with 1:900 gear ratio per axis
Yours may be more than 900 ? not sure