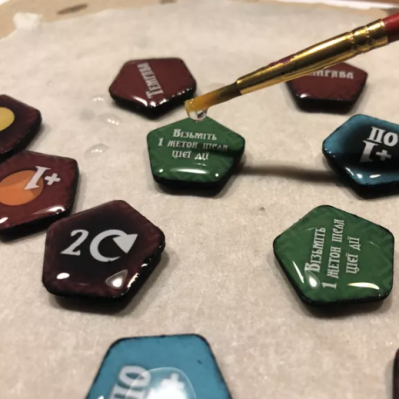
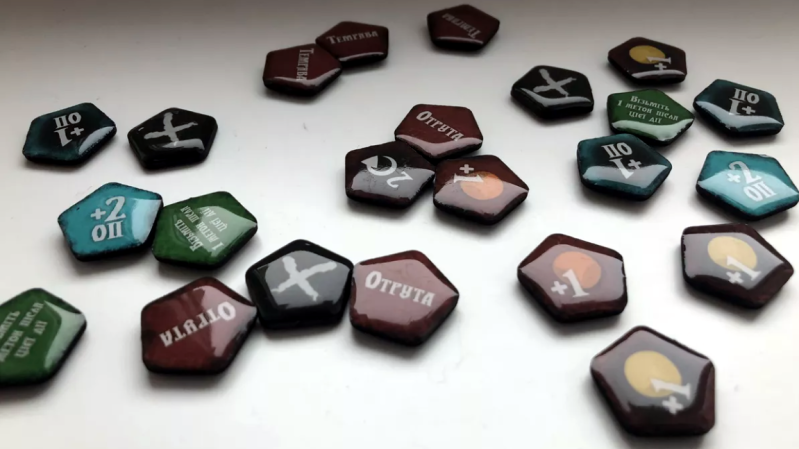
Tabletop games and cardboard tokens go hand-in-hand for a good reason: they are economical and effective. However, their tactile attributes leave a little to be desired. There’s something really great about high-quality pieces possessing a shiny, pleasing smoothness and click-clack handling that cardboard simply can’t deliver, but that all changes with [Dzhav]’s simple method for converting cardboard tokens into deluxe versions of themselves with a little work and a resin coating.
The result is a token with a crystal-clear, smooth, and slightly-convex coating of hardened resin on it. They feel (and sound) like plastic, rather than cardboard. The resin used is a two-part clear jewelry resin, used for casting things like pendants. It benefits from a long working time and unlike UV-cured resin (like the SLA 3D printer resin) it won’t be affected by light.

Like with most things, good results come from careful preparation and technique. [Dzhav] suggests preparing the tokens by sanding the edges completely smooth with fine sandpaper, then using a black marker to color them. Then, tokens are coated one side at a time with a paintbrush and correctly-mixed resin: while holding a token down with a toothpick, resin is brushed right to (but not over) the edges. Then, additional resin can be dropped in the center of the token, and gravity and surface tension will work together to ensure an even coating that doesn’t drip.
After the resin has had plenty of time to cure, the tokens are flipped over and the process repeated. The end result are tokens with both sides coated in a nice, smooth, ever-so-slightly-convex shield of resin.
They look fantastic, and sound even better. Turn up your volume and play the two-second video embedded below to listen for yourself. And when you’re ready for another gamer that didn’t settle for what was in the box, check out this redesigned Catan version.


I wonder if one could devise a similar process with casein based polymers… my local Rexall pharmacy for example is always reducing excess milk down to like 50 cents a gallon with a couple of days date left…. exctract and convert solids, blodge it around hard cardboard for a former and bake.
That sounds like you should be making cheese.
Yeah I’m not rubbing that cottage cheese concoction on my games!
Mmmm, lickable gaming tokens
Another simple way to “plasticize” carboard tokens and cards is simply to add water to regular PVA glue, the kind that cures clear, and brush or spray it on in multiple passes. It works as a kind of varnish – it improves the contrast of the print and makes the cardboard more rigid, yet the PVA is slightly soft so the card remains bendy and not slippery. More layers improves the effect, but too many will turn cloudy.
The use of jewelry resin is an important distinction in this. Those are GENERALLY a UV resin that contains additives (UV stabilizers and HALs) to resist yellowing of the resin from oxidation. The price will be higher than other varieties of clear two part resins, but you really want both of those additives. UV stabilizers alone simply extend the time it takes to turn yellow, but the end result will still be the same. So the same degree of yellowing after 3 months without stabilizers occurs at 12 months in the same conditions. HALs provide a mechanism to counter the oxidation, but it is expensive (relative to other ingredients) for the manufacturers so when they add it they are typically forward about it and to justify the associated increase in product price.
Will SLA printer UV curing resin work for this, or will there be unfortunate consequences?
Likely consequences – those resins tend to absorb water/oils and go slimy, generally are degraded by continued UV exposure, are often brittle and some warp as well.
But that doesn’t mean it won’t work, the world of UV cure resins is relatively poorly understood in material properties, longevity etc. So no doubt there are some good ones, maybe even a good colourless clear one that stays clear, colourless and glassy.
So I would probably do the same as the person involved as 2 part epoxies are more well understood, and generally much more stable.
I guess surfboard specific epoxy would work just as well. Not the ding repair, UV active kind, but the “real” formulas used in surfboard production, i.e. for lamination and hot coating. They are after all specifically formulated to be UV and moisture resistant, being subjected to quite intense levels of both. But if you don’t have any lying around, I guess for this particular it makes more sense to go with jewelry resin – rather than buying a gallon jug of Surf Clear. Unless you have a LOT of game tokens to coat, that is.
What game uses those tokens?
(Color me curious)
It’s a Russian board game. Which one? No clue.
dk if it’s russian, the text on the tokens is definitely Ukrainian
Just out of curiosity, how do you tell the difference?
I think because the word for poison is different in Ukranian and Russian
UA uses european numerals while in Russia CJK ones are used.
I think it’s the letter that looks like a Roman numeral 2 (II), which exists in Ukrainian but not Russian.
I believe people in occupied Ukraine spraypaint it around as a show of resistance.
Just to answer all of you at once.
From the first sight you can tell the difference by letter ‘i’.
That letter that CrimeRobot was talking about – that are two letters ‘i’ and ‘ї’. And yes, both of them russian doesn’t have.
What the others said basically. The letters і and ї, as well as words like отрута (poison)
Ukrainian not russian.
Definitely not Clue/Cluedo
Massive Darkness 2. The tokens shown are for the Rogue character class.
Massive darkness 2: Hellscape , Ukrainian version.
Have somebody tried polyurethane varnish for floors? That thing is supposed to be very hard and it is 2 component as this jewelry resin. It is not cheap and usually comes in big volumes.
Since the token edges are never covered with resin (just colored with a marker), the worst part of the cardboard is still exposed. If any liquid contacts the uncovered edges it will be wicked into the cardboard and damage it.
Look again, the edges are brushed while the token is pinned down with a toothpick.
It says “while holding a token down with a toothpick, resin is brushed right to (but not over) the edges.”
You have my permission to brush some on the sides afterwards.
I think an extra step of sealing the edges, after the two sides have cured, would fix that.
They then put one drop in the center, and gravity pushes the coating over the edges without it dripping.
The idea has merit but totally unworkable for any game where you need to stack tokens / counters / units.