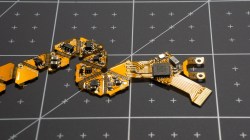
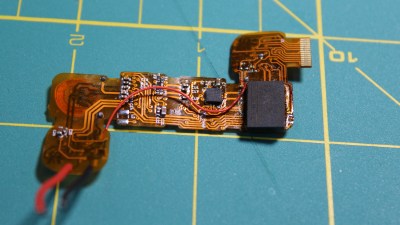
Simulate Running A Small Hardware Business With Hardware Hustle

[Oskitone]’s Hardware Hustle is a printable roll-and-write tabletop game that can be played on a single sheet of paper. It simulates attempting to run a small hardware business sustainably. Buy parts, make products, and sell them without burning yourself out!

If you’re not familiar with roll-and-write games, it’s a genre in which players take turns by rolling dice and then choosing how to assign those values in a game space as they progress from turn to turn. In the case of Hardware Hustle, it’s primarily a resource management game in which a player will be purchasing parts, assembling widgets, selling those widgets, and improving processes all while managing both money and opportunity costs.

The inspiration for Hardware Hustle comes from [Oskitone]’s own experience designing, building, and selling things like open-sourced, hackable synth kits that are known for their thoughtful design and fantastic use of 3D printing.

The game is in open beta-testing mode, so if you’d like to give it a try, head over to the PDF download section of the GitHub repository. Don’t forget to share your thoughts with the feedback form after playing. (If you’re wondering why a printable tabletop game has source code on GitHub, it’s because the game’s printable sheets are generated by JavaScript, making adjustments and tweaks and version control easier.)

Cardboard Game Tokens Become Shiny Click-Clacks With DIY Treatment

Tabletop games and cardboard tokens go hand-in-hand for a good reason: they are economical and effective. However, their tactile attributes leave a little to be desired. There’s something really great about high-quality pieces possessing a shiny, pleasing smoothness and click-clack handling that cardboard simply can’t deliver, but that all changes with [Dzhav]’s simple method for converting cardboard tokens into deluxe versions of themselves with a little work and a resin coating.

The result is a token with a crystal-clear, smooth, and slightly-convex coating of hardened resin on it. They feel (and sound) like plastic, rather than cardboard. The resin used is a two-part clear jewelry resin, used for casting things like pendants. It benefits from a long working time and unlike UV-cured resin (like the SLA 3D printer resin) it won’t be affected by light.

Careful application of resin relies on surface tension to prevent messes.

Like with most things, good results come from careful preparation and technique. [Dzhav] suggests preparing the tokens by sanding the edges completely smooth with fine sandpaper, then using a black marker to color them. Then, tokens are coated one side at a time with a paintbrush and correctly-mixed resin: while holding a token down with a toothpick, resin is brushed right to (but not over) the edges. Then, additional resin can be dropped in the center of the token, and gravity and surface tension will work together to ensure an even coating that doesn’t drip.

After the resin has had plenty of time to cure, the tokens are flipped over and the process repeated. The end result are tokens with both sides coated in a nice, smooth, ever-so-slightly-convex shield of resin.

They look fantastic, and sound even better. Turn up your volume and play the two-second video embedded below to listen for yourself. And when you’re ready for another gamer that didn’t settle for what was in the box, check out this redesigned Catan version.

Continue reading “Cardboard Game Tokens Become Shiny Click-Clacks With DIY Treatment”

Make Your Own Tabletop Game Organizers With Online Tool

There is a vibrant cottage industry built around selling accessories to improve the storage and organization of tabletop games, but the more DIY-minded will definitely appreciate [Steve Genoud]’s deckinabox tool, which can create either 3D-printable designs, or ones more suited to folded paper or cardstock. Making your own organizer can be as satisfying as it is economical, and [Steve]’s tool aims to make customization simple and easy.

The tool can also generate models for folded paper or cardstock.

The interface for customizing the 3D-printable token tray, for example, begins with a simple filleted receptacle which one can split into additional regions by adding horizontal or vertical separators. The default is to split a given region down the middle, but every dimension can of course be specified.  Things like filleting of edges (for easier token scooping) and other details are all handled automatically. A handy 3D view gives a live render of the design after every change.

[Steve] has a blog post that goes into some added detail about how the tool was made, and it makes heavy use of replicad, [Steve]’s own library for generating browser-based 3D models in code. Intrigued by the idea of generating 3D models programmatically, and want to use it to make your own models? Don’t forget to also check out OpenSCAD; chances are it’s both easier to use and more capable than one might think.

Tabletop Basketball With Tentacles

Unlike football/soccer and foosball, basketball doesn’t really lend itself to being turned into a tabletop game quite that easily. [The Q] has found a way around that, employing tentacle mechanisms to create a two-player, basketball-like game.

Each player uses a pair of two-axis control sticks and a foot pedal to operate a cable-driven tentacle with a gripper on the end. These are two stage tentacles, meaning that the top and bottom halves are independently controlled. The tentacles consist of a series of laminated foam discs clued onto bicycle cable sleeves. The cables are open in the section they control, and operate in a push-pull arrangement. The spring-loaded grippers are operated by the foot pedals, with a single cable running down the center of the tentacle.

The game looks quite fun and challenging, and we can imagine it being even more entertaining with teams of two or three people operating each tentacle. Add a bit of alcohol to adult players, and it might become downright hilarious, although the mechanisms would need to be beefed up a bit to survive that level of punishment.

We suspect [The Q] read [Joshua Vasquez]’s incredibly detailed three-part guide on two-stage tentacle mechanisms. Combine that with his guide to cable mechanism math, and you’d be well-equipped to build your own. Continue reading “Tabletop Basketball With Tentacles”

The Most Expensive D20 You’ll See Today

Roll your negotiation skill, because this d20 is a hefty one. The Tweet is also below. We are charmed by [Greg Davill]’s twenty-sided LED contraption, but what do we call it? Is it a device? A sculpture? A die? Even though “d20” is right on his custom controller PCB, we don’t think this will grace the table at the next elf campaign since it is rather like taking a Rolls Royce to the grocery store. Our builder estimates the price tag at $350 USD and that includes twenty custom PCB light panels with their components, a controller board, one battery pack, and the 3D printed chassis that has to friction-fit the light faces.

Power and communication for all the panels rely on twenty ribbon cables daisy-chained throughout the printed scaffolding, which you can see in the picture above. [Greg] made a six-sided LED cube last year, and there are more details for it, but we suspect he learned his lesson about soldering thousands of lights by hand. There are one-hundred-twenty LEDs per panel, times twenty, that is over two-thousand blinkenlights. We don’t yet have specs on the controller, but last time he used a SAMD51 processor to support over three-thousand lights. We don’t know where he’ll go next, but we’re game if he wants to make a chandelier for Hackaday’s secret underground lair.

(Editor’s Note: If you were at Supercon last year, and you got to play with this thing in the flesh, it’s worth it!)

Continue reading “The Most Expensive D20 You’ll See Today”

These Dice Know If You’re Cheating

Fans of D&D are surely aware of the significance of a good pair of dice. What if your dice were not only stylish, but smart? For anyone who’s ever had to deal with playing board games with less than reputable siblings or friends, the electric die just might be your savior.

The dice are configured via Bluetooth, tracking rolls and stats over the course of gameplay captured by an accelerometer.

The PCB had to have a flexible surface – specifically in the shape of an unfolded icosahedron – in order to form the shape of the die which constrains the design to two layers. Each face contains an LED facing outwards to light up the number on that side. The LEDs are directly powered by a rechargeable battery, which uses a small coil for wireless inductive charging. Rather than opting for a Qi charger chipset, which regulates the maximum amount of power transmitted if the efficiency falls below a threshold, [Jean Simonet] uses a simpler charger setup using a full bridge rectifier, capacitors, and a linear regulator to create a stable 5V supply for the receiving end.

While the initial design for the die required an injection molded plastic shell, an easier solution was to simply cast the designs in resin. The electronics are placed into a dice mold and cast just as a regular die would be.

This luckily also solved the issue of needing to fit the components inside a screw-on container with a removable lid, which presented a hassle in terms of finding a battery that would fit the dimensions. The LEDs – purchased for cheap on Alibaba – are daisy chained to reduce the complexity of the routing.

One issue with the LEDs, however, is that the internal PWMs modulating the intensity remain on even at an intensity of 0, constantly drawing 21 mA (for the 21 LEDs on the die). This causes the battery to die after 2-3 hours. The solution [Simonet] used was to add a transistor to cut off power to the LEDs and to have the MCU toggle the transistor when the LEDs are turned off. Even this solution didn’t solve the entire problem since the LEDs still drain current from the data and clock lines, so those lines had to be low before going to sleep.

There were some stability issues with using a small buck converter to bring the LiPo voltage down to 3.3V, so the power regulation was done directly by the MCU instead. Switching the die off is controlled by a magnetic switch connected to a power buck converter that turns off logic when a magnet is present. This initially caused the LED control lines to become floating when power was turned off, turning the LEDs to arbitrary colors. The solution was to wire the output of the magnetic sensor to the MCU and to allow the software to handle the LEDs as well.

Maybe it’s because creator [Simonet] happens to be a game developer as well, but the early development stages of the electronic die (CAD, circuit schematics, prototyping, hand soldering components) were streamed on Twitch, adding some interactivity to even the build phase. The end result may be small, but these dice certainly have large brains!

Continue reading “These Dice Know If You’re Cheating”

Get Ready For Games Night With 3D Catan

Settlers of Catan is a staple for boardgaming aficionados. Some fans like to express themselves by building a custom set of their own, and [Maclsk] is no different. Enter 3D Catan!

The models for the various pieces were designed in Blender, a great open source 3D modelling program. They were then printed on an Anycubic i3 Mega, taking about 80 hours and using 700 grams of PLA filament. With 116 game pieces, there was plenty of filing and sanding to do.

With this completed, it was then time for paint. [Maclsk] shows off a strong understanding of model painting fundamentals, from dry brushing to using PVA glue to give water elements a glossy sheen. If you’re new to the techniques, sit down with your local Warhammer players – they’ll be more than able to point you in the right direction.

Overall, it’s a great build that really pops on the gaming table. We’ve seen other die-hard Catan fans come out with their own builds, too. Video after the break.

Continue reading “Get Ready For Games Night With 3D Catan”