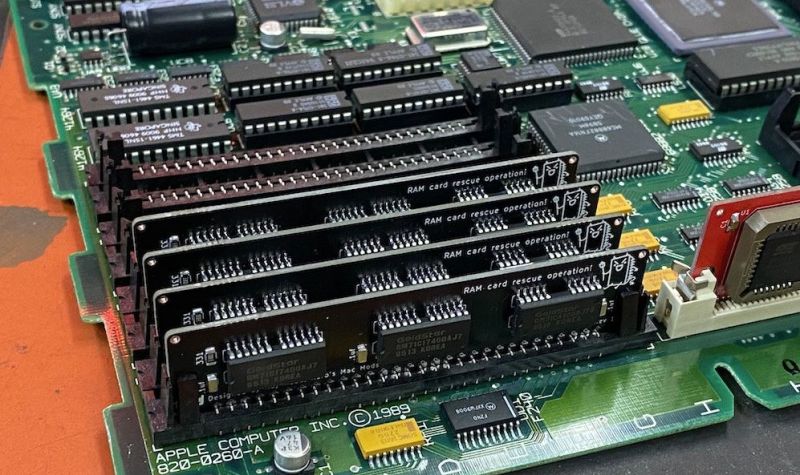
One fun aspect of retrocomputing is that you get to max out all aspects of these systems without having to take out a bank loan, as tended to be the case when these systems were new. Less fun is that decades after systems like the Apple MacIntosh SE/30 were last sold, the 30-pin SIMMs that form the expandable RAM for these systems has become rather scarce. This has led many to make their own SIMM PCBs, including [Kay Koba] with a PCB for 4 MB SIMMs along with information on which memory and parity ICs are suitable for these SIMMs.
For systems like the MacIntosh SE/30 with 8 30-pin memory slots, the maximum capacity is 128 MB, but this comes with many gotchas due to its ROM being ’32-bit dirty’. While this can be circumvented by swapping in a ROM from a later MacIntosh variant, the less invasive way is to enable the MODE32 system extension and install eight 4 MB SIMMs for a total of 32 MB RAM. RAM chips for such 30-pin SIMMs can be scavenged from the far more common 72-pin SIMMs, along with any old new stock one may come across.
These 4 MB SIMM PCBs are offered for sale by [Kay] with optionally the SMD components (capacitors, resistors and LED) included in the package. The original PCB card edge design is credited to work by [Zane Kaminski] whose GitHub profile also leads to e.g. this 30-pin SIMM project.
Have you modded your MacIntosh or other retro system yet to the maximum RAM and storage limits?


I once upgraded a HP printer which had a 1MB internal memory and an expansion slot with a 128MB stick from my old computer, of which it could “only” use 63m. It printed só much faster after that.
Why would it print faster with more memory?
From the total ignorance, I guess the RAM was used as a buffer, thus filling more the buffer lead to bigger chunks of the file being printed at a time? Or maybe the amount of RAM was enough to make the printer continuously print (if it was unable before, something we do not even know)? Once again, I do not have a clue of how the process is in reality, just guessing or inventing.
Yeah I was thinking in that direction too, with proper firmware in the printer that wouldnt really matter I thougt. Its just a streaming process.
Its not just a streaming process. Not even close. It does not stream “images” like you think. The printer receives drawing instructions which it renders to an internal “low level” image (what the printhead/laser/whatever needs to do). In case you are sending complex pages it will eat up the RAM and the computer can’t send the whole page at once plus it takes a ton of time for the printers CPU to render the image, wait for a new batch of instructions, render again, etc.
I had a laser printer with 2MB of RAM which I used to print PCB photo masks and it took up to 3 minutes after clicking print for the page to appear. Once I put more ram into it (8MB if I recall correctly) the time to start printing is significantly improved to around ~30 sec or so.
Using custom fonts also eats up RAM quick. Since every letter is sent as drawing instructions, instead of “print an A with the built in font”.
More ram to render postscript to pixels. A lot of laserprinters had their own render engine.
I bought some hp 72pin simms not adhering to the 72pin simm standard. They would fit, but the pinout was so different that even a short was created between 5v and ground. What a great idea. What could possibly go wrong… That’s hp for you. Now i’m in the process of designing a proper pcb for the chips so i can use the 64mb simms in my sampler
IIRC (this was 20 years ago) more buffer allowed the printer to have more buffer and spit out a whole page, and fill it’s buffer for the next page. In my memory, it would wait a minute between pages without the ram upgradd, and upgrading to 2MB would solve the problem. But 128MB was all I had.
I got an HP-4P for $15 at a rummage sale in 2004. By then I’d accumulated a lot of surplus ram, so I could fill the printer for nothing. That printer kept running till 2018.
“[…]without having to take out a bank loan,”
Umm, have you looked at prices for Amiga upgrades?
Not even talking about what Jens is selling, but the old stuff is an arm, a leg, a kidney and the firstborn.
I remember people paying tens of thousands for a few megabytes of memory back in the dark ages. Now I got 128 GIGAbytes sitting around for video editing and running neural networks and such and it didn’t cost me very much at all. Yes I have long grey nose hairs how could you tell
Yeah, my dad bleed 800 DMark for 16 *Kilobytes* for his TRS80 back then.
Nowadays i am content enough with the 16 GB in my Steamdeck, a deliberate choice to save some energy.
But when you look at the prices for some retro systems…
If you DIY you can get pretty cheap, but if you want a period correct turbo board for your Amiga 2000… mortgage on you house? o.o
I had an old, first generation, Gravis UltraSound (which used RAM chips directly on the board, with sockets) with 256KBytes of RAM, and some spare 256KBytes SIMMs, so I built a little adapter board, mounted directly over the sockets, that allowed me to use those SIMMs and fill it with the full megabyte supported.
For the AWE32 PnP and AWE64 someone built adapter boards to use ordinary 72 pin SIMMs instead of Creative Labs’ proprietary memory modules. The original non-PnP AWE 32 used 30 pin SIMMs, IIRC.
Install a ROMinator upgraded ROM and the whole 24bit issue goes away. https://metalbabble.wordpress.com/2020/04/24/a-green-jade-upgrade-ram-upgrades-custom-roms-and-running-mac-os-8-on-an-se-30/
Nitpick: Despite the Macintosh being named after the McIntosh apple, the ‘I’ is not capitalized in it.
The capitalization of everything came later, I guess … should we call this configuration a Maxintosh?
Soldering Mac SIMMs wasn’t unheard of even when the SE/30 was new. One of my first jobs was assembling Mac SIMMs. Someone had figured out that having your own PCBs made and soldering a few RAM chips to them (there might have been a few diodes/resistors too) was dirt cheap compared to what the official Apple parts went for. Not much has changed since then.
I once found some higher density RAM on a surplus motherboard. And someone gave me their 256K SIMMs. So I did a transplant. It worked fine, for a while. But if I let my Mac Plus sit there, moving the mouse would crash it.
It turned out the RAM wasn’t suitable, it wasn’t getting refreshed.
So I had to wait for 1M simms getting down to $10. As I recall, the price went up because of a fire, then down.
I had to use my heat gun on at least one of those 1M SIMMs because it haven’t been fully soldered.
More memory might be great but it’s not always better. I have a Macintosh Quadra 650 and once I upgraded to 128 MB using 4×32 72 pin SIMMs. It took a long time from power on to boot due to memory check. Restarts usually go by fast as the system would know how much memory.
There’s also a proportional limit on how much memory vs L2 cache you should have before having more memory impacts performance significantly unless you also upgrade the cache amount (and some motherboards didn’t support enough cache for the maximum amount of memory they could use). I used to know a rule of thumb for that back in the 486/Pentium days but it’s disappeared into some cobwebbed corner of my mind now.
I patched the RAM check out of the ROM in my SE/30 for exactly that reason.
Whether installing 32 megs or installing 128 megs, there’s no difference at all in “invasiveness”, unlike what the article implies. Also, there’s one – exactly one – gotcha with installing more memory, not many.