Maxing Out Your MacIntosh With A 4 MB Memory Stick Kit

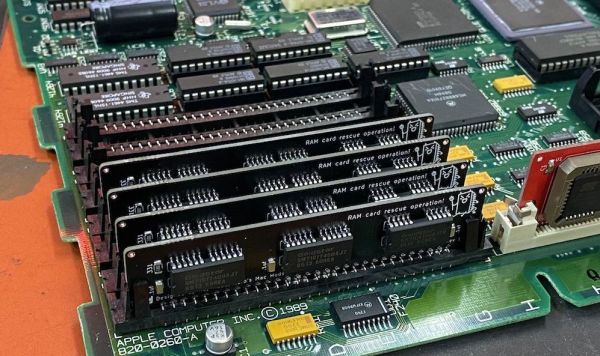
One fun aspect of retrocomputing is that you get to max out all aspects of these systems without having to take out a bank loan, as tended to be the case when these systems were new. Less fun is that decades after systems like the Apple MacIntosh SE/30 were last sold, the 30-pin SIMMs that form the expandable RAM for these systems has become rather scarce. This has led many to make their own SIMM PCBs, including [Kay Koba] with a PCB for 4 MB SIMMs along with information on which memory and parity ICs are suitable for these SIMMs.

For systems like the MacIntosh SE/30 with 8 30-pin memory slots, the maximum capacity is 128 MB, but this comes with many gotchas due to its ROM being ’32-bit dirty’. While this can be circumvented by swapping in a ROM from a later MacIntosh variant, the less invasive way is to enable the MODE32 system extension and install eight 4 MB SIMMs for a total of 32 MB RAM. RAM chips for such 30-pin SIMMs can be scavenged from the far more common 72-pin SIMMs, along with any old new stock one may come across.

These 4 MB SIMM PCBs are offered for sale by [Kay] with optionally the SMD components (capacitors, resistors and LED) included in the package. The original PCB card edge design is credited to work by [Zane Kaminski] whose GitHub profile also leads to e.g. this 30-pin SIMM project.

Have you modded your MacIntosh or other retro system yet to the maximum RAM and storage limits?

Using SIMMs To Add Some Extra RAM On Your Arduino UNO

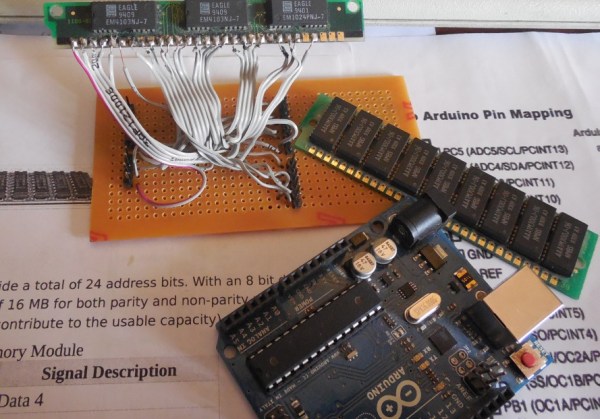
A Single In-line Memory Module (SIMM) is a type of memory module containing Random Access Memory (RAM) which was used in computers from the early 1980s to the late 1990s (think 386, 486, Macintoshs, Atari STE…). [Rafael] just made a little library that allows you to interface these modules to the Atmega328p-based Arduino UNO in order to gain some memory space. His work was actually based on the great Linux on the 8bit ATMEGA168 hack from [Dmitry Grinberg] but some tweaks were required to make it work with [Rapfael]’s SIMM but also to port it to the Arduino platform. The 30-pin SIMM shown above is capable of storing up to (hold on to your chairs…) 16MB but due to limited amount of available IOs on the Atmega328p only 256KB can be used. Our guess it that an SPI / I2C IO extender could lift this limitation. A quick (shaky) video is embedded after the break.

Continue reading “Using SIMMs To Add Some Extra RAM On Your Arduino UNO”

Making 128MB SIMMs From Junk

simm

Working for a tech repair/recycling center, [Jax] has access to a ton of cool hardware. Most of it is junk, but that’s just the way he likes it. Among his better finds in the depths of a tech treasure trove is a huge antistatic bag of 64 MB 72 pin SIMMs. These were the standard RAM form factor for just about everything in the 90s, and while 64 MB is a huge amount of RAM for the time, they’re still a bit away from the 72 pin max of 128 MB.

After inspecting these sticks, [Jax] noticed something odd. Each side had pads for memory chips, but only one side was populated. Given the rarity of 128 MB sticks of RAM, [Jax] decided he would have a go at adding 64 Megs of RAM to these chips by desoldering one stick and sticking it on the back of another.

These new 128 MB SIMMs made their way into a Macintosh Quadra 605 for testing. While the 64 MB chips worked fine, the new 128 MB chips threw a chime of death. Something was terribly wrong.

While investigating, [Jax] couldn’t find any bridged solder joints, and everything looked okay. Heat is a wonderful test of what went wrong, and with the SIMM connected to a power source, he found all of the newly transplanted chips were hot. Because the chips on back side of the SIMMs were meant to be installed upside down, [Jax] had inadvertently connected the ground to power and power to ground.

Fixing his mistake on a new SIMM, [Jax] popped it in his old Mac and tried booting with these SIMMs again. There wasn’t a chime of death, but booting with these chips took a very long time. This was actually just the Mac checking all the RAM, which was successfully addressed once [Jax] finally booted his OS.