We’ve seen some absolutely gorgeous freeform circuit sculptures. There’s a mystic quality to taking what has normally been hidden away for safety and reliability reasons and putting it on display for everyone to see. Of course, creating these unique circuit sculptures takes considerable time and effort. [Inne] created several silicone soldering jigs to help with these tricky joints.
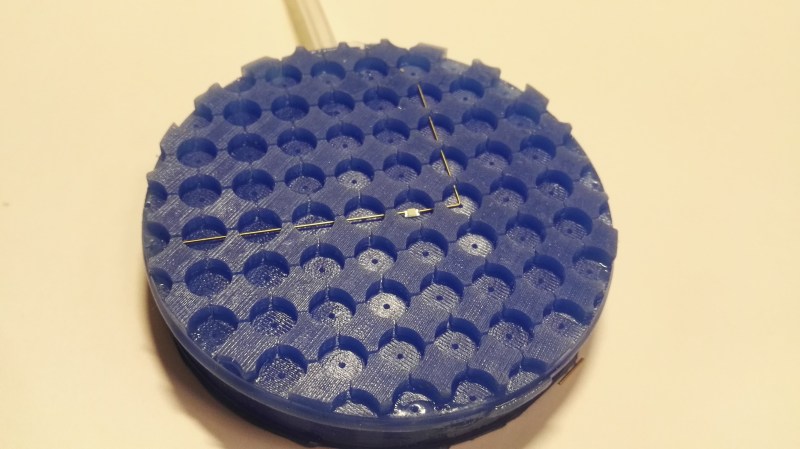
While a vice or helping hands is crucial for many joints, when dealing with tiny SMD components and exacting angles, you need something a little more specialized. Double-sided tape is often recommended, but heat ruins the adhesive and SMD components like to stick to soldering iron tips. Since silicone tends to be heat resistant, it makes a decent material for soldering on. [Inne] uses a city analogy with the cups for soldering called plazas, each with a hole (called a manhole) leading to a foot-switch vacuum pump to keep parts in place. The OpenSCAD code is available on GitHub under a GPLv3 license. It generates a two-part mold that you can cast in A-8/A-15 silicone.
It’s a clever project that makes it far easier to assemble gorgeous circuit sculptures. We love the design and thought that went into it, particularly the naming scheme as we often find appropriately naming variables in OpenSCAD quickly becomes difficult.


This. Is. AMAZING. I need to get this now
That should allow free form project to be done easily like the skeleton Arduino UNO posted on HAD a few years back: https://hackaday.com/2019/06/09/dead-bug-arduino-is-lively-and-shield-compatible/
…not that one. the jig barely has a 1cm grid
Couldn’t one make a mold that does 0.1″??
https://hackaday.com/2020/11/20/no-wonder-these-projects-won-the-circuit-sculpture-contest/
As covered here :P
I thought I’d seen that before.
The previous article sent me on a search for silicone-based putties that might be useful for holding things while soldering. Silly-putty does NOT work, but this stuff ( https://www.amazon.com/gp/product/B07RV5R33Y ) holds up pretty well. I’ve got a glob of it at my soldering station, and can just push components and wires into it to hold them in position – no actual molds required. (Of course, that doesn’t make for really neat arrays of components, but I still find it useful!)
thanks, great tip!
What’s wrong with blu tack? It’s a lot cheaper.
oh neat…our modern spirograph came with a new (to us) putty substance for holding the paper instead of push pins / thumb tacks. it’s much harder than silly putty and actually very sticky once properly applied. now i think i know what to look for in stores to buy it separately thanks!
AFAIK, blu-tack is not at all heat-resistant at molten solder temperatures (though I admit I haven’t tried it.)
And it’s not really “a lot cheaper”; just available in smaller packages.
Yeah, I saw that we covered it earlier but it was such as good idea that I felt like it deserved some extra love.
It’s a great idea and well thought out.
One thought: SMT resistors and capacitors do not have structurally strong
contacts. They often are electro deposited layers of plating(s), so the example shown of a brass rod connecting to an 0602 or 0804 will be very fragile with the shown ‘lever’ length. Maybe some glue to the body may help then fine wire tacked to the rod and contact on one of the sides.
My first (naive) thought was to hold the SMD components in place with vacuum suction. But in the current form it didn’t work, there are to many problems with it. I am now thinking of routing gutters, in line with the city theme, in them where SMD components can sit snugly.
You are very right that the SMD components are super delicate. Even worse the better way to solder them to wire is upside down. I forgot the reason but I think it has something to do with keeping the connection straight, and the component more in line with the wire instead of on top of it.
Glue as post solder treatment might work. Since its silicone you could even use UV resin, this might be an interesting feature for the jig. I am currently focusing on giving the jig some actual functionality, but will definitely keep this in mind. *Something that is both a jig and a mold at the same time, interesting*
Nice job but have you considered using a flat silicone base with many very small holes through it for the vaccum so you can solder components in any orientation? Also if you want to solder upside down why not tape/glue/whatever a small piece of magnetic metal on the smd part and put it on a thin silicone mat on top of a neodymium magnet and stick the magnet to something over your head?
Oh didn’t mean soldering the whole thing upside down, just the SMD component flipped so the underside is facing up. A LED would lay on its bulb for example.
For vacuum, I tried exactly that. In the picture you could also see the holes. Its just that you need cover all the holes before the parts actually stick. At that point the silicone I use is to flexible so it collapses in on itself.
There is a way that I think might work, but its very experimental so currently I am focusing on other more achievable things like more orientations you can clamp the rods/wires in and jigs specific for single sculpture designs.
OK, I look forward to your next HaD project.
What’s wrong with blu tack? It’s a lot cheaper.
God damn you Hackaday, why can’t comments go where they’re supposed to. Last comment was a reply to WestfW
Yet I can reply to myself ?!?
The method a lot of people use is double sided tape. Challenge with this it that it loses its stickiness after hitting it with the soldering iron. I tried double sided “nano tape” from Aliexpress, it retains stickiness, but this stuck too well and the forces needed to remove your sculpture or component break the delicate soldering connections.
Blu tack could work in places but it will probably be harder to hold SMD components in place. They need to be completely flat in order to avoid tension in assembly later, which tend to break the pads of the SMD components.
The idea originates from the fact that when pouring silicone, you are always left with a disk of the stuff that remains in your mixing cup. Works well as solder mat and thought might as well make a pattern in this, This was during the HAD circuit sculpture competition.
I am currently revisiting the project, it has great potential but there is still a lot to learn before it can help anyone.
I just erased my comment. It started with a long wolf whistle.
That looks delicious.
What if instead of vacuum you’ll use a bit of pressure to inflate the sides around the wires to pinch them in position?
Cool idea, fun to talk to u in real life at the makerfair hannover