3D printing’s real value is that you can whip up objects in all kinds of whacky geometries with a minimum of fuss. However, there’s almost always some post-processing to do. Like many manufactured plastic objects, there are burrs, strings, and rough edges to deal with. Fussing around with a knife to remove them is a poor way to go. As explained by [Adrian Kingsley-Hughes] on ZDNet, a deburring tool is the cheap and easy solution to the problem.
If you haven’t used one before, a deburring tool simply consists of a curved metal blade that swivels relative to its straight handle. You can drag the curved blade over the edge of a metal, wooden, or plastic object, and it neatly pulls away the burrs. There’s minimal risk of injury, unlike when pulling a regular blade towards yourself. The curved, swiveling blade is much less liable to slip or jump, and if it does, it’s far less likely to cut you.
For plastic use, just about any old deburring tool will do. They last a long time with minimal maintenance. They will wear out faster when used on metals, but you can get replacement blades cheap if you happen to need them. It’s a tool every workshop should have, particularly given they generally cost less than $20.
Given the ugly edges and rafts we’re always having to remove from our 3D prints, it’s almost egregious that printers don’t come with them bundled in the box. They’re just a bit obscure when it comes to tools; this may in fact be the first time Hackaday’s ever covered one. If you’ve got your own quality-of-life hacks for 3D printing, sound off below, or share them on the tipsline! We have able staff waiting for your email.


It’s a little more expensive, but this deburring MULTI-TOOL means you have essentially 90% of the finishing methods for 3DPrints in the palm of one hand. Use this guy all the time. https://www.amazon.com/Noga-RG1000-Multi-Burr-Deburring-Tool/dp/B01ARO2DN0?source=ps-sl-shoppingads-lpcontext&ref_=fplfs&psc=1&smid=A3H367CBPE368U
Added to cart!
Birthday gift for a dentist.
It’s ridiculously overpriced, £136.61 at rscomponents in the uk.
Considering I can buy a whole set, including spare blades from aliexpress for less than £20, I’ll stick with the individual comfortable handle tools.
You need to talk to [bob bob] – he can get them for half that :-)
Seriously though – everything is overpriced at RS. Always has been.
It’s RS though. You’re paying over the odds because you need it RIGHT NOW. Otherwise there’s always a cheaper alternative.
10 dollars US, 10 replacement blades and the handle holds the extra blades. Unless you are using these on metal I doubt the blade will really ever need to be replaced if only used on plastic. Maybe on some more higher temp stuff like carbon fiber nylon but for PLA it will last a lifetime. Same price as on AliExpress. It’s odd how many things I’m finding on AliExpress that is now on Amazon for the same price or just slightly more. Pretty sure people are just ordering stuff from AliExpress in bulk for a discount then reselling on Amazon.
https://www.amazon.com/dp/B08NWYRCC8ref_=cm_sw_r_apann_dp_QY2BAARV12RE29XZE93J
Somehow messed up the link
https://www.amazon.com/dp/B08NWYRCC8?ref_=cm_sw_r_apann_dp_QY2BAARV12RE29XZE93J
A little more expensive? £136.61 from rscomponents in the uk.
I can buy a set from aliexpress for £10, including spare blades.
I like it
I have a couple of these and, honestly, they rarely get used because we generally just use the individual, discrete tools. Far more maneuverable and much less expensive.
I’ve been using a Noga deburring tool ever since I got my 3d printer as a novice. Super easy to clean off skirts and edges.
This bugs me! I worked in aviation and my buddy in airframes introduced me to deburring tools years ago. It never once occurred to me to use it on prints! :)
You can buy that in every hardware store for few bucks. It’s called pipe deburring tool.
Or just set your settings so you don’t have these kind of problems.
Like set your brim to be 0.4mm from the part so it comes off easily.
It’s worth noting there is some danger with deburring tools. They have been known to break during use causing the blade to be a somewhat dangerous, sharp implement. If cutting towards yourself during this breakage, this can cause injury. I’ve known old machinists who referred to these devices as “wrist slitters” because of this. I’ve found good use out of these tools, but know the danger and still never cut towards yourself!
Citation needed.
Would my scars suffice? I’ve been using these tools for over 30 years and yes on occasion they can break. This usually occurs when trying to deburr steel parts with heavy burrs or getting a bad batch of blades. I used to use them hundreds of times a day. Now I look for other ways of deburring as my wrist can’t handle that motion any more.
These are amazing tools. They can save a lot of time and be safe to use. Just have to know when they should not be used. For use in plastic, they are excellent! But would advise to get a plastic rated blade. They are ground differently then ones for steel and stainless steels. Some manufacturers even make ones that are meant for left handed cutting (aka deburr holes counter clockwise direction vs clockwise).
Another safety tip, never try to sharpen the blades. It’s not worth it. The blades can be weakened so easily and suddenly snap when in use.
For a hobbyist, these tools can be worth their weight in gold. I just wouldn’t recommend them for production work in the steel industry. For custom work, that’s a different story.
Never seen one of these break, if it did it was probably cuz you were using it wrong
Ok. Sharp tools can be dangerous. Be careful. Got it.
Thank you @Mike for your tips on using one of these.
@Riley, given Mike has 30 yrs of experience (and sounds like he knows what he’s talking about), you should probably take his advice too.
These deburr tools were intended for metal parts. Please ask your father if you are old enough.
Mike, these kids don’t know about muscle memory and repetitive motion. They may think they do but, no. The dinky skinny pencil tool isn’t heavy enough to survive long in our work environs.
Hahaha I love it. My kids are just like I was; prove it! You should see my scars lol. No citation needed. :D
I often would grind the round safety tips down to almost a hawk talon to get the blade in very tight places, and Ive definitely bled when those connect, but most of these swivel deburr blades have solid steel round tips to them to prevent that very problem. Consequently they’re pretty safe and hard to cut yourself with, unless you’re a fanatic for grinding it off for max cut dexterity like me
The only idiot I’ve ever known to cut himself on a deburring tool is ME, and it wasn’t easy at all. And I think it was my finger, but boy it opened me up good. I was deburring, or rather breaking the sharp edge of polycarbonate sheets coming off a CNC router. Did it for ages before that, probably another hundred hours since, and never an incident.
I’ll maintain that the average deburring tool is way safer than lots of other options, like the three sided scrapers, which I always liked to call the world’s highest precision prison shank. Those swiss ones with the rabbit etched on them are deadly. I’ve even torn myself up on files before (not as bad as the deburring tool incident) but that was pretty hard to do too.
Which reminds me, I need more blades :-)
I ran a machine and fabrication shop for years.
Please be careful I have seriously injured myself deburring a 3d print using such a tool. I think the blade was a bit dull and I was using way more force than was safe. The tool unexpectedly lost purchase on the part and gouged deeply into my other hand. I strongly suggest using gloves or work with very minimal force and with fresh sharp tools.
If you find this tool dangerous, you shouldn’t be allowed to use anything sharp
The tool you don’t think is dangerous is more likely to injure you
They can be useful depending on what your printing, especially if it’s two things that need to connect tightly. Sometimes one part is slightly to large to slide into the other part and shaving off a tiny bit is easier than having edit the file and reprint.
Shaviv makes some excellent deburring tools. They specialize in carbide tooling and actually manufacture it in Israel. They are not a clonezone product as the one linked in the article.
https://www.amazon.com/SHAVIV-29249-Deburring-Handle-Pieces/dp/B003JY7LXI/
Love the design and handle. Thx for the link!
Machinist. Shaviv and Noga are the gold standards of these things in my industry, but the nicer ones are probably nicer than these folks need or are willing to pay for. Cheap for plastic is fine. The best style for this stuff here tho I’d guess would be the 3 point scraper style shank-like deburr tools, like these (they often come in 3 blade sizes) Noga SC-8000 Adjustable Scraper Handle Plus 1 T-80 Blade https://a.co/d/fhYBcIQ
My Dad gave me a Shaviv deburring tool for Christmas many (~18?) years ago, one with a gold-colored aluminum body and extendable shaft (the part that holds the blade). I’ve used it a few dozen times, but I’d swear the blades are just as sharp as when new. Probably helps that I try to use it only on relatively soft materials, like aluminum, copper, and plastics. But regardless of material, it always puts that finishing touch on the edges of pieces I’ve made. Thanks, Dad!
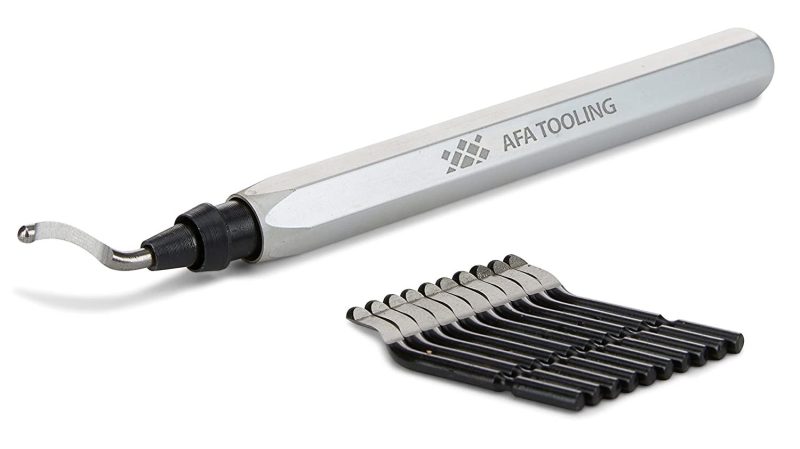
Non-affiliate link: https://www.amazon.com/AFA-Tooling-Deburring-Blade-Blades/dp/B09ND8J1J9
Thanks for sharing.
Looks nice but I started looking again after reading this article and this seems like the best bang for you buck . I actually had a situation after printing last night where I could have really used some one of those Fine Blade because the typical Standard Blade for Plastic that comes with most wouldn’t work, outside the one that is posted below which is a bit to expensive for my needs.
https://a.co/d/fymhcXI
On a side note on 3d printing for FDM printers, I got this PEA plate last night and it’s pretty amazing for the cost. It’s essentially like printing on glass but removable and can be used on both sides. It doesn’t stick quiet as good as PEI but the prints comes off silky smooth and you can always flip it over for a good PEI plate. Highly recommend, especially for the price. Say what you will about cheap Chinese stuff, and there is a lot of it out there out there but every once in a while they nail it for an amazing price.
https://a.aliexpress.com/_mPY9Rgk
It’s not 3d printed?
Not sure how serious you’re being, but… There are loads of designs on thingiverse, to pick just one site. I’m going to print the collet holder, for my big internal deburring/chamfer tool.
some additional advice: these work great on inside curves and straightaways, but they are terrible on outside curves, so it’s good to have something like a file or sandpaper or gray-wheel for those geometries. you cannot start these deburr tools off the edge of a part; you must start somewhere already along the path, and then flip the part over to catch the first part of the path that you skipped. otherwise your leadouts will be deburred but your leadins won’t.
Also worth saying that like several of the other longtime machinists on here leaving comments, I have cut myself very badly with these things several times! The lessons I learned from those various nasty cuts (usually on my fingertips / nails) were these:
1.) reposition the part in your hands frequently so that you have some distance between the part of it that you are cutting and the part you are holding, especially the fingertip that would take a hit if the cutter slips
2.) if doing straightaways, lean the cutter down a bit forward like a runner leans into the direction of motion because that helps direct the cutting force into the part better and it’s less likely to slip off
3.) as far as I am aware, cutting “toward you” is the only way that these things work.
4.) I always found that countersinks work better than these when it comes to small round holes.
Have a look at this heated tool:
https://www.antex.co.uk/products/retouch3d/retouch3d-heated-tool/
I used such a deburring tool for my 3D Prints too, but the real game changer is a leather beveler, imo.
This is a super tip!
Deburring tools are so nice, I have two. One in the basement, sitting by the drill press, for metal holes, and one upstairs for cleaning up 3D prints. I got cheapies at the hardware store, plastic handle, no-name, etc.
It takes a bit of finesse with the pressure, but that’s just something you learn by doing. Plastic takes almost none — a few lighter-than-you-think passes is the right way to start. Surprisingly, the same is true for aluminum. Go easy, or you risk gouging. (He says to himself, hoping he learns the lesson this time…)
Lowes stocks one in the plumbing tools for under 10 bucks out the door. Aluminum handle, Kobalt branded, with 2 blades about a buck more than the 2 pack of replacement blades they stock. If you want to pick one up today, this is easy.
Deburring tool I think I saw Ivan Miranda use that a couple of years back and straight away got a cheap one on aliexpress and never looked back. Absolutely marvelous for cleaning up brims and elephant feet. I would use it carefully on a finished product or use a really sharp blade really carefully but for those quick cleanups where you dont care if its perfect or not its so much better than using a hobby knife. And also really good if the part was slightly too big for holes or if there was some bunchup around a bridge that needed cleaning.
As for other tools. Some hobby knives come with a flat edge thats good for scraping and some blunt edge ones that are great for separating supports. I normally use a slight chamfer to countersink on screw holes but sometimes its not possible or just not neat enough so I use a countersink bit. Having seen some of the other comments with the deburring tool with the countersink head I think I’ll invest in one of those (easier that whipping out the drill in most cases).
Sometimes if I want some natural//soft/organic edges or shapes I print it roughly in rougly the right shape (if possible) and set it to thick walls and infill to none or very little and use a hot air rework station with different nozzles to only heat up the parts I want and mold them to the shape I want (I dont like using hot water as it permeates the piece and softens a lot of it). Also good for getting rid of the webbing that’s left behind from incorrect retraction or older filaments.
I’ve also heated up the tip of hobby knife blades (with a flame, probably not the best but it is the quickets) if I need to rework a printed piece rather than reprint it or to get the shape right before I know what changes to make in CAD. Can be good if you need to trim an edge or cut off a standoff that’s a couple of mm too long.
I find that the bite of a regular deburring tool for metal is to strong for 3D prints. It tends to dig in rather than scraping like it should.
I find that scraping with a knife edge is much more effective.
I wondered if someone had this experience. When I’ve used my deburr tool, it tends to catch the layers and pull them up instead of just deburring. Perhaps the edge is too sharp as can be the case with drill bits in plastics…
I’m going to have to try one. Mostly I use a small pair of wire cutters. It can cut and grab at the same time and works pretty well for most plastic prints.
I really enjoyed this article, thank you for sharing useful information. Regards, David, author of the blog https://online-casino-malaysia.com/
Important to mention that replacement blades are available in left and right handed options…
Citadel Mouldline Removal Tool from Games Workshop / Warhammer is excellent for external burrs on 3dprinted parts!
other similar tools are available i might add, and probably cheaper too, but this and a silverline deburrer sort out the vast majority of print finishing i need to do :-)
https://www.games-workshop.com/en-GB/citadel-tools-mouldline-remover-2022
These are amazingly handy tools for every kind of maker and I’ve owned and used them for years, yet I’m constantly amazed by how few people outside professional machine shops have ever even seen one.
I just don’t get it. They’re cheap, small, and simple to use and do the job they were designed for very well. They’re a perfect engineering hack and well worthy of the toolbox of every Hackaday reader. Yet I wouldn’t have ever heard of them myself if I hadn’t taken a machine shop class in high school. After that I spent years trying to find one for personal use but I didn’t know what they were called so I couldn’t really search or ask around. Finally I got lucky and found one at a garage/estate sale. By then I was married and my father-in-law told me what it was called and where to buy them.
Now of course I order them on the usual online sources and get them delivered to my door. Though I still have and use the one I found at the garage sale as it’s the best quality one I have. Like most things, the Chinesium versions are cheap, and inferior, but have their uses.
Anyway, for what they cost, everyone should have one in their tool-box.
Bought a cheap deburring tool this morning. It is MUCH faster to remove brims from 3D prints. A bit of manual trim with a knife or sidecutters may still be required, but the deburring tool will get you 90% there. Thanks for the tip!