If you’re a mechanical engineer, the material covered in this video on the basics of bolted joints probably won’t cover any new ground. On the other hand, if you aren’t a mechanical engineer but still need to bring a little of that discipline to your projects, there’s a lot to learn here.
If there’s one takeaway lesson from [The Efficient Engineer]’s excellent examination of the strength of bolted joints, it’s the importance of preload. Preload is the tensile force created by tightening a bolt or a screw, which provides the clamping force that keeps the joined members together. That seems pretty self-obvious, but there’s more to the story, especially with joints that are subject to cycles or loading and unloading. Such joints tend to suffer from fatigue failure, but proper preloading on the bolts in such a joint mitigates fatigue failure because the bolts are only taking up a small fraction of the total cyclical force on the joint. In other words, make sure you pay attention to factory torque specs.
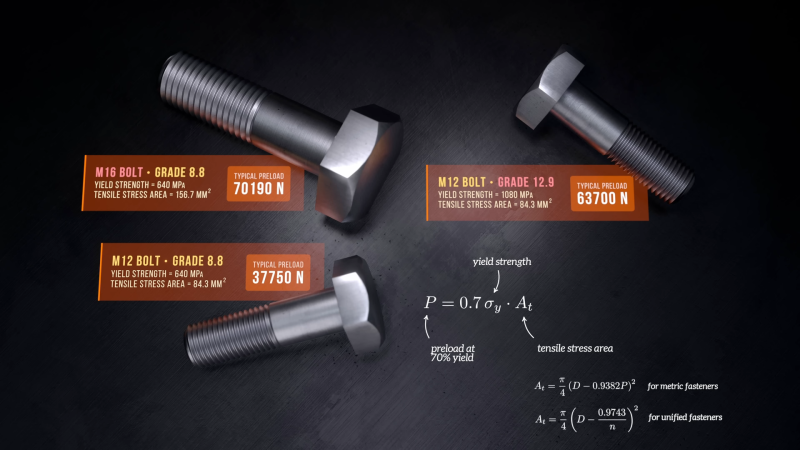
Speaking of torque, it was always a bit of a mystery to us how mechanical engineers specify torque. Luckily, [The Efficient Engineer] has an answer, and like most things in mechanical engineering, it boils down to the strength of materials. The rule of thumb is to apply enough torque to reach 70% of the yield strength of the bolt or screw, but there are plenty of variables to consider, including how the preload is measured. We picked up a couple of interesting tidbits in this department, like the use of ultrasonic inspection to determine how much a bolt stretches under preload, and the “turn-of-nut” method, which explains why some torquing procedures include adding an additional 30 or 40 degrees of rotation after reaching a specific torque. We also learned that the ISS docking system uses 16 motorized bolts to draw the joint between space station and spacecraft tight, and that each joint has a load cell to precisely measure the torque.
If you liked this look at nuts and bolts, you might want to check out the mechanism that makes them work.


An excellent mechanical engineer explained to me once that it isn’t the shearing of the bolt that is the issue (which I always had thought), but the clamping force of the bolt holding the two pieces together. After that it is friction really between the two “clamped” pieces. Who would have thought? Unless your design is all wrong and then maybe it is the shearing of the bolt!
It is not wrong to design a shearing load on a bolt, but you must understand the implications.
You can also consider the shear strength of the bolt your last line of defense against catastrophic failure. If the load overcomes the static friction and turns to sliding friction, which is usually much weaker, how much of the force is held by the bolts? Can it still withstand the impact, shear a few bolts at the highest loaded positions, or will it fly apart at once? One factor is the uncertainty of your pre-load, because the torque you feel in turning the bolt is different depending on the amount of friction between the threads and against the material or any washers you might have. If the surfaces are dirty or greasy, the technician may torque the bolt correctly but the pre-load becomes more or less! Adding washers where not necessary also introduces more surfaces where sliding may occur, which may allow the nut to slip and turn as the joint vibrates. Eventually, microscopic chattering of the joint pieces and corrosion can build up a layer of loose particles between the joint that act as tiny ball bearings.
These uncertainties mean you should not entirely trust your math with bolted joints. In engineering terms, your factor of safety correlates directly with your quality of sleep at night.
Yep, unfortunately just because you design something doesn’t mean it will hold together with magic the way it does in your imagination.
I have a foot operated band brake on a minibike which broke the rules on this – it was designed (by someone else) to horizontally align one side of the band using washers and nuts on a threaded rod. This meant that every time you put enough braking force, the way a band brake reinforces itself was not enough to prevent you from bending the rod! I can’t imagine how they thought it would work more than once.
I discovered by trial and error that grade 8 bolts were hard enough not to bend. However I still needed to make a partial box out of angle iron to carry the force around the band brake so I could preload it enough to keep my “threaded pin” from wobbling in its hole.
But – what about the washer? In my industrial training as a mechanic i learned to use them but got never a solid explanation why.
Uhmm… Because… Bacause… Don’t ask stupid questions!
A washer has two main purposes: 1) to act as a bearing surface for the nut and distribute the pre-load forces evenly so as to not deform the base material, 2) to add length to the bolt when joining two thin pieces – sheets usually. A longer bolt stretches more in absolute terms, which means the exact number of turns on the nut to achieve a suitable pre-load becomes less critical, and effects like thermal expansion won’t change the pre-load as much.
In thick pieces, metals especially, washers are often unnecessary and add extra friction surfaces which may also slip and allow the bolt or nut to turn, so washers can be counter-productive if used absolutely everywhere. However, it’s not very often that a joint is so critical that adding a washer will ruin it – that’s when the engineer optimized the structure too close to failure, which means the design has an inherent tendency for catastrophic failure anyways. Still, adding a washer where none was specified is not a good idea.
And of course, for joints that are meant to be re-assembled many times, the surfaces will be scratched and galled when tightening the nut or bolt, so the damage is on the washer and not on the parts you’re joining. The washer is cheaper to replace.
Also, since the material of the nut and washer can be specified independently of what you’re joining, the coefficient of friction between the two can be known – so you can calculate the required torque for your pre-load.
If there was no washer, the friction is unknown. For example, when the part is painted over, the first time there’s paint under the nut, the second time there won’t be any. The friction changes, and so does the required pre-load torque.
But for real theres a few reasons that I know:
– obviously being able to use smaller screw heads/nuts on larger holes
– obviously you can use them as shims
– not so obviously a washer provides a sort of gliding surface for the nut(or head). Otherwise the points of the nut can bite into the paint and: make it rust and make it harder to turn.
If you’re designing for preloads and forces it’s propaply already better to use welding because it will hold stronger than base material.
Well the ability to disassembly is important for some.
Or assemble.
Welds aren’t that strong actually, especially against cyclic loading. The fatigue rating of a welded seam is a whole other can of worms… and welds have to be inspected as well. You can trust any idiot with a torque wrench to do a decent job of it, whereas you need someone with actual training to wield a TIG welder, which shows up directly in the cost of labor.
And the lack of training, inspection, etc. are all-too-often demonstrated via catastrophic failures out in the wild…
Yes, please weld your engine head to your cylinder block.
if you want to explore this in an environment
where all aspects of this subject are worked out and
understood,then aircraft design is the one
strut braced wings have bolted joints that are in tension
and shear,often with 8 bolts total for both wings,realy
quite small bolts at that
VS automotive design,where the seat belt bolts are great huge(cromed) things that you can see,but the bolts that hold the seat on are tiny(and plain),where you cant see
gota keep the civilians happy
During a crash and high G-forces, the seat belt has to keep an overweight person from flying though the windshield, and those forces are much higher then what the bolts for the seat itself will ever see.
Yep. Even with a racing seat and four point harnesses, you’re not strapped to the seat – the harness mounts to the car’s frame.
It is told to those (re)building old automobiles to attach seat belts to the body of the car and NOT to the frame. As the likelihood of the body separating from frame the in an accident is definitely possible.
Let’s calculate. The yank on the bolt is about 30 kN to stop a 100 kg person in a crash. A 10.9 class bolt would have a yield strength of 900 MPa, so the cross-section area should be at least 32 square millimeters. That is actually just an M6 bolt.
But, you have to de-rate that somewhat to account for notch effects and stress risers, and regulation puts the safety factor for human rated equipment at somewhere around 5x on top, so you need something like an M14 bolt to have that safety margin, assuming you’re designing for a 100 kg person and not say a 200 kg whale.
If you’re hit from behind, it’s the seat back that’s taking the force of the body’s acceleration. The bolts that hold the seat to the floor take shear and tension in that case.
The seatbelt restrains you AND the seat – it’s not a conspiracy, it’s engineering.
Plus solidly-bolted-down things don’t move much in a crash, unlike large unconstrained bags of meat.
I love bolts so much, actually i am nuts for them.
There is also the old adage : When in doubt, slot the hole :)
A washer helps in that case, although the slots need proper calcs.