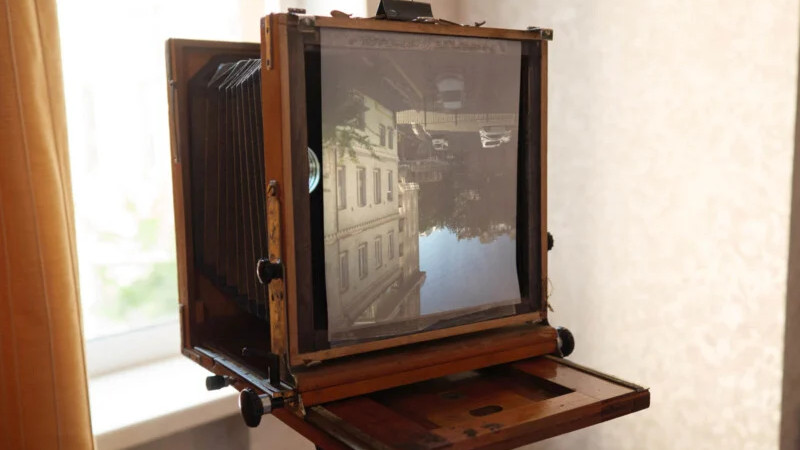
There’s a good reason that the go-to format for most film photographers is 35 mm, in that it provides a mix of convenience and cost. Shooting huge large-format negatives in the style of a 19th-century photographer can return astounding pictures with detail and lens effects unavailable on relatively tiny cameras, but it’s hardly the most convenient or cheapest medium. [Amos Chapple] may have a way to cut those costs though, by using a digital camera to capture the image projected by the camera onto a screen where the film would otherwise be.
He’s following in the footsteps of a Ukrainian photographer who tried the same technique photographing the projected image from the lens side, but that approach gave disappointing results due to the offset angle. Instead he’s placing the camera behind a translucent screen, having his DSLR behind a sheet of waxed paper held at the focal plane.
The results are we’d have to say, stunning. The old Soviet Ukrainian camera he’s using is something of a beast, but his photos of dancers at a folk festival have that other-worldly look to them which might well have something form the 1890s about it. We like it a lot and perhaps it’s tempting to fashion a poor-mans version using a cardboard box, and try for ourselves. Long-time readers will know it’s not the only attempt to digitize a large format camera we’ve seen.


Wouldn’t it be possible to put a beam splitter or a one-way mirror in front of the lens inside the camera and photograph the projection from the inside without the offset?
A beam splitter arranged in the describend way is a solution, However, at the expenso of light (max light intensity at the recording camera 25%). Using a prism beam splitter introduces optical abberation (which of cours can be compensated more or less by redisgning the lens. Inaddition the surfaces have ot be coated with a very efficient AR coating in order to avoid ghost images. One-way mirros don’t exist. although with polarized light a one-way mirror is possible. Unfortunately the light used in photography is not polarized. Give me a one-way mirror and I’ll disprove the 2nd law of thermoynamics!
The light intensity on the inside of the projection screen is much greater than what passes through on the other side anyways. The light loss through the wax paper is pretty bad, which is the point why you would want to take the picture from the inside of the camera.
Even if you have a half-reflective mirror in front of the lens, you only lose half the light, while the loss through the wax paper can be easily 80%.
I general, no room. Might be room with some lenses, barely, but bellows.
That’s why a ground glass back was used as a viewfinder in the first place.
Why is he using wax paper? Was the glass back for his camera missing.
The glass back was why cameras had black cloths the photographer went under. I’d suggest enclosing his camera and lens setup and attaching it.
This is obviously a poor substitute for a mega-bucks large format digital back.
What about a tilt shift lens? Usually they’re used for making “effects”, but they’re actually meant for correcting the plane of focus of something like a tall building onto an image plane which is not parallel. In the large format camera with a digital camera looking in offset to the lens, the image plane at the projection screen is tilted from the digital camera’s point of view, but the tilt-shift lens could correct that error.
I’m not sure I understand your point.
A large format camera is a tilt shift camera, the lenses were built to have similar function without the giant box.
All the tricks with bent focal plains is why large format still exists.
It’s not just some stupid hipster thing, like records and marxism.
Yes, but the digital camera that looks at the backplate isn’t, and that’s where the problem is. The digital camera sees the backplate at an off angle, so it doesn’t focus the image correctly – but if you use a tilt-shift lens with it, you can correct for the fact.
With large format cameras, every lens is tilt/shift. The front standard where the lens mounts can be articulated.
Yes, but in this case the main lens doesn’t need to be moved – it’s just projecting an image straight onto the image plane. It’s the digital camera (in the earlier versions) that is looking into the box past the main lens that is shifted off-axis.
This version solves the problem by moving the digital camera behind the projection screen, so it can be placed on-axis, but then you lose a lot of light as the image has to be seen through the waxed paper. If instead you put a tilt-shift lens on the digital camera to correct for the offset error, it could remain inside the bellows box and get more light off of the projected image, and the image would be sharper without the light diffusion through the paper.
One interesting option, especially for landscapes, is to take a series of overlapping photos and then stitch them together into one big photo. For example taking 16 photos in 4×4 grid, that overlap by 12,5% with 24MPix camera will give us a photo with 150MPix resolution. I have an idea and basic design for a device that could automate this process. Unfortunately I don’t have any funds to build a working prototype…
I’m interested. What’s the basic design and how is it automated? And what’s the speed like?
A simple articulated arm that would move the camera by adjustable interval and then use remote shutter cable to take a picture. The speed would depend on both camera and how fast and stable the head could move. My target is 0,5s per photo. With some additional trickery I might make it even faster – I have a few ideas for that. I even plan a portrait mode, in which the core face/body photographs would be taken as fast as possible, and then background could be shot a bit slower so camera has time to save the shots. I’d love to add pan/tilt head to it so it could make panoramas by rotation, too. And maybe some other functions so it would also work as a crane and a rig for stop-motion animations and timelapses. My other goal is to make this portable and battery-operated, and as small as possible, because I don’t have much space and my wife threatens me with “radical junk removal”…
Also all processing would be done with software of choice of the user. Many major image and photography manipulation apps offer automated photo stitching, and there are also dedicated apps, like Hugin’.
Would be a clever hack to add a scanner to the back of the camera. Vibration control would be a challenge though, and it would only really work for landscpes and still life shots.
Actually, the vibration can be completely ignored, if the shutter speed is fast enough. The other thing is to either add a constant delay after each movement, or detect the vibration and release the shutter as soon as it’s low enough…
Consider that there’s a photographer in New York, who did this manually, including some portraits, IIRC…
This was done a long time ago, and produced some astonishingly high (for the time) resolution ‘photos’ https://makezine.com/projects/deluxe-scanner-camera/
Shoot a picture, then shift the camera by 1/2 pixel (the camera’s image sensor pixels) up, shoot again, then shift to one side by 1/2 pixel and shoot again, then combine images. The movement is in microns, but could be done using something like a differential screw, or maybe even a piezo positioner. I think some early digital cameras had something like that built in to increase resolution.
This is how some cameras do that, but it uses build-in in body image stabilization. It would by very hard to implement in any other camera, and for each model the solution would have to be redesigned. Also image processing is quite intensive, so only few cameras offer this option, despite the fact that many models have IBIS. Some cameras offer “Panorama” mode that stitches series of photos made while moving/rotating vertically or horizontally…
The vibration of the camera messes up with the alignment of the photographs. Otherwise, stacking is commonly used in cellphones etc. which have the benefit of an IMU to estimate how much the picture was actually shifted.
The biggest problem is not the vibration, as there are ways to reduce its impact. The problem is in keeping movement both rapid, constant and accurate, while managing quite a bit of mass at the end of a long arm. If the movement is too fast, it can cause the whole device to wobble, introducing rotation and position shift to the image. At worst the whole thing could be overbalanced – imagine the horror of the camera hitting your floor. Good thing I’m considering this, and many more failure modes.
I think you’ll find problems with the entire camera shaking more than half a pixel all over the place.
That is, for all sorts of external reasons like you holding the camera, or the wind, or the ground not being exactly rigid…
My phone did this automagically 10 years ago.
I bet yours did too. Panorama mode.
They make camera mounts that automate this process already. I have a telescope/camera mount that has a pano mode that allows you to specify a grid of a given angular h/w with a specified # of photos. It can either do the math for you on camera lens angle of view and tell you how many photos in what grid you need to do a given shot or you can punch it all in manually. It allows you to specify overlap amount as well. It even connects to the camera to automatically snap the photos and move to the next position (though you do need to wire up your own custom cables for this). Cost me in think a bit over $250, it was called the skywatcher allview. You still buy it but it’s a Celestron product now.
Pro mode involves using a high focal length lens (like 200mm, I’ve used a 1000 on occasion) and produce gigapixel resolution images. I’ve done stitched panos that resulted in 2+ gigapixel images. Takes a long time to stich but it can be awesome.
You can also take regular pictures and then use AI to upsample them.
Yeah, but this is a bit limited, as AI will introduce artifacts when you upsample too much. It’s very hard to fake information that isn’t there.
The technique is limited to the resolution of the digital camera, discarding the potential of the large format. Light falloff at the edges is substantial. The discovery of wax paper and artist’s tracing paper as a uniform translucent material for the intermediate image is good.
I suspect the “otherworldly” property of the images is due to diffusion in the complex optical system, particularly in the tracing paper.
This is a fun and educational project, but it’s not a way to get technically excellent photographs.
It’s not really about resolution so much as the ability to (re)capture the bokeh effects of a large format lens with its long focal length combined with a much wider FOV than what the same focal length can produce on a much smaller substrate like 35mm. There is a very expensive large format digital camera (LargeSense LS911), but it’s monochrome and its resolution is only 26 mp.
He could rebuild the first analog lightfield camera with a pinnhole matrix array from 1920. With a way better Resolution than modern lightfield cameras.
For post produktion, scanning on flatbed Scanner.
My inexpensive wide-angle large-format solution was a cylindrical Quaker oatmeal container. The ‘film’ was a sheet of photo paper iinserted into the container — load in a darkroom, hey? A pinhole in a sheet of tinfoil serves as the ‘lens’.
The first lightfield camera was flat and more a box type like in the article. And the actual lightfield cameras has still a flat digital sensor. The type of lens is not important, if you put the micro lens array in front of the lens or behind the lens. I newer read about a cylindrical or tubular lightfield camera or sensor or if the photo is turnable into a lightfield picture.
From the blog the “waxed paper” is called baking paper and I wold guess it is what cooks call parchment paper. Later he used artist’s tracing paper. Any of these give quite a bit of vignetting as you can see in the photos. Also, with a different or newer old used 8×10 he have full tilt-shift for all kinds of neat results.
Shooting B&W film in 8×10 cameras is not so expensive and the results are phenomenal, either contact printed on photo paper or scanned in a good scanner photo scanner like an Epson V600 Photo.
Wax paper, parchment paper, and baking paper are all different. Parchment paper is either chemically treated or compressed through rollers to gelatinize the cellulose fibers into a translucent sheet that is less porous and non-sticking, but not completely waterproof.
Parchment paper: acid treated paper, no wax. Usually brown
Parchment paper: roll compressed, no wax. Usually white.
Wax paper: wax coated paper, not heat resistant
Baking paper: silicone coated, heat resistant
There is a whole community of actual camera obscura photographers (like this, but using an entire room as the camera back). Obviously this isn’t portable in the least and has a very Da Vinci feel to the results, but very cool nonetheless. The rest is essentially shooting a digital picture through an old lens system (another community) or stitching digital images together. I still like Microsoft ICE for this last one, an outgrowth of some RANSAC software from UBC. It’s not officially listed from MS anymore – likely incorporated into something profitable or killed entirely – but can be found online.
https://www.microsoft.com/en-us/research/project/image-composite-editor/
It seems that of the digital camera lens is on axis to the view camera lense and they are both focused on the viewing screen, you can take the viewing screen away and there will still be an arial image you can photograph with no paper texture, no?
But unless I’m confused this is not ‘large format without the price’ but ‘no-post large format look.’ Isn’t one notable characteristic of large format photography it’s ability to capture extraordinary detail? This approach seems limited to whatever prosumer digital camera he is using.
It seems to me he is replicating the optical qualities of large format – the extreme depth of field and the ‘spotlight’ vignetting. Still very fun to get these optical qualities in-camera. They have a distinct nature that sets them apart and evokes that nostalgic/ regal emotion.
For those saying the resolution is going to be inferior just because it’s digital; if you want extreme resolution you can easily get very high resolutions if you want; pick a natively 50-60MP camera with pixel shift and maybe take a panorama. The *lens* is the limiting factor in that regard for both small and large formats if you’re doing it right. 8×10 is a good representative for large format. 10 inches is about 7x as wide as a 36x24mm sensor (although it’s more square / taller), meaning even if you focus perfectly and nothing shakes or moves, the lens has to be 1/7th as sharp across the whole frame as the 35mm-format lens in order to come equal on horizontal resolution. But… modern 35mm lenses have a lot more complex optics that can keep them at very high sharpness all the way into the corners for all colors, and that’s just not how simple optics generally work. You might get a nice peak measurement to plug into a calculator and claim you’ve got 600 megapixels once scanned, but I don’t think it’ll be that easy. I do know your digital competitor is going to find it vastly easier to keep from blurring the image since they’ll be able to use a fast shutter, electronic stabilization, precise focus, and repeated shots to make sure they get a keeper.
A very neat example I saw a year or so ago improved brightness / reduced vignetting mostly using fresnel lenses IIRC. https://www.cined.com/building-a-large-format-camera-with-35mm-f-0-4-lens-equivalent-diy-perks/ has a bit of text about the original video.