What do you do when a PCB is cracked or even broken in two? [MH987] has a plan: superglue the board back and then bridge the traces with solder, solder paste, or wire. The exact method, of course, depends on the extent of the damage.
We’ve had some success with similar techniques, and, honestly, for single-sided boards, we would be tempted to add a thin backer behind the crack. We’ve also used conductive paint to repair traces, but it’s good to have having as many tricks as possible because you never know what will work best for a particular repair. The post mentions that this is easier to do on a single-sided board, but it is certainly possible to do on a two-layer board.
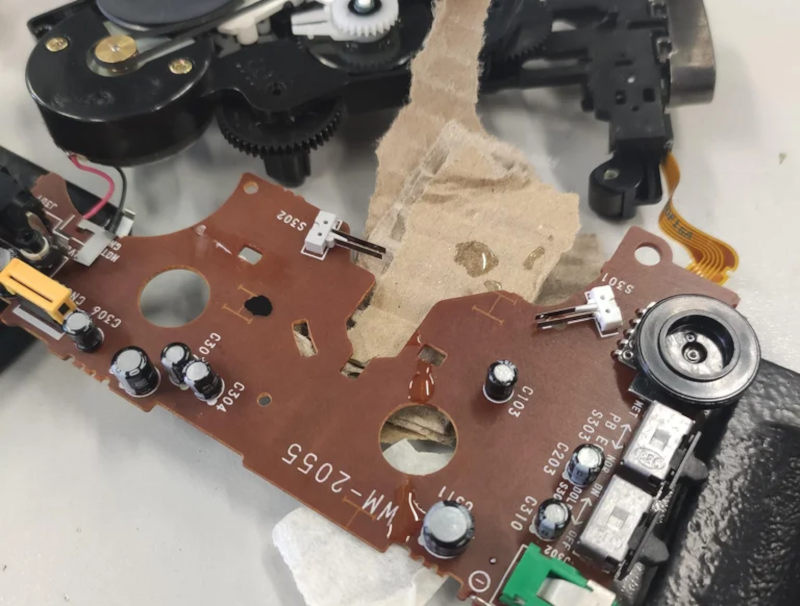
The example repair is a Walkman which — if you are a youngster — was a portable music player that takes cassette tapes. These haven’t been made since 2010, so it is important to repair what you have.
If you can’t repair your Walkman, you could build an updated version. If your board is seriously damaged, you might get hope from this more extreme repair.


As a professional tech thirty years ago, I was doing that. I guess history does repeat itself 🤠
I probably would have added some piece of scrap pcb backing across the gap to increase the strength of the bond. 2 component epoxy might be a better choice than super glue, but I’m no expert.
ATTENTION: Superglue fumes are harmful.
Little trick to remove and clean the PCB from pieces stuck with superglue.
Solder and flux paste.
Using the soldering iron and flux prevents it from sticking.
example of buttons glued with superglue by inexperienced people
Thumbs up for the superglue/sekundenkleber warning. 🙂👍
As a child, I often felt strangely dizzy after using it.
The eyes did hurt a bit, too.
Btw, superglue is bad for plastics. It will make it brittle and there is a discoloration (usually white).
With such materials, hot glue or and ordinary glue is a better choice.
Or even better, two-component adhesive. Using it needs a bit of experience, though.
There’s also special plastic glue, for the model making hobby. It needs careful use, too.
But if it has to be superglue, it maybe helps to slightly wet the section that’s broken (use a qtip).
That way, the superglue has a better chance to stick/react/bond with the material.
Wearing plastic gloves is also worth a consideration. I can’t remember how often I got glue on my fingers. The most annoying thing is that the superglue makes the fingers feel numb.
I can’t see such exact and careful work being done with any kind of gloves on. Learn to keep fingers free of glue when working with it, some places need to be kept clean. Two part glue for sure no need for reinforcements. Clean any rosin or wax off maybe even scrape the sides not the crack to get better adhesion.
These brownboards are paper particle and melamin. Melamin belong to the duroplast, so he need epoxy. But if superglue works so i am gone fine with it. Next Thing lead and leadfree solder, you should Mix them or Clean Them Afterwards.
But good Work.
I don’t see what is the point of using super glue instead of epoxy… FR4 PCB made of fiberglass+epoxy resin.
I think it’s a phenolic resin PCB (https://en.wikipedia.org/wiki/Phenolic_paper#:~:text=Phenolic%20paper%20is%20a%20material,is%20a%20fibre%20reinforced%20plastic.).
I’m not sure if that will make a difference in terms of repair, but there’s no epoxy here. It was a common PCB material for a long time (up to the late 80’s ISTR) for most PCBs, and was used later for cheap devices for cost reasons. Annoyingly brittle vs. FR4, so having large boards crack being repaired wasn’t uncommon.
I literally did a similar repair yesterday.
I’m restoring a friends Korg Guitar Synth that he just bought, and a previous owner put a screw too deep in the hole to attach it to a stand, and ended up punching a hole clean through the center of the phenolic PCB.
Luckily there was no component damage, and some of the pieces of PCB were still floating around inside the enclosure.
I superglued the pieces back in place, then put a bit of painters masking tape over the remaining hole on the component side.
Fill the hole from the back with superglue and set it hard with a bit of kicker and the hole was no longer a hole at all.
The superglue won’t stick to the adhesive on the masking tape so it can be cleanly removed.
Finally, some bodge wires across the damaged area following the path of the original traces and some green laquer over the top and it’s (almost) as good as new.