Compact, Gesture-Based Remote Control Over Bluetooth

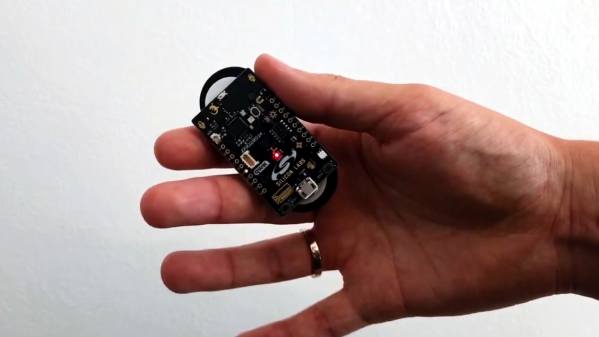
[AlexMiller11] shared a project for a DIY gesture-sensing remote control that acts like a Bluetooth keyboard, capable of controlling media and presentations on a computer with a high degree of accuracy.

The device recognizes eight different gestures and controls a host PC over Bluetooth.

The hardware is a Silicon Labs xG24 dev kit, a small IoT-focused board able to be powered by a CR2032 cell. Part of what makes it all work is the six-axis IMU sensor, but the rest is the software to interpret that data and figure out what motions the user is trying to do. That happens with a Neuton.AI model and SDK, a tiny but effective machine learning framework for small devices.

How does it actually work? The device acts as a Bluetooth HID, and gets connected to a PC in the same was as a regular Bluetooth keyboard. Once that’s done, recognized gestures are printed out the serial port as well as sent via Bluetooth to the host machine. Media can then be played, paused, volume adjusted, presentations controlled, and more. More details are on the project’s GitHub repository. There’s also a demo video that explains exactly what’s going on, embedded below the page break.

Machine learning is a way of using software to solve the kinds of problems humans are not very good at writing programs to solve, and accurate gesture recognition is a good example. Not all such applications require heaps of overheating GPUs, either. We’ve seen the concept of a neural network stripped down to its bare essentials running on an Arduino Uno, for those who would like to better appreciate the fundamentals.

Continue reading “Compact, Gesture-Based Remote Control Over Bluetooth”

AI-Powered Snore Detector Shakes The Pillow So You Won’t

If you snore, you’ll probably find out about it from someone. An elbow to the ribs courtesy of your sleepless bedmate, the kids making fun of you at breakfast, or even the lady downstairs calling the cops might give you the clear sign that you rattle the rafters, and that it’s time to do something about it. But what if your snores are a bit more subtle, or you don’t have someone to urge you to roll over? In that case, this AI-powered haptic snore detector might be worth building.

The most distinctive characteristic of snoring is, of course, its sound, and that’s exactly what [Naveen Kumar] chose as a trigger. To differentiate between snoring and other nighttime sounds, [Naveen] chose an Arduino Nicla Voice sensor board, which sports a Syntiant NDP120 deep-learning processor and a built-in MEMS microphone. To generate a model that adequately represents the full tapestry of human snores, a publicly available snoring dataset — because of course that’s a thing — was used for training. Importantly, the training data included samples of non-snoring sounds, like sirens and thunder, as well as clips of legit snoring mixed with these other sounds. The model is trained with an online tool and downloaded onto the board; when it detects the sweet sound of sawing wood three times in a row, a haptic driver board vibrates the pillow as a gentle reminder to reposition. Watch it in action in the brief video below.

Snoring is something that’s easy to make light of, but in all seriousness, it’s not something to be taken lightly. Hats off to [Naveen] for developing a tool like this, which just might let you know you’ve got a problem that bears a closer look by a professional. Although it might work better as a wearable rather than a pillow-shaker.

Continue reading “AI-Powered Snore Detector Shakes The Pillow So You Won’t”

PCB Repair Is A Sticky Proposition

What do you do when a PCB is cracked or even broken in two? [MH987] has a plan: superglue the board back and then bridge the traces with solder, solder paste, or wire. The exact method, of course, depends on the extent of the damage.

We’ve had some success with similar techniques, and, honestly, for single-sided boards, we would be tempted to add a thin backer behind the crack. We’ve also used conductive paint to repair traces, but it’s good to have having as many tricks as possible because you never know what will work best for a particular repair. The post mentions that this is easier to do on a single-sided board, but it is certainly possible to do on a two-layer board.

The example repair is a Walkman which — if you are a youngster — was a portable music player that takes cassette tapes. These haven’t been made since 2010, so it is important to repair what you have.

If you can’t repair your Walkman, you could build an updated version. If your board is seriously damaged, you might get hope from this more extreme repair.

2023 Halloween Hackfest: Candy Basket Sees You Coming

On Halloween, some people can’t or don’t want to open the door for various reasons. Maybe they have a cat that likes to escape every chance it gets, or maybe their favorite TV show is on during prime trick-or-treating time. Whatever the case, we think it’s perfectly acceptable to leave a bowl of candy outside the door, especially if there are electronics involved.

In this case, the bowl detects trick-or-treaters and candy eaters using an LD2410 60 GHz radar sensor and an RP2040. A light pipe shows orange when a person is detected, and switches over to green as they come closer, as if to say you may have candy now.

Nothing happens after that, but now that we think about it, it would be cool to add an MP3 decoder and a speaker to play a little witch cackle or something once they’ve had a chance to stick their hand in the bucket.

[Mike Kushnerik] actually designed the PCB a few months ago for non-Halloween purposes: some home automation projects. But then they were trying to think of something for Halloween, and this delightful light-up bucket came to mind. In addition to the RP2040 chip, there’s a 128 MB flash chip, a WS2812 LED, and a header for communicating with the radar sensor over UART. Be sure to check out the brief demo video after the break.

If you’d like to stand outside and give out candy, at least send it down a light-up slide or something.

Continue reading “2023 Halloween Hackfest: Candy Basket Sees You Coming”

Lessons Learned: Plastic Injection Molding For Products

Injection molding is one of the technologies that makes the world go round. But what does it actually look like to go through the whole process to get a part made? [Achim Haug] wrote up a blog post that does a fantastic job of explaining what to expect when getting plastic enclosures injection molded in China.

These air quality monitors required a two-part enclosure.

Injection molding a part requires making a custom mold, which is then used by an injection molding machine in a shop to crank out parts. These are two separate jobs, but in China the typical business model is for a supplier to quote a price for both the mold as well as the part production. [Achim] describes not only what navigating that whole process was like, but also goes into detail on what important lessons were learned and shares important tips.

One of the biggest takeaways is to design the part with injection molding in mind right from the start. That means things like avoiding undercuts and changes in part thickness, as well as thinking about where the inevitable mold line will end up.

[Achim] found that hiring a been-there-done-that mold expert as a consultant to review things was a huge help, and well worth the money. As with any serious engineering undertaking, apparently small features or changes can have an outsized impact on costs, and an expert can recognize and navigate those.

In the end, [Achim] says that getting their air quality monitor enclosures injection molded was a great experience and they are very happy with the results, so long as one is willing to put the work in up front. Once the mold has been made, downstream changes can be very costly to make.

[Achim]’s beginning-to-end overview is bound to be useful to anyone looking to actually navigate the process, and we have a few other resources to point you to if you’re curious to learn more. There are basic design concerns to keep in mind when designing parts to make moving to injection molding easier. Some injection molding techniques have even proven useful for 3D printing, such as using crush ribs to accommodate inserted hardware like bearings. Finally, shadow lines can help give an enclosure a consistent look, while helping to conceal mold lines.

Close To The Metal

Firmware is caught between hardware and software. What do I mean? Microcontroller designers compete on how many interesting and useful hardware peripherals they can add to the chips, and they are all different on purpose. Meanwhile, software designers want to abstract away from the intricacies and idiosyncrasies of the hardware peripherals, because code wants to be generic and portable. Software and hardware designers are Montagues and Capulets, and we’re caught in the crossfire.

I’m in the middle of a design that takes advantage of perhaps one of the most idiosyncratic microcontroller peripherals out there – the RP2040’s PIOs. Combining these with the chip’s direct memory access (DMA) controllers allows some fairly high-bandwidth processing, without bogging down the CPUs. But because I want this code to be usable and extensible by a wide audience, I’m also trying to write it in MicroPython. And configuring DMA controllers is just too idiosyncratic for MicroPython.

But there’s an escape hatch. In my case, it’s courtesy of the machine.mem32 function, which lets you read and write directly into the chip’s memory, including all of the memory-mapped configuration registers. Sure, it’s absurdly low-level, but it means that anything you read about in the chip’s datasheet, you can do right away, and from within the relative comfort of a Micropython program. Other languages have their PEEK and POKE equivalents as well, or allow inline assembler, or otherwise furnish you the tools to get closer to the metal without having to write all the rest of your code low level.

I’m honestly usually a straight-C or even Forth programmer, but this experience of using a higher-level language and simultaneously being able to dive down to the lowest levels of bit-twiddling at the same time has been a revelation. If you’re just using Micropython, open up your chip’s datasheet and see what it can offer you. Or if you’re programming at the configure-this-register level, check out the extra benefits you can get from a higher-level language. You can have your cake and eat it too!

Making A Concrete Sign

While paging through the feed a few days ago our attention was caught by something a little away from the ordinary in Hackaday terms, a DIY video about creating cast concrete signage from [Proper DIY] which we’ve placed below the break. A deceptively easy-looking mould-making process has a few tricks that  will make the difference between a hard-wearing sign that lasts for years, and a lump of concrete.

So, to make a cast concrete sign, you throw together a mould with some letters, and chuck in some concrete? Not so fast, because the key appears to be preparation, and ensuring that there are no 90-degree corners on the mould parts. The letters are carefully shaped and sealed with varnish before being attached to the mould with silicone adhesive, and all the corners are beveled. Finally a light oil is used as a release agent, and hefty vibration takes care of any air bubbles.

The result is a set of signs, but we can see these techniques finding uses outside signage. For example, how about casting using a 3D printed mould?

Continue reading “Making A Concrete Sign”