A lot of colloquial words that we might use when describing something’s durability take on extremely specific meanings when a materials scientist or blacksmith uses them. Things like “strength”, “toughness”, “hardness”, and “resilience” all have different meanings when working in a laboratory or industrial setting than most people might otherwise think.
For the beginner metalworker, this can be a little bit confusing at first but some hands-on practice will help. To that end, this beginner lesson in heat-treating steel from [Blondihacks] demonstrates why it can be beneficial to trade some of the metal’s toughness for improved hardness and just how to accomplish it on your own.
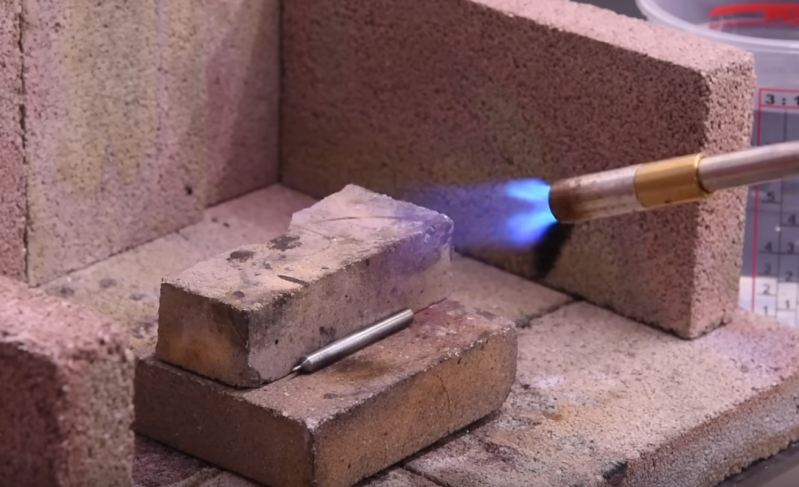
The first part of the lesson is to make sure the steel is high-carbon steel, since most other steels aren’t able to be heat treated. It will also have a specific method for its quenching, either in oil, water, or some other medium. But beyond that the only other thing required for this process is a torch of some sort. [Blondihacks] is using a MAP-Pro torch to get the steel up to temperature, which is recognizable when it turns a specific orange color. From there all that’s needed is to quench the hot metal in whatever fluid is called for. At this point the metal can also be tempered, which restores some of its toughness while maintaining a certain amount of hardness.
While the process doesn’t require specialized tools, [Blondihacks] does have a hardness tester, a fairly expensive piece of instrumentation that measures how deeply the metal can be indented by a force. By measuring the size of the indentation made by the tool, the hardness can be determined. As it’s many thousands of dollars this is mostly for demonstration and not necessary for most of us, but does go a long way to demonstrate the effectiveness of heat treating and tempering in an otherwise simple environment. If you’re looking for excuses to start heat treating and tempering metal, here’s a great project which creates a knife nearly from scratch.


She had such a calming voice and kind of video making. But the part of the hardness test take me back into engineering class (university) and my heartrate goes anxcious :-)
Quinn at Blondihacks is the patron saint of home machining. There are lots of good machining and metalworking channels on Youtube, but for instructional purposes and learning how to actually do stuff, it’s hard to beat Blondihacks. I’m experienced and have worked in multiple machine shops, and I’ve learned TONS from her channel. It’s absolutely top shelf stuff, and this isn’t even one of her better videos. The older machining videos were absolutely stellar.
Once upon a time, there were “shop classes” in school where one could learn these things.
I did a *cheap* machete with blowtorch and quench on cold bricks (some explody, but teenage fun) long ago; that became a 30+ year tool that is still useful. Sharpening it sucks but that’s only needed once every few years.
Good thing is: diamond tools don’t really care about a blades hardness :D
Thanks! That was very useful.
High carbon steel is purchased as oil-hardening, water-hardening, or air-hardening “drill rod” or “ground stock”. My understanding is that oil-hardening is most common and less likely to shatter from the temperature change when quenched than water-hardening stock.
Mild steel *can* be case-hardened, either by packing it in a carbon-containing mixture and heating, or with commercial case-hardening compounds such as Kasenit.
And I too went to school in The Land of Ago, where I made a cold chisel. We had gotten a new junior-high school building in 9th grade, and it had an actual gas forge and a complete aluminum foundry. Fun times indeed.
That’s tool steel, steel alloys designed for specific working properties. Your common, everyday high-carbon steel (10xx series) pretty much all requires a water quench, and is easy to get in bar stock, which means you don’t need to forge it into a bar shape just to make a knife, and can start off with basic stock-removal for shaping the blade, which requires much less of an upfront investment, since you won’t need an anvil, stump and various hammers and tongs, and can technically get by with just some fire bricks and a torch, though I would recommend at least putting together a simple soup-can forge. It is also generally cheaper than tool steels, and good for learning to quench, and how far you can go with shaping before heating/quenching, since it will definitely let you know if you mess up (cracking, warping, distorted cutting edge, etc), since you’re shock quenching it in water. You really want to temper them afterwards, though, otherwise they like to shatter, as the fast quench results in a lot of stress points within the steel, which tempering will ease up. If it’s just a knife, you can do that in your regular home oven, though.
Now, the tool steels you were probably thinking of are technically categorized by their usage requirements, as either water-hardening, cold-work (this refers to what you’ll be using the steel for, not that it itself should be cold worked), shock-resistant, high-speed, hot-work or special purpose; but most folks I know just go by their AISI-SAE grades, since several of them are named directly according to their quenching medium followed by a number, which you can look up for the specific properties (i.e., O1, etc for oil quench, A1, etc for air-hardening, W1, etc for water quench). It’s just easier to remember, I guess, and a lot of people first learn about them by those grades.
A-types are the simplest to harden, since they, well, harden in air, no quench needed, and are not particularly prone to cracking or warping, since it’s a relatively slow process, so sudden stresses inside the steel are less likely to develop. The first ever tool steel was also air hardening (Mushet steel), and began the whole trend. They do have a high chromium content, though. Pretty tough and wear resistant, while still not being too much of a pain to sharpen, and less prone to rusting thanks to the chromium (usually around 5%), you’ll see a decent number of bigger, survival-style knives made out of it.
W-types are the most prone to cracking or distortion during quenching, since they have low hardenability, hence them requiring an aggressive water quench to achieve the hardness you want. They are for the most part
just regular high-carbon steels, although some are alloyed with manganese, silicon, molybdenum, and sometimes vanadium, for increased toughness over plain high carbon steel. I have no idea why they are in their own class, since they are cold-working, too, but I guess they do have significantly lower hardenability than those…
O-types are somewhere between, since they still need to be quenched, but quenching in oil is slower and less of a shock-quench, so they are also less likely to crack or warp. That also means you can get a nice hard exterior while still having a softer, tougher interior – I made my first stiletto using O2 rod, for example, and it can both give and take pretty well.
There are other tool steels outside of those basic, easy to remember ones, like the D-types (high carbon-chromium), and you’ll see plenty of bigger outdoorsy knives using D2 out there as well, with the marketing gimmick being that they are supposed to be a “semi-stainless” tool steel, due to their above-10% chromium content, but it doesn’t really work that way, and they are only slightly less susceptible to rusting than other tool steels, and you definitely need to still take care of them. Also kind of a pain to heat-treat.
Then there’s the S-types, which make up the entirety of the shock resistant group, and are actually pretty low carbon (~0.5%), but can still get pretty hard, I guess due to some of the other alloying elements helping form carbides? Not all that wear resistant, but tough. I’ve never worked with any of these, they are more for impact-rated tools and such. Primary alloying elements making them so tough are either silicon/molybdenum or nickel/carbon (still low carbon, though).
Then there are the Ts and Ms, named for their primary alloying elements (Tungsten and Molybdenum), which make up the High-speed Steel group. They can get nice and hard, pretty wear resistant, and stay that way under the relatively high temperatures they see from friction under use as drill bits, taps, cutters and such. Some also use Cobalt as an additional significant alloying element, letting them reach even higher hardness and heat resistance. Never worked with, but there are a lot of supposed T10 katana sold out there, with some pretty magical attributes ascribed to them. All I know is – hell to sharpen a blade made out of it.
I know next to nothing about the H series, which are intended to stay hard and tough under continuous high-heat. Low carbon, high alloy, Tungsten-Chromium or Molybdenum. Given their desired propeties, I can only imagine them being a serious pain to work.
Finally there are the “Special purpose” tool steels, the P, F and L types. P is specifically made for zinc die casting and plastic injection molding dies (hence the P). L is the low-alloy group, tough and wear-resistant, but not very hard. AFAIK, generally used for parts of other tools, rather than directly used for parts that contact the work, but I’m really out of my element with this whole group. Finally, there’s the F-types, which sound similar to W-types, except with tungsten added in for additional wear resistance. I don’t even know where the F comes from.
Anyway, this has been my TED Talk on Tool Steels, some of which I’ve used, plenty of which I haven’t.
I started out with plain old High Carbon Steels (1060, 1080, 1090), and those are… fine? As you go up the ladder, they contain more carbon, making them harder but less tough, so you need to be more careful so you don’t chip the blade. 1060 is pretty tough, but not that hard, so you’ll end up sharpening it more often, and, if you’re making swords, they’ll be more likely to bend and permanently deform, rather than snap. Neither one is a good thing, but a bent sword is a lot more embarrassing. You can use spring steel if you don’t want either to happen, but that has its own downsides, and this has gone on long enough.
Sorry for the wall of text, folks, I get excited when Hack A Day actually covers something I’m not currently a complete amateur at.
This is actually pretty spot on from what I know myself- you got most of that pretty spot on.
S7 is the most common S series tool steel, and it’s typically what jackhammer tips are made out of. Extremely shock resistant when hardened, exceptionally tough stuff, and a pita to forge as a blacksmith. Even nastier to machine hardened using hard milling (I’ve done a lot of hard milling and hard turning in tool and die work, yes you can machine hardened steels, but it takes special techniques and very small chips compared to normal machining, and with stuff like 6C PCD tools it’s even possible to directly machine solid carbide easily, but I digress..)
H13 is what most of the forging dies for hot forging titanium parts were made out of when I worked for a company who specialized in that. I made all of the forging dies, as yes, titanium can absolutely be drop forged in heat, and most aerospace parts made of it usually are. H13 is specifically made to hold its hardness and toughness even at very high temperatures compared to other steels, except exotics like FXT2 and FXT3 from A. Finkle & Sons, which are mold optimized steels. The nicest blacksmith’s anvils I know of are made by a guy on IG called Oaklawn Blacksmith, who has them custom cast from solid H13 toolsteel. Absolutely overkill for a blacksmith anvil but it will last forever and then some, haha.
A great book for those of you who actually want to dive further into all this stuff, there’s a cheap book that’s really great on this topic and easy to follow. It’s called “Tool Steel Simplified” by Palmer & Luerssen. There’s probably a copy floating around on the interwebs somewhere, but the book itself isn’t expensive or hard to find.
I worked in tooling in a ring rolling plant for 5 years for the most part completely agree. we did ~75% titanium, 20% nickel super alloy and 5 percent steel or aluminum.
H13 is great because of its higher hardness and how high of a temp it keeps its hardness but I have seen tools shatter especially when the machine operator sprays water on the tools to cool them.
Finkl FX temper 2 (38-42RC) was my go to basically same thing as 4340 (dont tell the finkl reps i told you so) Only because of the cracking issues with H13. high wear areas (corners of contoured mandrels) get notched and welded with higher hardness alloy cormet DG/F 64 was my go to I believe 48-52RC.
High temperature operations and alloys may require nickel based tooling which is much softer than tool steel at room temp but keeps its hardness much better at higher temperatures.
corners of mandrels can be notched and welded with nickel based wire to protect them. Punch tips are typically inconel 718 or waspalloy.
Conical axial rollers on radial axial ring mills have the tips welded with cobalt based alloy which is very expensive but hard and keeps its hardness at a high temp
Yes, most of the dies were made from H13, but some with extreme bumps in the geometry were made from Incolnel 718, and hardened with a special process.
The cracking with H13 you mentioned is definitely a thing- I once heard a 2 ft long x 18 inch wide 10 inch tall die for forging a narrow blade of titanium for a fin crack in half during forging- it sounded like a gunshot from several hundred feet away through 2 buildings. Cracked right down the middle at the ends of the blade cavity. In solid masses with no weak points though, like most dies, it never happened, and would just get locally cracked perhaps usually just distorted from forging hot titanium, and then I would relocate the die and rework the cavity slightly bigger.
4340 would indeed be more ductile. I was told that FXT3 stuff was stupidly hard to machine. Most of our punches & dies were between 46 & 52 Rc.
I have a user’s perspective on knife steels (not completely applicable to other blades like axes or swords) which can be different from and not completely a subset of tool steels. I should also specify that I am not looking at forging steels, but instead the sorts of things a pocket knife may be made with. There’s of course plenty of cheap knives using crappy no-name steels, often improperly heat treated. The next level up is pretty common – the very cheap and fairly old named hardenable steels, where you mostly only have the choice between stainless and carbon, and my perception is that they all are pretty similar, relying on carbides with iron and some chromium and not much else. The stainless ones won’t rust much and you won’t really make it any worse by sharpening it badly with one of those kitchen sharpeners. The higher carbon ones can be less crap for the same price, but of course can corrode easier. There’s been a lot of knives using something like 420HC or 440C that I would put in this category, personally. I might even include D2, to be fair. Somewhere in this general level is also knives forged out of random hardenable steel objects like railroad spikes, depending what they chose to use.
The tool steels that seem appropriate for blades will generally beat each of these options, but there’s a lot of room between the usual and the best knife steels, and even the best options can be perfectly reasonable in price as a fraction of the cost of a knife in my opinion. I may misremember or not remember a lot of the options, so I’ll try and limit myself to the ones I’ve used, and take this as my perspective. 154CM is a steel that is like 440C but with some molybdenum, and it’s a decent basic steel as far as knives are concerned. There’s a sintered powder version called CPM154, I suppose it’s a little better. S30V is more of a step up, as a powder steel that’s also got vanadium carbides which are better than chromium carbides, as well as a bit of molybdenum. S35VN is an update that adds to that a small amount of niobium, and is a good change. That’s near the limit of what a lot of home knifemakers may use, honestly. M390 is another one which may be favorably compared. I believe it has no niobium, but does have tungsten.
There’s a number of steels that get to the top of the charts depending on your priorities (since there’s always tradeoffs), and I’m leaving most of them out because I haven’t tried them. The one I’ve had a couple of doesn’t use the normal naming conventions for tool steels, but instead is called Magnacut. Like many of the other options, it’s a powder steel and available from Crucible. It pays close attention to the quantities of each element, avoids forming chromium carbides in favor of vanadium and niobium carbides, and adds a little bit of nitrogen besides.
I enjoyed reading your post and I would like to thank you for taking the time to explain alot of the steels.I would like to know what you think of spring steel. I’m a beginner at any blades, I’ve mostly done casting and armor. I’ve worked in foundries several times over the years and understand some things. But I’m clueless on alot of forging techniques. I’m currently working on my power hammer and a better forge. Again thanks for your insights
I really enjoyed reading this. Do you have any (reading) suggestions for learning more about steel (or to be honest, metals in general) grades?
I could get my hands on a random textbook easily enough, but something that is written in a way that invites reading it does increase my chances at actually reading it.
Blondihacks is great. Her current work on the tender engine has been amazing.
Be careful! Don’t be this guy: https://www.newyorkupstate.com/capital-region/2017/12/cohoes_fire_ny_tv_show.html
“Forging in a 55 gal drum on a day with 25 mph winds gusting to 50-60mph. What could go wrong?”
I live 3 miles from where he took most of a city block out.
I know HAD readers know better, but please be careful! Third degree burns last a lifetime. (Looks at back of hand ruefully)
Machinist, and blacksmith for about 7 years now. There’s a large open free smithy out near me in Scotdale, PA called Fort Allen. I’ve learned smithing with those guys over the years as well as with a couple other local blacksmithing groups that blacksmiths in the US have a love-hate relationship with that show- it skips over a lot of the critical steps to make it look easier than it actually is to make items, and though it has helped leader resurgence in popularity of the art, it has also created guys like that who end up burning things down, as well as driving up the general price of anvils greatly.
It’s not as though you can’t forge at home- I will say blacksmithing really is possible at home, but when you live in a city, you really shouldn’t have open flame like that. We do it with coal and coke, but Fort Allen Antique Farm Equipment Association blacksmithing is out in a farm field. If you must forge in the city- pay up, and get an induction forge. You can buy them off Amazon now, and go to Cluaran Forge on Instagram for custom shaped coils for blacksmiths.
I need to make a fine crafting knife/ x-acto from a drillbit with a good ergonomic wood handle. For cut out detailed paper siluettes.
Can i use candles for annealing?
I want to file a triangle shaped blade at the end of the drillbit.
And than hardening again.
To borrow from the wisdom of the ‘net “To anneal steel, heat it up about 100 degrees F above its critical temperature, soak it at that temp for 1 hour per inch of thickness, and let it cool at a maximum rate of 70 F per hour.” So clearly candles are not going to be hot enough… but drill bits or little files aren’t too thick, so using a torch to get them to orange, and then instead of quenching, just letting them air cool gradually should take the temper off.
Thanks for your comment Toby. I have the same fear as Blondi above with a flame torch. Maybe i will break glass or ceramic tiles into little sharp pieces and fit it with epoxy into a wood handle. Or just go with the flame torch and the drill bit.
For something that small, it’s probably easier to start with material that is already sufficiently hard, like a drill bit, and use a sharpening stone to grind the shape you want. Just sidestep the heat treatment process entirely.
You can also get pre-hardened blanks in various shapes and sizes and steels from places like McMaster-Carr.
Maybe we all think to complicated. Would a plotted or laser etched papercut not be enought?
I will try this with steel wire hammered with a raw hide mallet onto a file and than harden it, in case i need saw blades for my fret saw.
Trimmer line with silicone carbide powder works well in a microwave oven.
Trimmer line is mostly polyamide (Brandname Nylon).
Silicone carbide is really aggresive cutting material and gets really hot in the microwave.
Place the needed saw blade lenght of trimmer line in something (heat resistant) with needed abrasive size (1200 grit?) and power up the microwave. The carbide heats up and melted itself in the trimmer line.
Sometimes i made myself sharpening stones on this way. Diy oscillating multitool sanding pads works also well.
But watch how long you let it in. I was inspired by the diy microwave kiln guys.
Funny, plenty of people actually start out making knives out of saw blades and files.
Red hot -> dunk in water -> use it carefully. People overthink this stuff. I’ve been using a “glass-hard” center punch I made for a decade now. Haven’t had to regrind the point yet. The more steps there are in a procedure, the more likely it is that you’re wasting your time.
Heat treatment exists for a reason.
Hitting a glass hard completely untempered center punch is a recipe for injury.
When something is glass hard, kind of a slang term for completely hardened with no tempering, it’s typically brittle. Doing that with something that is specifically meant to be struck with a steel hammer is about the worst idea I can think of to tell people to do. It is likely at some point to shatter. If you insist on continuing without tempering this at all, at least use a brass hammer to hit it. It’s less likely to send shards as far.
I’ve watched this exact thing happen with people who don’t temper things and then go to hit them. I’ve seen it happen in person. Please don’t listen to this person’s advice above. For the record, I’m professionally trained in heat treating manually both as a blacksmith, also as a machinist, and separately a third time in a 2 year school of watchmaking. I’ve learned a few ways of doing heat treatment and tempering safely.
I must agree with you fully! I know a man who still has metal fragments in his leg from a hardened punch that exploded when tapped with a hammer. Temper that steel!
There’s a great reason there are extensive references on how hot to heat a steel alloy (and usually, the exact color), if to quench them and in what, and how they should be tempered.
People created these because when you simply “heat red hot and dunk in water”, the end result frequently critically failed in a way that caused severe injury. Heck, the wrong steel heated and dunked in water will shatter right then and there. People have lost eyes. People have lost testicles (always wear your apron!). When these resources exist, not using them is just asking for a Darwin Award. Might as well stab it directly into a block of dry ice.
I hate it when people use a single anecdote to justify general behavior, especially when they advocate it to others. Life is a game of statistics. It’s entirely possible to run up to a hungry lion, give it a big hug and kiss, and successfully slow-walk back to your car, and end up living a long, happy life. But the chances of that playing out that way are… Not the best. Same here. Doing something stupid and surviving is not a reason to tell others to do the same – it’s a reason to tell others how stupid you were, how lucky you are that nothing bad happened, and not to try something that stupid themselves.
I’m, at best, an amateur at the fine art of turning pieces of metal into cool, deadly items. But even I know enough not to purposely make those cool, deadly items potentially deadly to the wielder, simply because I’m too lazy to do the work right.
As a pro, DrewTheMachinist might cover yield strength better than I could, so I’ll just say I think it’s worth specifically telling everyone that just because it got harder, deforming less in moderate situations, doesn’t mean that Anonymous has improved the point of failure. It’d be natural to think if it’s harder that it will take more to make it fail even if it fails catastrophically once it does. But actually if it’s brittle enough it could snap/shatter/fracture in a situation where a more reasonable heat treatment would have let it survive, counter to the natural intuition.
Agreed, and Quinn confirms exactly this, that dead glass hard steel can shatter in the video if he watched it.
I mean anyone can say they know whatever on the internet and ultimately people don’t know, so I’m not trying to convince with an appeal as authority argument here. I don’t have a web page unfortunately to show off what I do. Casual research from anyone will quickly find out and confirm exactly what I said above, which is further confirmed in the video in this post.
It might be possible that he only partially hardened his punch, by not letting the heat soak far enough through the whole thing, and effectively doing a partial hardening just to the tip by accident because of it. It’s still dangerous especially with exactly that specific thing to leave at glass hard. And also completely unnecessary.
If you know what hardening is in metal, you should also know what the property of ductility is.
Ductility is the ability for a metal to be drawn and formed through coldwork, and when you harden something, it loses ductility. Many metals like copper and silver and gold are traditionally hardened by hammering, which work hardens the surface. It takes advantage of the ductility of the metal to spread it, but it also hardens the surface after it is cold worked.
Raw steel is more ductile than hardened steel, but many steels can be surface work hardened through hammering or peening, not just through heat treatment. Steel chain links that have dimpling on their surface on larger ones are often surface hardened through shot peening. This makes the surface hard to resist abrasion, but also keeps the core ductile so that the chain does not snap under load.
It’s possible he has achieved just a case hardening from not fully hardening properly when he did it, and that might be why it hasn’t shattered on him yet if that’s the case. It could just be he’s lucky 😬
I would like to add in something that Quinn didn’t put in her video (which honestly otherwise was very straightforward and well done, intentionally kept simple for the purposes at hand), that can be very important depending on what you’re using the part for- oxidation control to prevent scaling.
A lot of times when you need to harden something, it needs to be dimensionally unchanged on the surface so that it can fit into something. Normally when you harden a part and quench it, scale can form on the surface, which creates an uneven surface. Anyone who has ever stuck anything metal in a fire for a little while and pulled it out has seen bits of the metal on the surface flake off if they got it really hot. That’s scale.
There are a few ways this is prevented in industry, largely this is prevented with air hardening steels by doing the heating in an oxygen-free atmosphere, such as a nitrogen purged furnace, or sealing smaller items inside stainless steel tool foil hardening wrap. This keeps the amount of oxygen near the part that leads to scale formation to a minimum, so that the surface stays basically dimensionally unchanged.
You can do this at home with your own heat treating by using tool wrap and folding over the edges for small items, or if you are making small parts- like watch parts, there are methods that watch and clockmakers use I can describe here.
I learned this method in watchmaking school over a decade ago, and there are variations of it out there, such as in the book Watchmaking by George Daniels. Basically, if it’s a small part, you can wrap that part in iron or steel wire, and then mix together a paste of Anhydrous Lime powder and denatured alcohol, the consistency of wet oatmeal. Smear this completely over the part, and around the wire, which will help keep it in place around the part. Light this on fire carefully over an alcohol lamp or with a lighter, a greenish blue flame will burn for a little bit until all the alcohol is cooked off, and you should be left with something like a ceramic shell that will crumble to the touch around the part that should not be wet anymore.
Continue to heat up your part exactly like Quinn describes in her video, your ceramic shell will glow bright orange like fire brick when it gets hot, just give it time so that it isn’t even glow and stays glowing a bit when you take the flame off. Make sure that you hold that glow, and then quench in oil or water as normal.
Using boiling water afterward will dissolve the hydrated lime shell around the part.
What this does is create an airtight shell freeform around your part, which helps block out oxygen from reaching it at the surface, which is what creates scale on your part. If you do this carefully, you can get a part that was polished previously to even come out still fairly well polished without any scale at all, and fully hardened so long as you do everything else right.
Hope this helps some of you 😊
To add one last tidbit to that- if you are doing small parts like that- you can temper them in a little brass tray full of fine brass file or mill or lathe shavings, over an alcohol lamp. This helps distribute the heat from the lamp extremely evenly to your part, and allows you to very carefully control the oxidation color that shows up on the surface of the part very gradually, for an extremely precise temper. Just be sure to let it soak through the entire part at a certain height over the flame for a while without that color changing to be sure the temper is taken all the way through the part the same level.
We also used white quartz sand in little brass trays with a wooden handle on them in school for this too. Quartz sand is white so it makes seeing the oxidation color on the part which tells you the temper of the part much easier to see. It just doesn’t distribute the heat quite as nicely as brass shavings.
I’ve even done straight shafts rolling on a curved piece of copper sheet over an alcohol lamp as well.
For tempering, especially for knives rather than small watch parts, I’ve often heard of toaster ovens being used. After all, they can have a dial you set to a particular temperature in the right range, and you could still look thru the window to see the color as a second indicator, or use a thermometer.
The calcium paste idea sounds clever; could probably also paste the cracks in a foil wrap. Might also get away with a minimal leak and a bit of baking soda (or other things, but baking soda is easy) to displace the oxygen, in those cases where the temperature’s low enough that co2 doesn’t affect anything.
Look for the heat treating app from the Heat Treaters Society (part of ASM) in the Apple
Store. Regards, JQuinn
Quick note for anyone looking for a less expensive means of hardness testing – they make hardness testing file sets that are fairly cheap and will give a rough approximation of Rockwell C hardness plus/minus 5 points
I would love to see a follow up video that shows what happens when you use the wrong quenching from not knowing what kind of steel something is made out of. For example you buy the cheap HF wood plane and heat it up to 400 or so and let it air cool, take the diamond hone to it and get it really sharp, heat it up hot with a torch, or in my case an induction heater, and quench it in oil, see if you can sharpen it any more and give it a try, if you crack the edge, soften it up, re hone it, re harden it and anneal it a bit and try again. I am curious if their metal can be improved on. I have chisels too not melting the plastic handles would be hard.
Best and cheaper upgrade you can made to a toaster oven: Replace the work thermostat with a cheap electronic thermostat with a thermocouple probe. Use a solid state relay or a contactor as needed. Now you are measuring the temperature of the part, no the temperature of the cavity. For more precise control, wrap the part and the thermocouple together in aluminium foil or other suitable material.