When working on a project, plenty of us will reach for an Atmel microcontroller because of the widespread prevalence of the Arduino platform. A few hackers would opt for a bit more modern part like an ESP32. But these Arduino-compatible platforms are far from the only microcontrollers available. The flash-based PIC family of microcontrollers is another popular choice. Since they aren’t quite as beginner or user-friendly, setting up a programmer for them is not as straightforward. [Tahmid] needed to program some old PIC microcontrollers and found the Pi Pico to be an ideal programmer.
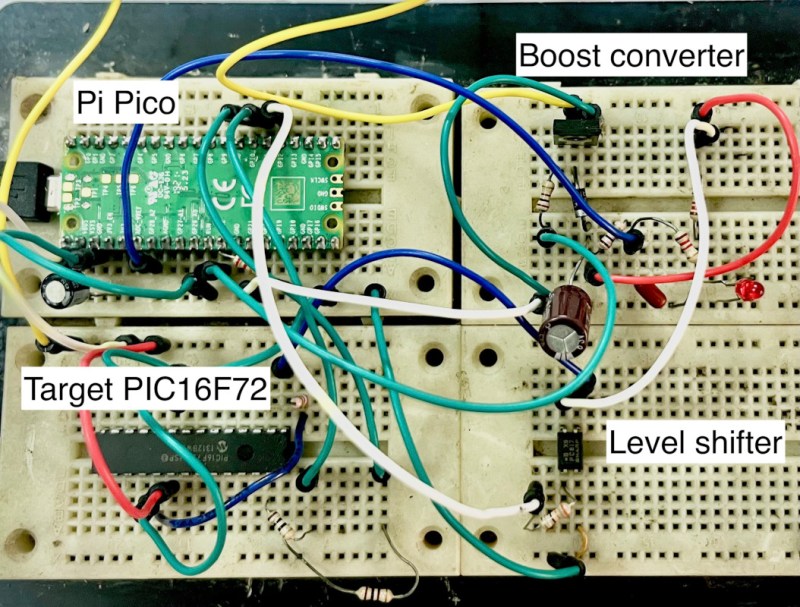
The reason for reaching for the Pico in the first place was that [Tahmid] had rediscovered these decade-old microcontrollers in a parts bin but couldn’t find the original programmer. Thanks to advances in technology in the last ten years, including the advent of micropython, the Pico turned out to be the ideal programmer. Micropython also enables a fairly simple drag-and-drop way of sending the .hex file to the PIC, so the only thing the software has to do is detect the PIC, erase it, and flash the .hex file. The only physical limitation is that the voltages needed for the PIC are much higher than the Pico can offer, but this problem is easily solved with a boost converter (controlled by the Pico) and a level shifter.
[Tahmid] notes that there’s plenty of room for speed and performance optimization, since this project optimized development time instead. He also notes that since the software side is relatively simple, it could be used for other microcontrollers as well. To this end, he made the code available on his GitHub page. Even if you’re more familiar with the Arduino platform, though, there’s more than one way to program a microcontroller like this project which uses the Scratch language to program an ESP32.


Nice article and a clever fix for his problem.
As to the level of “User-Friendly-ness” between flashing PIC and Arduino, I see no great distinction. Just read the docs. Both work well, I have had no issues either way. I have used different PIC’s, embedded in thousands of RF/microwave production units, all being flashed by line workers. Flashing PICs were the least of my issues. Most of my issues were at Ku band and up.
Yes, Arduino is more beginner friendly. Once you’ve reached a reasonable level of knowledge though it becomes easy to forget what it was like to not know things.
A not insignificant portion of the Arduino user base doesn’t have a basic knowledge of electronics, rather they have a rudimentary knowledge of basic circuits, switches, lights and a voltage source. That’s ok.
I spent an ungodly amount of time getting an STM32 dev environment set up and working. I was able to reprogram the device I had for LoRaWAN and do what I needed with it. But, actually getting everything up and working was a big lift. Meanwhile, I have electronics / RF background as well as extensive knowledge on computers. I’m pretty sure some STM32 users would have laughed at my issues getting the environment to be useful, I’m sure theirs works just fine 90% of the time and they’d think I was an idiot.
It’s easy to forget what it’s like to not know something that later becomes obvious. It’s hard to remember what it was like to not know something. Being able to remember what it was like and present information in a useful manner to those without that knowledge is a significant skill. Most educational material does this poorly, it’s why hands on instruction can fill the gap.
Arduino has an approachable ecosystem with a nice range of support for 3 and 5v electronics. It’s fault tolerant enough that looking at it wrong isn’t going to give you any grief. There’s a number of sites and blogs to find online to provide instruction and ideas.
It’s not hard for me to remember what it was like to not know something, because I get reminded each time I am not able to remember that something.
True!
The ‘Spock’s Brain’ syndrome.
Well, setting up the dev environment for my STM32 board was actually the easiest thing to do. Choosing WHICH dev environment turned out to be harder. There are multiple choices. I settled in PlatformIO.
But the really hard part was figuring out WTH my STM32 boards were not programmable, or some things don’t quite work.
And you know what? Turns out that there are a bunch of Chinese clones, which are all incomplete one way or another.
Arduino is great for the beginners. The problem is that many of them stay Arduino programmers and never go beyond. Instead they grab more powerful Arduino variants.
I learned uC programming with PICs and C. However recently I grabbed a BlackPill and set up PlatformIO environment. Programming it wasn’t all that straightforward as it supposed to be, as documentation was all over the place, especially for STM32 specific features. Still I enjoyed my experience and can understand the appeal of Arduino. But I wouldn’t use it for commercial product.
I was programming PICs back when Arduino stuff first came out. After a few years Arduino became the most popular stuff with hobbyists. Microchip had a huge variety of chips, an enormous library of app notes that showed how to do almost anything you could ever want to do with a uC, and a great IDE including a simulator that worked for every chip they made. It all worked because it was all designed and programmed by actual engineers.
My much later experience with using Arduino and RAMPS boards for my first 3D printer build was that every time they “upgraded” the Arduino IDE, I could no longer compile the firmware for the printer. FFS, this was 15 years into Arduino being “the thing”!
I suspect the problem for MicroChip was their programmer cost about $100 (IRIC). One thing I learned from 3D printing hobbyists is that cheapness rules. 99% of hobbyists put zero value on their time, and will happily spend days dicking around with hardware and software to avoid paying $100 for something that would solve the immediate and many future problems in 5 minutes. Meh.
Back when dinosaurs roamed the Earth, NOBODY used an “official” PIC programmer, everyone just hooked a few components to the nearest LPT port (remember those…?) and the bit-banging free programmer of your choice to get their 16F84 PIC programmed (mostly using “high voltage” programming which just meant you had to have a 12V source and a transistor switching it to MCLR).
In more recent times, “the” programmer one is supposed to use as a hobbyist is whatever the most recent version of the Pickit is, except they’re still ludicrously expensive in hobbyist terms – the only difference being that pretty much all “free” PIC programmers (much like the LPT port) are now well and truly dead – most likely due to the impossible burden of keeping up with how to program 1242135236347 different models of PICs (oops, now it’s 1242135236348…).
Which pretty much leaves the official, but possibly lesser-known “Microchip SNAP” as the only sane programmer to use, at $40 or so, which while still nowhere as cheap as an USBAsp (~$3) for an Atmel chip, is at least at a price point one can consider acquiring the damn thing at. As long as you’re fine with not having high voltage programming capabilities… but… yeah – basically, Microchip is either consistently having their heads up their fucking asses about this, or they’re quite successfully trying to send the message “we don’t want you kind around here” to hobbyists.
One ‘feature’ with PIC programming is that the programming sequence is different for pretty much every sub-family of PICs (i.e. in the PIC16F series there’s several different programming sequences). So you can have a programmer that can program PIC16F72s in this case, but it won’t be able to program many other PIC devices. I don’t understand why/how Microchip made the programming so complicated but that’s what it is. They clearly document the programming sequence needed in the datasheets, but to write a ‘universal’ programmer involves a heck of a lot of case statements. From memory i think you can count the number of different programming sequences Atmel has one one or maybe two hands, which obviously helps with adoption of their chips (although Microchip bought Atmel not so long ago).
There’s a good programming application PICKLE that I’ve contributed a few devices to and it happily works with PIs for the LV devices. It can handle the HV devices too but obviously needs extra circuitry for this.
I think this is done in such convoluted way because each sub-series has slightly different core and memory management system, and there are different development teams that work on their own families of chips.
I tried to program my first PIC with JDM, a RS-232 programmer. This didn’t work because software had problems directly controlling the hardware. So I bought genuine PICKit3, and whenever I switch uC to be programmed, it has to update its firmware for different timing sequences. Now I’m wondering if different families and subfamilies use different unlock sequences for self-programming. I only did that once to emulate EEPROM in program memory.
When I started with PICs in 1998, it was with the 16F84. I made my own programmer, controlled my home-made workbench computer. I wrote the driver code in Forth, and it took almost no debugging to get it going. My next project was with the 16C72 (EPROM-based), and I had to make small modifications to the driver code. Then came 16C71, then 12CE673 and 674, then 16F72 and 74, these last two requiring minor modification again. I’ve programmed the 16LF7x with the same driver code. I don’t think I ever looked into the 16F1xx’s, so I don’t know if they’re different; but I looked into the PIC18, and found it’s _entirely_ different, and the PIC’s own processor runs in the programming process, and you feed it instructions while it’s running, rather than keeping it out of the picture until you’ve programmed the instruction memory. I didn’t feel like figuring out all of that. I want to get into PIC24’s now (as the 18’s don’t go far enough in fixing the mickeymousities of the 16’s), but I have a couple of commercially made programmers now that should handle it.
I should have added: My home-made programmer does have an A/D converter to check the Vpp to make sure it’s within the narrow specified range, and a D/A converter that controls the Vdd (and all the logic-level shifting), because for production, the EPROM-based PICs in particular required programming at 5V and then verifying at higher and lower voltages to verify good erase margin and programming margin. The PICkit 5 steps up the Vpp to 12V, whereas the 16F72 data sheet specifically says it needs to be 13.00V ±0.25V; so I don’t know how they get away with that.
I will +1 on the ‘hack’ here, but my experience with components flopping around on my bench connected by Dupont jumpers does not give me a warm ‘n fuzzy feeling about the the reliability of the prototype. I’m thinking that weekend-programmers would be better served to buy a PIC programmer from AliExpress, eBay, or Amazon. More experienced hardware folk can put the circuit into a permanent build eliminating the ProtoBoards & jumpers.
Trying to “debug” a non-working programmer will drive a novice beyond the state of mental recoverability.
I see Chinese knockoff PicKit 2 programmers for $30 and an original from Microchip for $100 on the first page of ebay listings. If you’re really into how the chips work and want to DIY a programmer, more power to you, but why on earth would anyone else spend the time and effort to build a programmer and then write the code to drive it when an off-the-shelf programmer is so cheap? Hobbyists never fail to amaze me with their cheapness and the low value they put on their time.
What else were they going to do with their free time? Watch the latest round of “Big Brother” or “The Bachelor” or “The Apprentice” or “Game of Thrones” or maybe just the latest soccer or football game? They are better off doing something instead of watching whatever crap comes on TV or the streaming media.
There’s a world of difference between reading about something (or watching a video of it) and actually doing it yourself.
You’d be surprised how often the documented ways of doing things differ from what happens when you do it yourself.
Exactly. You can build your own programmer and spend days debugging it and writing software for it, or you can shell out a few $ and know it’s going to work when you need it. Programming the chip isn’t a part of the project I revel in. Getting the project to do what I want in the way I want is.
I’m FIFTY this year. NOT a free time millionaire. Yet I would NEVER consider spending $100+ on a goddamned programmer in the age when basically all MCUs can either a) be programmed by just plugging them into the nearest USB port or at least can b) be programmed with a simple USB-UART adapter (a non-FTDI one, because fuck those bastards for all eternity).
I’m not a venture capital funded company – I’m just ME, and NOBODY is paying me $100 for anything I can do easily or quickly; so as long as I can get comparable (sorry, actually much superior 32-bit ARMs) MCUs with a built-in USB/serial/CAN bootloader instead, not will I ever pay a king’s ransom for a damned chip programmer.
Not every project requires a 32 bit CPU/MCU. Some are better with little 6 pin SOT23 devices or something in between. If you don’t know what your next project is going to be, or the one after that, etc., having a generalized tool can be very useful. I’d rather spend my time debugging the actual project than the programmer for the project, but not everyone feels that way.
Exactly Max. I had a project come up. Started with a PIC. Programming issues immediately popped up. Switched to Arduino and never looked back.
I see that the python code is using Assembler NOPs to achevieve precise timings, i am wondering if the same could be achieved with Arduino code (in a portable way so that it works on different microcontrollers with different clocks speeds). Trying to convert that code of z ch32v003 flasher to something portable to other micros:
https://gitlab.com/BlueSyncLine/arduino-ch32v003-swio/-/blob/main/swio.c
My recent motherboard has an old time serial port. I made a JDM programmer (few spare parts on hand) with Vpp control and 5V supply. I used PICPgm and it works perfectly for all my PIC’s.
That’s cool, I’ve used a DIY programmer for my PIC16F84A, too. 😃
Software was PICProg/ICprog on Windows 98 at the time, I think.
However, I didn’t use the parasite power thing (stealing power from data pin via diode), but added a battery instead.
That had the advantage that no +/-12v compatible serial port was needed.
A normal TTL signal would do, as long as the software would see a COM Port (some talked to port addresses like 3F8h directly).
It’s been a real long time since I’ve used a PIC. Do they not have the PICkit debugger/programmer any more? I thought the PIC dev environment was nice and the tool was a bargain.
Now a pickit 5 will run you $100 or so, I can definitely see why you may go to the trouble for hobby use. I remember having to upgrade from a pickit 3 to a pickit 4 for a newer (at the time) MCU I was using, I’d imagine you could have the same issue today. Backward compatibility is great though. They also sell the bare board mplab snap (PG164100) for around $40, I’ve never used one but It may be the way to go if all the comparability is there.
The PICKits have gotten more expensive- but they have expanded in capability. The most generic inexpensive programmer/debugger is now the “Snap”.
PIC was great, I used them for many years. Until I used one of the 12F line and had so many problems with it. Extremely weird behavior not documented in the datasheet or in the errata documents, just an awful buggy chip, and I was on a deadline and had to find really bad workarounds. If I had to do another 8-bit embedded miniature mcu it would probably be AVR or just anything but PIC.
Re: decade old
The 16F72 is about 2 decades old.
The first PIC microcontrollers came out in the 1970s as I/O controllers for a more complex processor.
PICKIT2s are still being made. The software to support the 1100+ PICs and PICKIT2/3 is maintained and support by my company.
We are a Microchip Approved Software Partner and this means we support the very latest PICs.
See http://www.pickitplus.co.uk
We are nice guys too!
So the wheel turns.
Back in the days of DOS I wrote most of a PIC programmer application in MSBasic, when you read the programming algorithm you realise it’s really quite simple to program PIC chips, the most difficult bit was reading in the .hex files which for a combination of reasons (I think) including the PIC 14bit ‘word’ are a bit ‘odd’ and don’t/didn’t quite match up with standard Intelhex format.
I’d got it to erase PIC16C84 chips and it was writing to the PIC chips but wasn’t quite right.
Then some software from a bloke called David Tait at my local Uni made an appearance on Usenet and the rest is history.
It’s not the minimal programmer. I once developed an 8-bit PIC16F676 manual programmer using just a 555 timer; a 7805 voltage regulator; a couple of LEDs and tact switches; 9 resistors & 5 capacitors.
It was extremely tedious, but it did work!
https://youtu.be/Rif9cserayI?si=uG0RwOGlrv69aOD-
Part of what sold me on the Arduino ecosystem all those years ago was that the Arduino had its MCU in a socket so you could use it to program bare MCUs. And you can program an Arduino to as an SPI programmer for other AVR microcontrollers. So your $20 Arduino (or cheaper clone) is a swiss army knife tool, that can be used to make other tools or program other microcontrollers, in addition to BEING a microcontroller, if that’s all you need.