If you have ever had to fix a modern desktop motherboard, you might have noticed that the BIOS (UEFI) SPI flash is 1.8V – which means you can no longer use a Raspberry Pi or a CH341 adapter directly, and you’d need to use a 1.8V level shifter of some sort. Now, some of us can wait for a 1.8V level shifter adapter from an online store of your choosing, but [treble] got a “BIOS flash failed” motherboard from Facebook Marketplace, and decided to make it work immediately.
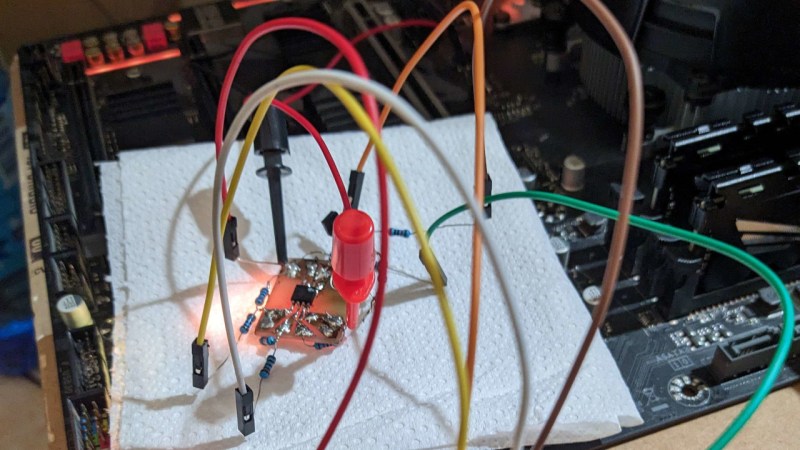
She tells us a story about reviving the motherboard, and there’s one thing she shows that is interesting in particular – a very simple way to level shift 3.3V signals from a serprog-flashed Pi Pico down to the 1.8V that the flash chip required, something you are guaranteed to be able to build out of the parts in your parts bin, only requiring nine resistors and an NPN transistor. If you ever need to reflash BIOS on a modern motherboard, take note. As for 1.8V rail, she ended up tapping the 1.8V power pin of the SPI chip the motherboard itself to power the chip while programming it.
In the end, after swapping the two BIOS chips places and fixing a broken trace mishap, the motherboard booted, and works wonderfully to this day, a much-needed upgrade to [treble]’s toolkit that allows her to do RISC-V cross-compiling with ease nowadays. This is not the first time we see people reflash modern boards with 1.8V chips – if you want to learn more, check out this incredibly detailed writeup! Need to do some further debugging? Use your Pico as a POST card!


Cool save. Did you pay full price for the mobo. I tend to offer scrap value for the ones that will not at least POST. I get a lot of used computes and the POST is where I draw the line, those that do and those that do not.
Also, the shady bios worked that is great. It sucks when you get stuff and you can not get support. It really burns my ass when I get an old piece of network geat that they will not support anymore and they will not at least give you the last firmware for. I am somewhat of a believer that almost anything is out there on the internet if you are willing to do enough digging, and perhaps spin up a VM for fishing in nefarious waters. Anyway, nice save and thanks for the fun read narrative as to how you did it.
i paid 60 euro shipped for the motherboard, i am still running the shady bios dump and don’t wanna test my luck updating it for now..
thanks for your comment!
I really would like to know why manufactureres don’t offer simple dumps of their BIOSs. It can’t be for security or copyright reasons because everyone with a computer a handful of wires can dump and spread it (which apparently nobody does, so shady assholes filled that gap)
I had so many BIOS repairs where I had to skim the shady corners of the web, or piece together bits and bytes from different files to get a working binary.
It sucks, really….
really wish they did provide dumps, i tried taking a look and comparing the bios dump i had with the official files by Gigabyte for the update (they have extension names based on the version) and they seemed pretty similar but there was some extra stuff in there i didn’t know how to work out so i left it at that, didn’t wanna risk ripping all the pads off the motherboard :D
Given that the board has two copies of the bios (m_bios -> main, b_bios -> backup) and even the bios boot block was functional enough to show a log, it sounds like this might have been a trivial repair by either figuring out how to enter the boot block recovery flash mode or by shorting the m_bios or b_bios clock line to ground during power on to get it to boot from the backup flash (or whatever the documented “use backup” for that board is). :)
A quick search for “gigabyte b_bios recovery” finds this:
Method 1
1. Switch off your computer
2. Hold the power button until your computer starts and shuts down again
3. Press the power button again, your backup BIOS should kick in now and should re-flash the backup BIOS if there’s anything wrong with the new one.
Method 2
1. Switch off your computer
2. Hold the power AND the reset button for about 10 sec, then release.
3. It should boot into the backup BIOS now.
Method 3
Only use this if nothing else works.
1. Short out pins 1 and 6 on the main BIOS chip by attaching a jumper to both the pins (pin #1 should be marked with a red dot or whatever)
2. Tell a friend to press the power on button while you do this, because right now you are holding the jumper on the pins
3. Remove the jumper you’re holding between pins 1 and 6 as soon as you hear a beep.
4. Backup BIOS should boot now.
She has more ball than I do to attempt such a repair.
Of course there was a time when I used to unsolder 40 pin DIPs to repair C64’s. Now get off my lawn.
LM317 came into my head when I read this, it’s been so long I had to check they still make them. They do. 1.5-40v variable voltage regulator. Nice work with the transistor though!
This is part of the reason I always overpay anytime there’s a motherboard issue – it’s great that this worked, but I wish dual-bios still came with a jumper you could change to force the backup bios to take precedence. That and no-cpu usb flash support, for when you have an old board and no old cpu to update it with, can save a lot of time and frustration.
that would really be great, but sadly it wasn’t available on this model
Isn’t this just a very common way of level shifting since each SPI line is unidirectional?
The wires from the pico to the EEPROM just need voltage dividers and from the EEPROM to pico just needs a transistor and pull resistor.
not that common yet, and defo worth highlighting as 1.8V tech gets more and more popular!
With a bit of surgery it might be possible to convert a Pi Pico to 1.8V. The RP2040 has 1.8V core voltage available on a pin, and separate IOVDD pins that power GPIO.
wasn’t the core voltage about 1.1V?
Dunno, whatever VREG_VOUT / VREG_IN are used for :) The block diagram in the RP2040 shows “Core Supply Regulator” in the same purple color as those pins.
Ah, never mind. Yes, you are right, the regulator outputs 1.1V. I should look less at pretty pictures and actually read the datasheet 🥸