When temperatures plummet, there’s nothing like a hot beverage to keep you warmed up inside. [] aka [Tim] sure does fancy a nice cuppa, but only within a certain temperature range is it ideal to drink. In an attempt to signal when the time is just right, he created various iterations of a hot beverage coaster.
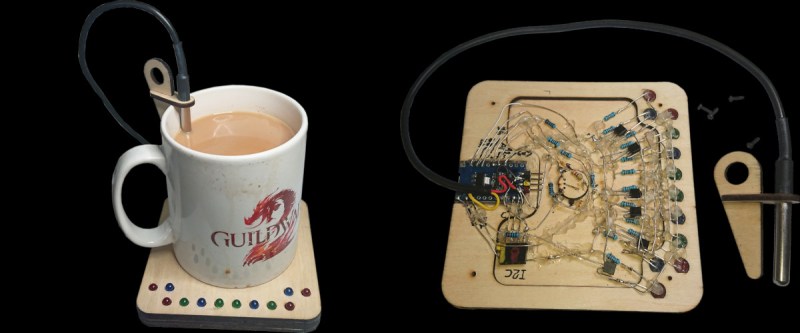
To be clear, this is a plywood sandwich that does not keep the beverage warm, though that would be an interesting addition to the project. Rather, it indicates when the beverage’s temperature is just right using LEDs. When it’s too hot, the red LEDs are lit. The green LEDs flash while it’s just right, and once [Tim]’s tea has gone cold, the blue LEDs take center stage.
The brains of the operation is an STM8S103F module, aka the Blue Pill, which is paired with a DS18B20 temperature sensor. [Tim]’s original coaster has one in a TO-92 package embedded in the top layer, but ultimately he went with the probe version as it reads a truer temperature by virtue of being directly in the liquid. Be sure to check out the video after the break which covers planning the original version.
If you do want to keep you drink warm, here’s an ESP8266-based solution. If you’re more into looks, check out this blinkencoaster.


Cool project and that’s not something I just say in the heat of the moment of typing this comment. I don’t think I’d be building this design myself as I’m afraid to get cold feet once (during the warm up time of the soldering iron) I start to think about what the wife might say regarding the sensor contraption dangling in my muck. But perhaps a more direct approach at the bottom of the cup in the center of the coaster might be more of my cup of tea. Although that requires some calibration as the results per muck might vary. The basic idea really is some hot stuff if you’d ask me and if it would be made commercially available it might get a warm reception and be selling like hot cakes. Anyway I’m glad not to be in the hot seat regarding these design decisions. I hope this project gets a warm welcome and stirs up the muck business. It’s nice to see that the project involves a real working circuit and a real muck and isn’t just a silly non working mockup.
The STM8S03F is not the “blue pill”, the instructible calls it the “little blue pill”. The “blue pill” boards are STM32F103 boards. I’ve normally heard of the STM8S boards refered to as “don’t use those, there’s way better choices out there”
The rest of the design speaks similarly to me. I wish [Tim] the best and I hope they keep on learning about electronics and microcontrollers.
TBH, I thought this was a disregarded problem for those who care about such things. Don’t reasonably-priced mugs with phase-change wax linings exist to fix this very problem? Obviously, the benefit of doing a project like this is never just the finished product, but there are battery-free devices out there that will not only monitor the temperature of your drink, but actively cool the drink to the desired temperature and then actively keep it at that temperature for longer than it would be otherwise.
I mean, this is plenty fine for solving the problem as presented. I am just surprised that people are still having this problem at all.
There have been a few mugs/floaty things containing paraffin wax marketed.
They basically don’t work. The ratio of coffee/paraffin is too low.
Besides if you aren’t drinking you coffee before it gets cold in an insulated mug, you should get a coffee foul. Three and it’s decaf for you.
IIRC there are color changing pigments that could turn color. But what temp?
Like undrinkable can pee. Mountains on the can that turn color when so cold you can’t taste the contents.
I have started (and never finished) such a project based on an IR sensor, it worked fine, but has to be recalibrated on the mug material, so glass mugs give a wholly different IR profile than porcelain ones.
A friend of mine recommended using two IR sensors sensitive to different but known wavelengths. Then compare the relative received energy. I haven’t tested it yet, though.
So, this is a really just a thermometer that doesn’t tell you the actual temperature, but still requires power?
Too Hot — Yummy — Too Cold
In an Arduino world, “map()” can easily deal with these 3 states an the uC has a decent A/D which means that a dirt-cheap 10K thermistor can be utilized.
Ref my very, very old sample code:
https://forum.arduino.cc/t/interrupt-sleep-attiny85-lot-of-questions/979112/8
In the above, a sacrificial ceramic cup would be drilled with an appropriate bit to create a hole just large enough to insert the thermistor. Secure and seal everything with FDA approved 2-part Epoxy (Amazon, etc.) The base can be configured with a set of contacts to connect with the bottom of the cup where the contacts are arranged in concentric circles.
My preferred approach would be to use an IR thermal sensor, like the MLX90614, and place it on a flexible gooseneck to point into the coffee cup. The Arduino circuitry for these sensors is very simple.
https://lastminuteengineers.com/mlx90614-ir-temperature-sensor-arduino-tutorial/
I would find this really cool if the probe was built directly into the mug. Either a passive piece of metal that conducted the liquid better, or a small active probe inside the cup.