Recently [nibbler]’s Evakool 55L vehicle fridge started to act strangely, reporting crazy temperature errors and had no chance of regulating. The determination was that the NTC thermistor was toast, and rather than trying to extricate and replace this part, it was a lot easier to add a new one at a suitable location
A straight swap would have been boring, so this was a perfect excuse for an overboard hack. Reverse engineering the controller wouldn’t be easy, as the data wasn’t available, as is often the case for many products of this nature.
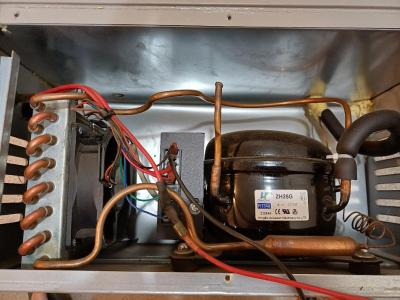
While doing a brain transplant, the hacker way, we can go overboard and add the basics of an IoT control and monitoring system. To that end, [nibbler] learned as much as possible about the off-the-shelf ZH25G compressor and the associated compressor control board. The aim was to junk the original user interface/control board and replace that with a Raspberry Pi Pico W running CircuitPython.
For the display, they used one of the ubiquitous SH1106 monochrome OLED units that can be had for less than the cost of a McDonald’s cheeseburger at the usual purveyors of cheap Chinese electronics. A brief distraction was trying to use a DS18B20 waterproof thermometer probe, which they discovered didn’t function, so they reverted to tried and trusted tech — a simple NTC thermistor.
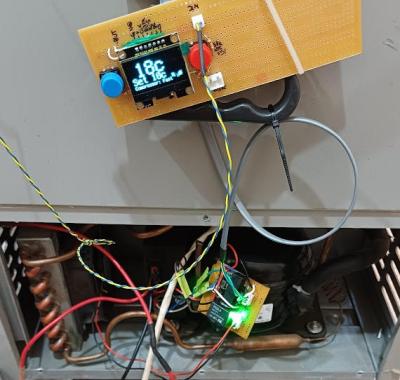
The final puzzle piece was to interface the Pico to the compressor controller. The controller expected a variable resistance to control the speed, for which they could have used a digitally controlled potentiometer. However, after failing to tame this particular beast, an easier solution was to build a small PCB with a few relays and some fixed resistors and call it a hack.
An annoyance was the lack of interrupt support in CircuitPython. This meant that interpreting the fault codes from the controller would be a bit tricky. The solution was to wedge in another microcontroller, a small Arduino. Its job is to sit there, listen for commands on the serial port, control the relay board to drive the compressor, listen for any error codes, and pass those back to the Pico. Of course, this could have all been done directly on the Pico, just not with CircuitPython, and a lot more learning would have been needed.
Of course, you need to own a working refrigerator to hack it, but you can easily build it from scratch. Even on a tight budget, you can get your beers cold. Needs must!


Another advantage of this is you can adjust the temperature to fit the kinds of drinks you like. Standard refrigerator temperatures are just way too cold for most beer.
I’ve seen them used on deep-freeer to turn it into a full size kegarator, or lagering fridge.
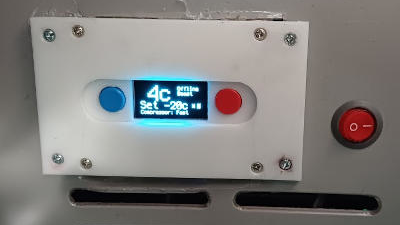
There are off-the-shelf solutions for these but I rather like the display on this one.
“way too cold for most beer”
I don’t hear that very often here in Australia particularly around north western Queensland.
That’s because: ‘Aussie beer is like making love in a canoe.’
I applaud the write-up of the repair. It exudes a real hacker spirit: try your best with the stuff you have or get your hands on. I like it.
While I don’t understand the fridge (does it really cost $ 1500?) I want to point out some other details I noticed.
The ds18b20 has a lower limit of -10° C (that is 14 F), the fridge might get lower than that. BMP280 (that is the cheap BOSCH thing you get from Aliex if you do not pay attention to the item selector of that exceptional cheap BME280 offer) goes down to -40° C/F.
And they wrote that they went shopping for parts. So why not add some µC with glued display to the bill? Obvious popular choice are some ESP thingys for 6 € or so.
Add a SSR-100DD and SSR-10DD and the entire board could be replaced. Or do I miss something here?
But again, A+ for it.
The problem with (nearly) all SSR’s is that they fail on. Thinking about it for a fridge/freezer that would probably be the ideal failure mode (But not for the heating element of a reflow oven).
That was my initial thought (an ESP with built-in screen). Unfortunately, the one I had was recovered from a previous project, and I think that I broke it somewhere along the way as some of the pins were behaving really weird.
Initially I had only purchased the screens on that order to get to the $25 order minimum, I was actually making that order mainly for a couple of DS18B20. By the time I had realised my recovered unit was faulty, the order had arrived. At this point, I was getting pretty sick of working out in 35c+ days without cool beverages available, so I took the quick option and slapped the Pico W I already had on to one of the screens.
Hadn’t realised the lower limit of the DS18B20, but mine failed at ambient temperature (about 28c). Trying to be cheap led me to some of the usual online places, and I don’t think I was discerning enough to avoid a counterfeit unit. I’ll keep the Bosch unit in mind, thanks!
I guess you could say this should serve as a lesson in patience and counterfeits?
Also should mention, it was originally AU$1000, marked down to $500 on clearance. I then had $200 of gift cards for the retailer. So really it was $300 for the fridge.
I used to have a Peltier based fridge, and that was garbage.
FWIW the U.S. original price for equivalent items without any of that is under AU$450 / 300USD and less than half that for smaller versions, so we’d naturally tend to have some sticker shock at the original number in (AU) $.
Most fridge controller boards include some kind of safety features so I guess that [nibbler] wanted to keep them alive, so It was a logical step not to interface directly to the compressor motor, although possible, if you do it right.
The specs for the DS18B20 say it’s useable down to -55°C (-67°F). The -10°C/14°F figure is just for the lower bounds of its +/- 0.5° C precision range. My guess is that for most purposes the control of a refrigerator/freezer doesn’t require much in the way of precision, so a DS18B20 is probably fine.
Of course, those specs are for a genuine DS18B20. Who knows the performance you’ll get from the run-of-the-mill supposed DS18B20 devices you get from most places that sell them?
That having been said, I have a temperature-and-power monitor on a chest freezer that uses cheap-as-dirt sensors from Amazon. It senses down to at least -5° F with no problems so far.
You are right and I am wrong.
I was fooled by a seller site that stated the limits in its shopping system. I should know better not to believe those data and always go to the real source.
After the main board was toast, My old MABE refrigerator is running thanks to an attiny85. It takes the average of 10 readings from the thermistor and the temperature pot to decide if is time to turn on or off the compressor. I was not sure how the defrost resistor worked at that time so I just removed the corresponding relay, I have a better understanding now and I think I should update the code but the thing is working fine so…
Hmm, seems I have evaporating comments.
I’ve updated the linked page to shed more light on my display purchasing decision. tl;dr I bought the screens as a consequence of buying the ds18b20, not the other way around. Was just too tired to write this correctly at the time, so I have corrected it now.
Some compressor interfacing info I found said it ran on 12v, others said it was driven in some kind of three phase arrangement. I thought it safer to leave it.
Looking at your image of the compressor driver PCB I totally agree it’s in fact a brushless (3 phase BLDC) motor driver. It features three power output cables and 6 MOSFETS attached to them. A typical brushless driver configuration. Plus, you’d need much less complexity to drive a DC brushed motor. So your decision was pretty wise, to use it as-is.
Love repair hacks. Great job bringing scrap back to life.
>The control panel PCB is relatively simple, with an STM STC15W408AS as the brains of the operation.
reminds me of all the super cheap STM8 boards available, here example of $1.5 Thermostat one https://hackaday.io/project/26258-w1209-data-logging-thermostat
more boards supported from same author https://hackaday.io/project/16097-eforth-for-cheap-stm8s-gadgets
Barry, is that you?