Bonkers Nerf Blaster Sprays Balls Everywhere

Nerf blasters are fun toys, to be sure. However, they’re limited by factors like price and safety and what Hasbro thinks parents will put up with. Few caregivers would ever countenance a build like this one from [ItllProbablyWork].

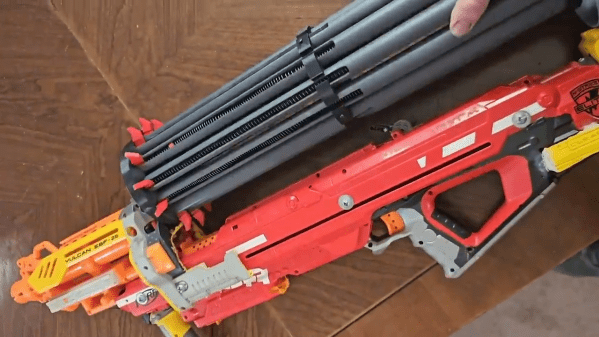
It’s a blaster designed to fire 48 darts in a second or so, or a truly ludicrous 288 Nerf balls. Like so many rapid fire blaster designs, it’s based on a pair of rotating wheels which fling darts out at rapid speed. The trick to the rapid fire ability is the delivery of ammunition. In this case, the blaster has a rotating drum of 12 barrels, which can each be loaded with 4 darts or 24 balls. As the drum rotates into position, a trigger mechanism unlatches a spring which forces the contents of the barrel out through the wheels and on to the target.

It’s mostly pretty good with darts, but with balls, it tends to send them flying everywhere, including jamming a bunch into the blaster’s internals. It is very funny to watch, though.

We’ve seen some other great blaster builds recently, too. Video after the break.

Continue reading “Bonkers Nerf Blaster Sprays Balls Everywhere”

Making Floating Point Calculations Less Cursed When Accuracy Matters

Inverting the earlier exponentiation to reduce floating point arithmetic error. (Credit: exozy)

An unfortunate reality of trying to represent continuous real numbers in a fixed space (e.g. with a limited number of bits) is that this comes with an inevitable loss of both precision and accuracy. Although floating point arithmetic standards – like the commonly used IEEE 754 – seek to minimize this error, it’s inevitable that across the range of a floating point variable loss of precision occurs. This is what [exozy] demonstrates, by showing just how big the error can get when performing a simple division of the exponential of an input value by the original value. This results in an amazing error of over 10%, which leads to the question of how to best fix this.

Obviously, if you have the option, you can simply increase the precision of the floating point variable, from 32-bit to 64- or even 256-bit, but this only gets you so far. The solution which [exozy] shows here involves using redundant computation by inverting the result of ex. In a demonstration using Python code (which uses IEEE 754 double precision internally), this almost eradicates the error. Other than proving that floating point arithmetic is cursed, this also raises the question of why this works.

Continue reading “Making Floating Point Calculations Less Cursed When Accuracy Matters”

Celebrating Pi Day With A Ghostly Calculator

For the last few years, [Cristiano Monteiro] has marked March 14th by building a device to calculate Pi. This year, he’s combined an RP2040 development board and a beam-splitting prism to create an otherworldly numerical display inspired by the classic Pepper’s Ghost illusion.

The build is straightforward thanks to the Cookie board from Melopero Electronics, which pairs the RP2040 with a 5×5 matrix of addressable RGB LEDs. Since [Cristiano] only needed 4×5 LED “pixels” to display the digits 0 through 9, this left him with an unused vertical column on the right side of the array. Looking to add a visually interesting progress indicator for when the RP2040 is really wracking its silicon brain for the next digit of Pi, he used it to show a red Larson scanner in honor of Battlestar Galactica.

With the MicroPython code written to calculate Pi and display each digit on the array, all it took to complete the illusion was the addition of a glass prism, held directly over the LED array thanks to a 3D-printed mounting plate. When the observer looks through the prism, they’ll see the reflection of the display seemingly floating in mid-air, superimposed over whatever’s behind the glass. It’s a bit like how the Heads Up Display (HUD) works on a fighter jet (or sufficiently fancy car).

Compared to his 2023 entry, which used common seven-segment LED displays to show off its fresh-baked digits of Pi, we think this new build definitely pulls ahead in terms of visual flair. However, if we had to pick just one of [Cristiano]’s devices to grace our desk, it would still have to be his portable GPS time server.

Continue reading “Celebrating Pi Day With A Ghostly Calculator”

Building A Hydraulic Loader For A Lawn Tractor

Lawn tractors are a great way to mow a large yard or small paddock. They save you the effort of pushing a mower around and they’re fun to drive, to boot. However, they can be even more fun with the addition of some extra hardware. The hydraulic loader build from [Workshop from Scratch] demonstrates exactly how.

The build is based around a John Deere LX188 lawn tractor, which runs a 17 horsepower Kawasaki engine and features a hydrostatic transmission. It’s a perfectly fine way to mow a lawn. In this case, though, it’s given new abilities with the addition of a real working loader. It’s fabricated from raw steel from the arms right down to the bucket. It’s all run from a hydraulic pump, which is mounted to the engine via an electromagnetic clutch. The clutch can be engaged when it’s desired to use the hydraulics to actuate the loader.

As you might expect, the humble lawn tractor isn’t built for this kind of work. Thus, to support the extra equipment, the mower was also given some frame reinforcements and a wider track for stability.

If you’re trying to give your neighbours mower envy, this is how you do it. Or, you could go another route entirely. Video after the break.
Continue reading “Building A Hydraulic Loader For A Lawn Tractor”

A new display wedged into a car-based fridge

New Brains Save 12 V Fridge From The Scrap Heap

Recently [nibbler]’s Evakool 55L vehicle fridge started to act strangely, reporting crazy temperature errors and had no chance of regulating. The determination was that the NTC thermistor was toast, and rather than trying to extricate and replace this part, it was a lot easier to add a new one at a suitable location

Bog-standard fridge internals

A straight swap would have been boring, so this was a perfect excuse for an overboard hack. Reverse engineering the controller wouldn’t be easy, as the data wasn’t available, as is often the case for many products of this nature.

While doing a brain transplant, the hacker way, we can go overboard and add the basics of an IoT control and monitoring system. To that end, [nibbler] learned as much as possible about the off-the-shelf ZH25G compressor and the associated compressor control board. The aim was to junk the original user interface/control board and replace that with a Raspberry Pi Pico W running CircuitPython.

For the display, they used one of the ubiquitous SH1106 monochrome OLED units that can be had for less than the cost of a McDonald’s cheeseburger at the usual purveyors of cheap Chinese electronics.  A brief distraction was trying to use a DS18B20 waterproof thermometer probe, which they discovered didn’t function, so they reverted to tried and trusted tech — a simple NTC thermistor.

Continue reading “New Brains Save 12 V Fridge From The Scrap Heap”

Retrotechtacular: Air Mail For The Birds

Today, if you want to send a message to a distant location, you’ll probably send an e-mail or a text message. But it hasn’t always been that easy. Military commanders, in particular, have always needed ways to send messages and were early adopters of radio and, prior to that, schemes like semaphores, drums, horns, Aldis lamps, and even barrels of water to communicate over distances.

One of the most reliable ways to pass messages, even during the last world war, was by carrier pigeon.  Since the U.S. Army Signal Corps handled anything that included messages, it makes sense that the War Department issued TM 11-410 about how to use and care for pigeons. Think of it as the network operations guide of 1945. The practice, though, is much older. There is evidence that the Persians used pigeons in the 6th century BC, and Julius Caesar’s army also used the system.

You wouldn’t imagine that drawing an assignment in the Signal Corps might involve learning about breeding pigeons, training them, and providing them with medical attention, but that’s what some Signal Corps personnel did. The Army started experimenting with pigeons in 1878, but the Navy was the main user of the birds until World War I, when the U.S. Pigeon Intelligence Service was formed. In World War II, they saw use in situations where radio silence was important, like the D-Day invasion.

The Navy also disbanded its earlier Pigeon Messenger Service. It then returned to avian communications during the World Wars, using them to allow aviators to send messages back to base without radio traffic. The Navy had its own version of the pigeon manual.

Continue reading “Retrotechtacular: Air Mail For The Birds”

Dev Board Watch Takes Path Of Least Resistance

Building your own watch or clock is kind of a maker’s rite of passage. Once upon a time, if you went with a wrist watch, you’d typically work on producing your own compact PCB with everything crammed into a typical watch form factor, maybe relying on a simple binary output for compactness and simplicity. Times have changed, however, and [Arnov]’s design is altogether different in its construction.

The build relies on a XIAO ESP32-C3 microcontroller board as the brains of the operation. It’s paired with the XIAO expansion board. It’s designed as a carrier for the ESP32-C3, giving it a bunch of IO that’s accessible over readily-accessible connectors. It also features a display, a real-time clock, and a battery — pretty much the three main things you’d need to add to an ESP32 to turn it into a watch.

Thus, with the electronics pretty much done, it was simply up to [Arnov] to turn the device into a watch. He achieved this by screwing the frame and strap of an old Casio watch to a 3D printed carrier for the XIAO expansion board. With that done, it was simply a matter of writing the code to show the time from the RTC on the display. There’s no connectivity features, no smart stuff going on — just the time and date for your perusal.

Some might decry the project for simply slapping a watch band on a devboard. Or, you could look at how this indicates just how fast and easy development can be these days. Once upon a time, you could spend weeks trying to find a cheap display and then further weeks trying to get it working with your microcontroller. Now you can spend $20, get the parts in a few days, and get your project blasting along minutes later.

If you’ve done an altogether more ornate watch build of your own, we’d love to see that, too. Show us on the tipsline!