The usual way to put a durable threaded interface into a 3D print is to use a heat-set insert, but what about other options? [Thomas Sanladerer] evaluates a variety of different threaded inserts, none of which are actually made with 3D printing in mind but are useful nevertheless.
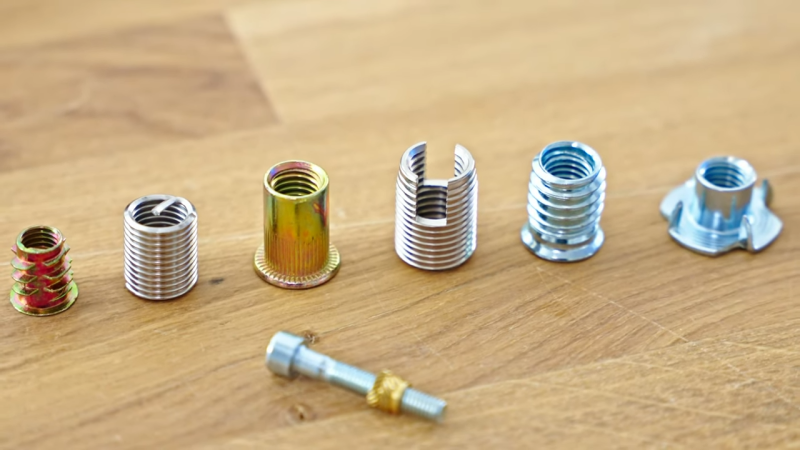
 There are a number of other easily-available threaded inserts, including the rivnut (or rivet nut), chunky hex socket threaded inserts intended for wood and furniture, heli-coils or helical inserts (which resemble springs), self-tapping threaded inserts (also sold as thread adapters), and T-nuts or prong nuts. They all are a bit different, but he measures each one and gives a thorough rundown on how they perform, as well as offering his thoughts on what works best.
[Thomas] only tests M5 fasteners in this video, so keep that in mind if you get ideas and go shopping for new hardware. Some of the tested inserts aren’t commonly available in smaller sizes. Self-tapping threaded inserts, for example, are available all the way down to M2, but the hex socket threaded inserts don’t seem to come any smaller than M4.
These threaded inserts might be just what your next project calls for, so keep them in mind. Heat-set inserts are of course still a great option, and our own Sonya Vasquez can tell you everything you need to know about installing heat-set inserts into 3D printed parts in a way that leaves them looking super professional.


Good point. Without watching the video I think we can all agree that the answer to the big question will be: “it depends…”. Another question is would be “is it really important”, but also that depends.
Look at the video as more of a “how to use and install these different adapters in 3D printed parts”, with a side order of “here is how they stack up to each other strength-wise”. There isn’t really a single best one, it depends on the 3D printed part as well as what one needs and expects from it.
For example, the prong nuts are (unsurprisingly) the strongest… but they require access to the back of the part for installation. They also require a special shape to be 3D printed into the part to accommodate them. Heli-coils are cheap and available in every size under the sun (they also performed better than expected in the strength tests) but they must be installed into a properly-threaded hole which is more of a hassle. And so on.
That being said, my personal overall favorite is the self-tapping threaded adapters (and Thomas does mention he likes them as well) for a number of reasons, but while not super expensive they are far from being the cheapest option out there.
I think the idea to use this kind of inserts is banal, but these inserts are normaly made to repair threads with high stress. So they are of high quality and also high price. So for plastic perhaps to expensive?
Olaf
Maybe there are a handful of custom functional prints that might justify higher quality fasteners. I’m having trouble thinking of one though when a small nut can be embedded into parts pretty easily most of the time.
Most of those “alternatives” cost 10 times more then the heat set inserts. The Heli-coils for example I bought a set 10 years ago for $40.00 to fix a transmission pan leak.
In my experience, I have found that inserts melted into place are impossible to accurately align normal to the surface plane of the part. I think that a press is needed.
I ussually heat the insert and press it down until about 1 mm remains. Then I quickly turn the the part over and press it down on a flat surface. This way the insert sits flush with and normal to the surface of the part.
I always press fit rivet nuts into a print. They work pretty great when you get the hole size just right. The splines bite into the plastic and almost never spin when tightening or loosening the fastener.
Interesting press that uses rubber bands to provide the force needed to place inserts.
https://cybernightmarket.com/products/heat-set-insert-press
Highly overpriced and over-engineered, use a dremel drill press or any of the 43mm collar devices, download a dremel hakko iron holder from thingiverse or a 43mm collar hakko iron holder and you’re done.
It’s quite a shame of putting in all this effort and to make such a nice well choreographed video, and then using a torque meter to measure pullout force. Torque to linear force is not a fixed relationship. Especially when using different materials (Brass, stainless steel, zinc, zinc plated)
But in the end it probably does not matter much because the results are predictable. Strength increases with the diameter of the nut, with the pronged T-nuts being the strongest. Do note though there is a lot of quality difference between these. The ones shown with the circles (spiral) stamped into the flange tend to be from the thickest steel, and have well formed thread and are of good quality. I’ve tried to buy a few thousand of these nuts from an internet store here in the Netherlands, but they were of such poor quality that I send them back (and got a refund).
It would be really interesting to see further automation. Such as a 3D printer printing a recess, then inserting a nut and then printing over it to fix the nut into place.
“Such as a 3D printer printing a recess, then inserting a nut and then printing over it to fix the nut into place”
This has been my go to method when repeated screwing/unscrewing is expected. But I don’t halt the print and insert the nut and print over it, I just print with the cavity on the “backside”. I then heat inset or glue the nut into place. Like the T nuts shown above the part will break before they pull through. The downside is a thicker part to cover the depth of the nut cavity.
On the other hand it might more realisticaly simulate real-world scenario. Because thread inserts are usualy abused in both tension and torque. not just tension.
The best way if the design allows it is to put the threaded insert in from the opposite side of the part that the screw goes in to. For the screw to pull out you would have to plow the thread insert through solid plastic. And when you insert them you can align them properly by using a longer fastener screwed in to the front of the insert and pull it in to the part while you heat from the rear. And then you can simply use hex or square nuts instead and pull them into a slightly undersize hole. Nylocks are an option, too, for things you don’t plan to disassemble.
Just use course thread fasteners and tap the plastic, unless you’re screwing and unscrewing something more than a few times over the life of the plastic part. imho ANY threaded insert for 3d printed parts is just overkill/too much complication. Just dont try printing the threads.
If the part geometry permits, dialing in the sizes to press-fit a conventional hex nut from the backside works well, and is cheap and quick.
i know these are convenient and useful in a lot of settings and i’m glad to have lots of options. but personally i like my PLA in compression and my metal in tension. so when it’s plausible i want my bolts to go all the way through the piece and emerge on the other side to meet a nut.
Having spent the last couple days assembling IKEA flatpack furniture, my appetite for reading about threaded inserts is substantially diminished.
I usually design a thread into the part if it’s not going to be disassembled often. Another YouTuber tested and it outperforms heated inserts for that use case.
Otherwise hex nuts are cheap and easy to get. If you are creative there’s a million ways to permanently affix hex nuts including just pausing the print to drop them in before printing over them.
What about just a hex nut in a pocket? Cheap, simple and hard to pull out or twist. Especially if CA glued in place.
Thank you for the informative video. It will come in handy…
A lot of other people have mentioned inserting a regular hex nut into the back (or embedding it into a print), but it would be nice if you could do a run and compare the results to what you have in your video for comparison.