Alternate Threaded Inserts For 3D Prints

The usual way to put a durable threaded interface into a 3D print is to use a heat-set insert, but what about other options? [Thomas Sanladerer] evaluates a variety of different threaded inserts, none of which are actually made with 3D printing in mind but are useful nevertheless.

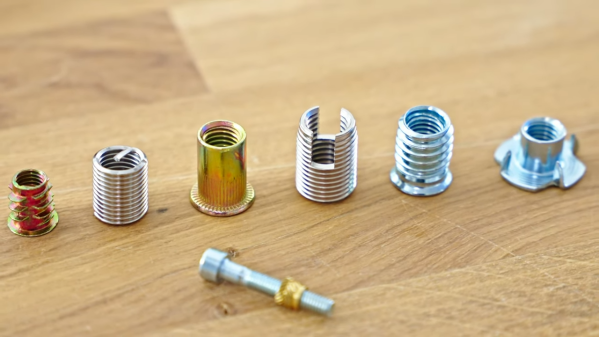
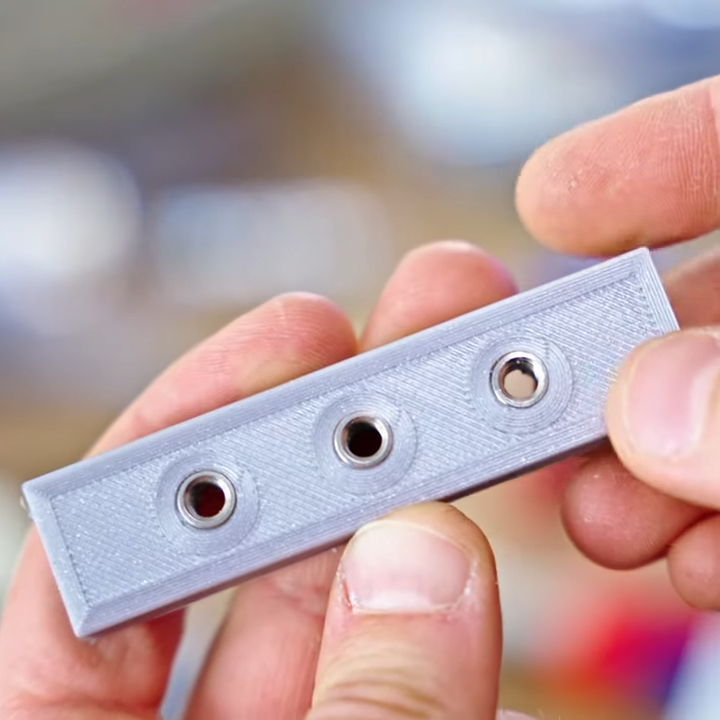
There are a number of other easily-available threaded inserts, including the rivnut (or rivet nut), chunky hex socket threaded inserts intended for wood and furniture, heli-coils or helical inserts (which resemble springs), self-tapping threaded inserts (also sold as thread adapters), and T-nuts or prong nuts. They all are a bit different, but he measures each one and gives a thorough rundown on how they perform, as well as offering his thoughts on what works best.

[Thomas] only tests M5 fasteners in this video, so keep that in mind if you get ideas and go shopping for new hardware. Some of the tested inserts aren’t commonly available in smaller sizes. Self-tapping threaded inserts, for example, are available all the way down to M2, but the hex socket threaded inserts don’t seem to come any smaller than M4.

These threaded inserts might be just what your next project calls for, so keep them in mind. Heat-set inserts are of course still a great option, and our own Sonya Vasquez can tell you everything you need to know about installing heat-set inserts into 3D printed parts in a way that leaves them looking super professional.

Continue reading “Alternate Threaded Inserts For 3D Prints”

Building A Tape Echo In A Coke Can Tape Player That Doesn’t Really Work

Back in the 1990s, you could get a tape player shaped like a can of Coca Cola. [Simon the Magpie] scored one of these decks and decided to turn it into a tape echo effect instead. It didn’t work so well, but the concept is a compelling one. You can see the result in the video below.

The core of the effect is a tape loop, which [Simon] set up to loop around a pair of hacked-up cassette shells. This allows him to place one half of the loop in the Coca-Cola cassette player and the other half in a more conventional desktop tape deck. A 3D-printed bracket allows the two decks and the tape loop to be assembled into one complete unit.

The function is simple. The desktop tape deck records onto the loop, with the Coca-Cola unit then playing back that section of tape a short while later. Hey, presto — it’s a tape delay! It’s super lo-fi, though, and the tape loop is incredibly fragile.

Continue reading “Building A Tape Echo In A Coke Can Tape Player That Doesn’t Really Work”

Compaq Portable III Is More Than Meets The Eye

The Compaq Portable III hails from the 386 era — in the days before the laptop form factor was what we know today. It’s got a bit of an odd design, but a compelling one, and the keyboard is pretty nifty, too. [r0r0] found one of these old-school machines and decided it was well worth refitting it to give it some modern grunt.

The Portable III ended up scoring a mini-ITX build, with an AMD Ryzen 7 3700X and an AMD RX580 GPU. Cramming all this into the original shell took some work, like using a vertical riser to fit in the GPU. Hilariously, the RGB RAM sticks are a little bit wasted when the enclosure is closed.

For the purists out there, you’ll be relieved to know the machine’s original plasma display was dead. Thus, a larger modern LCD was fitted instead. However, [r0r0] did play around with software to emulate the plasma look just for fun.

It’s funny to think you could once score one of these proud machines for free at a swap meet.

Continue reading “Compaq Portable III Is More Than Meets The Eye”

Plasma Cutter On The Cheap Reviewed

If you have a well-equipped shop, it isn’t unusual to have a welder. Stick welders have become a commodity and even some that use shield gas are cheap if you don’t count buying the bottle of gas. But plasma cutters are still a bit pricey. Can you get one from China for under $300? Yes. Do you want one that cheap? [Metal Massacre Fab Shop] answers that question in the video below.

First impressions count, and having plasma misspelled on the unit (plasme) isn’t promising. The instructions were unclear, and some of the fittings didn’t make him happy, so he replaced them with some he had on hand. He also added some pipe tape to stop any leaking.

The first test was a piece of quarter-inch steel at 35 amps. The machine itself is rated to 50 amps. Sparks ensued, and with a little boost in amperage, it made a fair-looking cut. At 50 amps, it was time to try a thicker workpiece. It made the cut, although it wasn’t beautiful. The leaking regulator and the fact that he can’t run the compressor simultaneously as the cutter didn’t help.

From the look of it, for light duty, this would be workable with a little practice and maybe some new fittings. Unsurprisingly, it probably isn’t as capable as a professional unit. Still could be very handy to have.

It is possible to convert a welder into a plasma cutter. A handheld unit like this probably won’t benefit from a Sharpie.

Continue reading “Plasma Cutter On The Cheap Reviewed”

3D Printing A Cassette Is Good Retro Fun

The cassette is one of the coolest music formats ever, in that you could chuck them about with abandon and they’d usually still work. [Chris Borge] recently decided to see if he could recreate these plastic audio packages himself, with great success.

He kicked off his project by printing some examples of an open source cassette model he found online. The model was nicely accurate to the original Compact Cassette design, but wasn’t exactly optimized for 3D printing. It required a great deal of support material and wasn’t easy to customize.

[Chris] ended up splitting the model into multiple components, which could then be assembled with glue later. He then set about customizing the cassette shells with Minecraft artwork. Details of the artwork are baked into the model at varying heights just 1/10th of the total layer height. This makes it easy to designate which sections should be printed with which filament during his multi-colored print. And yet, because the height difference is below a full layer height, the details all end up on the same layer to avoid any ugly gaps between the sections. From there, it’s a simple matter of transferring over the mechanical parts from an existing cassette tape to make the final thing work.

It’s a neat trick, and the final results are impressive. [Chris] was able to create multicolored cassettes that look great. It’s one of the better uses we’ve seen for a multi-colored printer. This would be an epic way to customize a mixtape for a friend!

We’ve seen some great 3D printed cassettes before, too, like these retro reel-to-reel lookalikes.

Continue reading “3D Printing A Cassette Is Good Retro Fun”

Logic Analyzers: Decoding And Monitoring

Last time, we looked into using a logic analyzer to decode SPI signals of LCD displays, which can help us reuse LCD screens from proprietary systems, or port LCD driver code from one platform to another! If you are to do that, however, you might find a bottleneck – typically, you need to capture a whole bunch of data and then go through it, comparing bytes one by one, which is quite slow. If you have tinkered with Pulseview, you probably have already found an option to export decoded data – all you need to do is right-click on the decoder output and you’ll be presented with a bunch of options to export it. Here’s what you will find:

2521888-2521888 I²C: Address/data: Start
2521896-2521947 I²C: Address/data: Address write: 22
2521947-2521954 I²C: Address/data: Write
2521955-2521962 I²C: Address/data: ACK
2521962-2522020 I²C: Address/data: Data write: 01
2522021-2522028 I²C: Address/data: ACK
2522030-2522030 I²C: Address/data: Start repeat
2522038-2522089 I²C: Address/data: Address read: 22
2522089-2522096 I²C: Address/data: Read
2522096-2522103 I²C: Address/data: ACK
2522104-2522162 I²C: Address/data: Data read: 91
2522162-2522169 I²C: Address/data: NACK
2522172-2522172 I²C: Address/data: Stop

Whether on the screen or in an exported file, the decoder output is not terribly readable – depending on the kind of interface you’re sniffing, be it I2C, UART or SPI, you will get five to ten lines of decoder output for every byte transferred. If you’re getting large amounts of data from your logic analyzer and you want to actually understand what’s happening, this quickly will become a problem – not to mention that scrolling through the Pulseview window is not a comfortable experience.

The above output could look like this: 0x22: read 0x01 ( DEV_ID) = 0x91 (0b10010001). Yet, it doesn’t, and I want to show you how to correct this injustice. Today, we supercharge Pulseview with a few external scripts, and I’ll show you how to transfer large amounts of Sigrok decoder output data into beautiful human-readable transaction printouts. While we’re at it, let’s also check out commandline sigrok, avoiding the Pulseview UI altogether – with sigrok-cli, you can easily create a lightweight program that runs in the background and saves all captured data into a text file, or shows it on a screen in realtime! Continue reading “Logic Analyzers: Decoding And Monitoring”

Analyzing The Code From The Terminator’s HUD

The T-800, also known as the Terminator, was like some kind of non-giving up robot guy. The robot assassin viewed the world through a tinted view with lines of code scrolling by all the while. It was cinematic shorthand to tell the audience they were looking through the eyes of a machine. Now, a YouTuber called [Open Source] has analyzed that code.

The video highlights one interesting finds, concerning graphics seen in the T-800’s vision. They appear to match the output of various code listings and articles in Nibble Magazine, specifically its September 1984 issue. One example spotted was a compass rose, spawned from an Apple Basic listing. it was a basic quiz to help teach children to understand the compass. Another graphic appears to be cribbed from the same issue in the MacPaint Patterns section.

The weird thing is that the original film came out in October 1984 — just a month after that article would have hit the news stands. It suggests perhaps someone involved with the movie was also involved or had access to an early copy of Nibble Magazine — or that the examples in the magazine were just rehashed from some other earlier source.

Code that regularly flickers in the left of the T-800s vision is just 6502 machine code. It’s apparently just a random hexdump from an Apple II’s memory. At other times, there’s also 6502 assembly code on screen which includes various programmer comments still intact. There’s even some code cribbed from the Apple II DOS 3.3 RAM Disk driver.

It’s neat to see someone actually track down the background of these classic graphics. Hacking and computers are usually portrayed in a fairly unrealistic way in movies, and it’s no different in The Terminator (1984). Still, that doesn’t mean the movies aren’t fun!

Continue reading “Analyzing The Code From The Terminator’s HUD”