The good part about older game consoles like the Super Nintendo is that they have rather rudimentary region locks, but unfortunately this also gives some people the idea that installing something like the SuperCIC mod chip to make a SNES region-free is easy. The patient that arrived on [Skawo]’s surgery table was one such victim, with the patient requiring immediate surgery to remove the botched installation before assessing the damage.
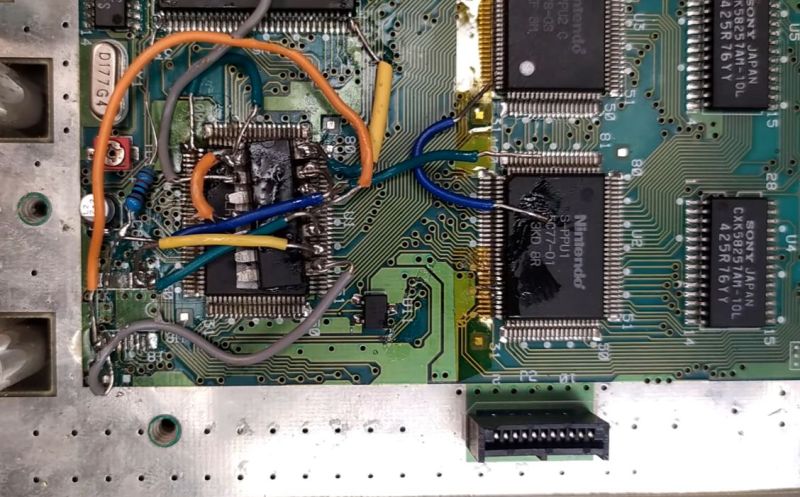
Here the good news was that the patient features the revision B CPU, making it a good console to rescue. The bad news was that the pads of the old CIC chip had been ripped up, there was a solder bridge on S-PPU1 between two pins and both the installed wiring and soldering were atrocious, requiring plenty of touch-ups.
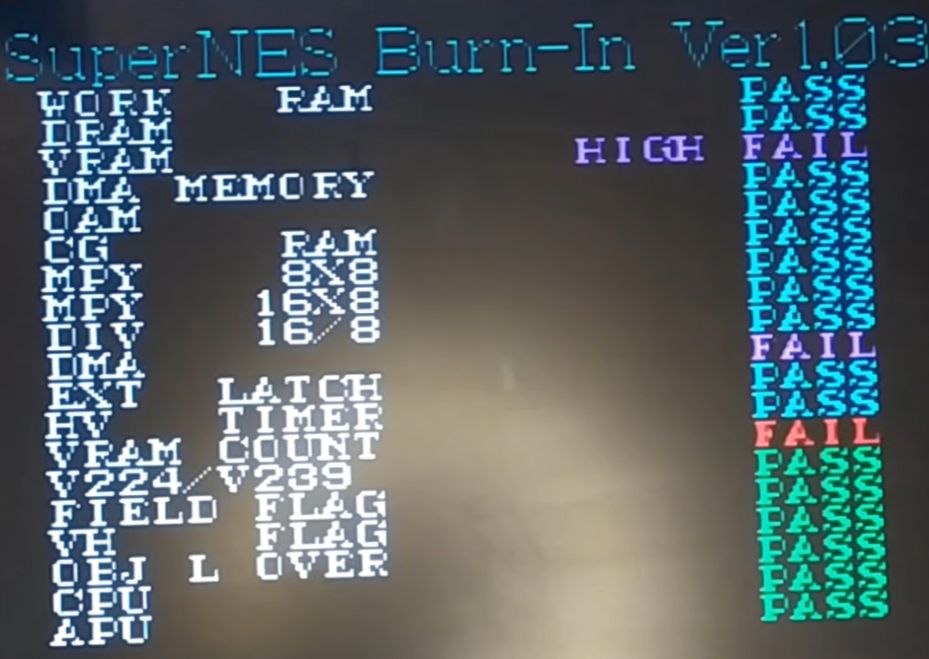
With the CIC pads already a loss, finishing the SuperCIC mod seemed like a good plan, also since this would make for a nice region-free console. This mod involves a PIC16F630 with special firmware that works with the corresponding CIC IC in each cartridge, while also switching between 50/60 Hz mode to fit the cartridge’s region. After an initial test with PAL and NTSC cartridges everything seemed all right. Then [Skawo] ran the SuperNES Burn-In test from its cartridge, which gave dire news.
Something was wrong with one of the VRAM ICs, leading [Skawo] to first try replacing the IC in question with a replacement from a donor board, which unfortunately did not fix the issue. This led him back to the suspicious solder bridge between pins 25 and 26 on S-PPU1. This would have put 5V into a pin that was not expecting it, and may have led to permanent damage.
One lifting of a donor S-PPU1 IC and nerve-wrecking swap later, it was time for a retry. This time the test passed with flying colors, allowing Super Mario RPG to be played again without funny graphical artefacts and hopefully fixing the last of the issues caused by the botched SuperCIC installation. Fortunately the damage was fixable, but along with a destroyed case it also took out the S-PPU1, which is not an easy to replace chip.
Moral of the story is perhaps that if you really want to mod your SNES, you should leave it to someone who has the requisite skills, lest people like [Skawo] have to rescue another hapless victim from such displays of depravity.


Man, feel so much better about my soldering skills now. :)
I guess the individual who messed up either wasn’t accustomed to SMD parts or didn’t have the right equipment at hand.
The wires are much too thick and too unflexible for fine work, for example.
Using fine, flexible cables would have been a cleaner alternative.
Roughly about the size of the SMD pins, maybe.
The English term is “stranded wire”, I suppose?
magnet wire has a thin isolating coating, easily removed from the ends with a soldering iron with some soldering tin and flux
Thin, solid wire with PVDF (“Kynar”) insulation, commonly used for wire-wrapping, comes in small gauges. It’s very handy for PCB modifications and repairs.
That’s the best for mods like this. It’s easier to strip than magnet wire and the insulation doesn’t melt and shrink back like PVC. 30 AWG is a good size for connecting to SMD pins.
Kynar > magnet wire 99.5% of the time. It also looks way more professional and the insulation doesn’t flake off with handling or heat, and can be routed through holes without potential shorting.
That looks slightly worse than the first ps2 i ever chipped – did half a dozen or so with a cheapo radio shack iron and solder. I actually have the last roll of radio shack rosin-core silver solder i bought before they closed sitting not too far away as i write this.
That said, it’s not that hard to learn the “right” way if you’re motivated and have the resources available. I started a new job the first week of the year that is a total career shift for me. I figured i might as well see if I capitalize on a hobby, and maybe even enjoy going to work.
A good mentor, microscope, soldering station, proper flux and solder, and manipulation/workholding tools, and I am now perfectly capable of doing smt work down to 0402 by hand to aerospace standards. And installing qfp’s is surprisingly easy once you get the hang of it.
That said, that looks like a job for 30awg or smaller – stranded if you don’t need to jump adjacent pins, magnet wire if you do. I couldn’t tell you what I used back in the day, but I find myself amazed now that something I was that intimidated by for the longest time is far simpler than I ever imagined – I just needed the kick in the ass and the right learning environment.
“Moral of the story is perhaps that if you really want to mod your SNES, you should leave it to someone who has the requisite skills”
Wtf. This is hackaday and the initial solder work is a hack. Not sure if it ever worked but it seemed like it could have been close to working, stably or not.
We’ve all done solder work worse than this when beginners. You have to try a few times until you master something. Acquiring those “requisite skills” takes starting somewhere and this looks like an excellent beginners project for light SMD work.
I guess it’s a matter of choosing what to learn on. If you destroy something valuable it’s worse than just messing with your dead stereo’s PCBs.
Back when Heathkit was around, they sold soldering training kits that allowed you to practice you skills on something low cost. Something like that, adapted for modern components, could save a lot of grief.
They have that. It’s called IPC training.
You can get SMD practice boards for cheap on Amazon.
Reminds me of when a guy in my dorm asked to borrow my cheapo soldering iron so he could install a modchip in a ps1. He knew nothing, and it was before youtube so i don’t even know how he found clear directions. But he succeeded! Despite leaving the iron on his bed, leaving a big burn mark…which violated the one piece of advice i did give him.
So i’m countering the “don’t do it if you don’t know how” advice here :)