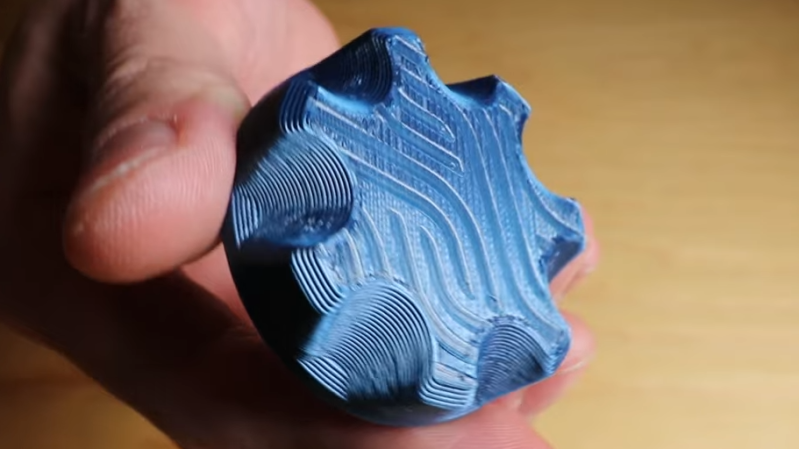
While working on a project that involved super-thin prints, [Julius Curt] came up with selective ironing, a way to put designs on the top surface of a print without adding any height.
For those unfamiliar, ironing is a technique in filament-based 3D printing that uses the extruder to smooth out top surfaces after printing them. The hot nozzle makes additional passes across a top surface, extruding a tiny amount in the process, which smooths out imperfections and leaves a much cleaner surface. Selective ironing is nearly the same process, but applied only in a certain pattern instead of across an entire surface.
While conceptually simple, actually making it work was harder than expected. [Julius] settled on using a mixture of computer-aided design (CAD) work to define the pattern, combined with a post-processing script. More specifically, one models the desired pattern into the object in CAD as a one-layer-tall feature. The script then removes that layer from the model while applying the modified ironing pattern in its place. In this way, one can define the pattern in CAD without actually adding any height to the printed object. You can see it in action in the video, embedded below.
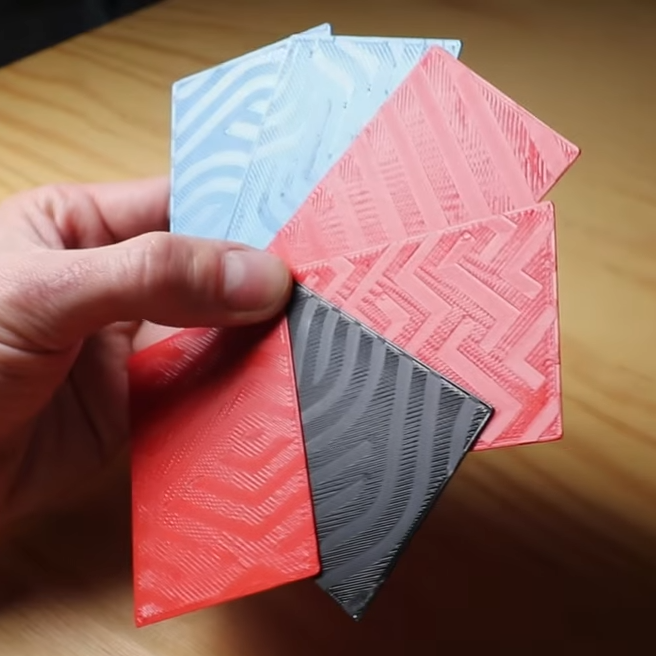
We’ve seen some interesting experiments in ironing 3D prints, including non-planar ironing and doing away with the ironing setting altogether by carefully tuning slicer settings so it is not needed. Selective Ironing is another creative angle, and we can imagine it being used to embed a logo or part number as easily as a pattern.
Selective Ironing is still experimental, but if you find yourself intrigued and would like to give it a try head over to the GitHub repository where you’ll find the script as well as examples to try out.


Maybe iron Aztec patterns for prints of the Refit Enterprise from Star Trek: The Motion Picture?
That might need doing after printing.
I wonder, if using transparent, of another color actually, if finished in a pearl type finish, with some tweaking, you could create a holographic type look, at least a rudimentary one.
Unfortunately, not even close to easily. As stated it would just be a minor colour shift. Getting enough reflectivity either would require the translucent material to be mostly made up of the reflective additive and therefore problematic to print.
You might be better off attempting to make real quasi-holographic imagery using the smoothing itself, ideally non-planar, by attempting to approximate what happens when an array of micro scratches can create holograms on surfaces with transparent or translucent materials like car paint. You might leverage your pearlecent material as a top coat to make this easier.
I’ll note that using an iron and a finely patterned surface it’s going to be far faster though, and will transfer a much more detailed image. Other alternatives include a textured external mold to fit curvature while it’s heated, or even using lasers directly.
There are advancements towards nacre like materials:
https://www.nature.com/articles/s41598-025-91080-2
https://www.science.org/doi/10.1126/sciadv.aau9490
https://3dprintingindustry.com/news/researchers-3d-print-nacre-inspired-composites-with-tailored-interfaces-using-multi-material-inkjet-printing-241100/
There was a wood grain done much like this I remember from a year ago or so.
Oh! I was thinking it would be nice if the slicer could use a specific pattern to fill in the top layer, as a better way to render text than sunken or raised lettering. But ironing using post-processing! I might could actually do that.
Very amusing video with good info. And I won’t trust what you say entirely but it drives me to try.
nice idea looks like you can just achieve this with a modifier and enable ironing there for the selected region no need for a script.
Yeah, this. Just use a svg on the top to control ironing.