 In a recent video [Saša Karanović] revisits the DIY filament dryer that he gave a shot a couple of years ago. Back then he reused an existing filament dryer, adding a custom controller and such to improve its performance.
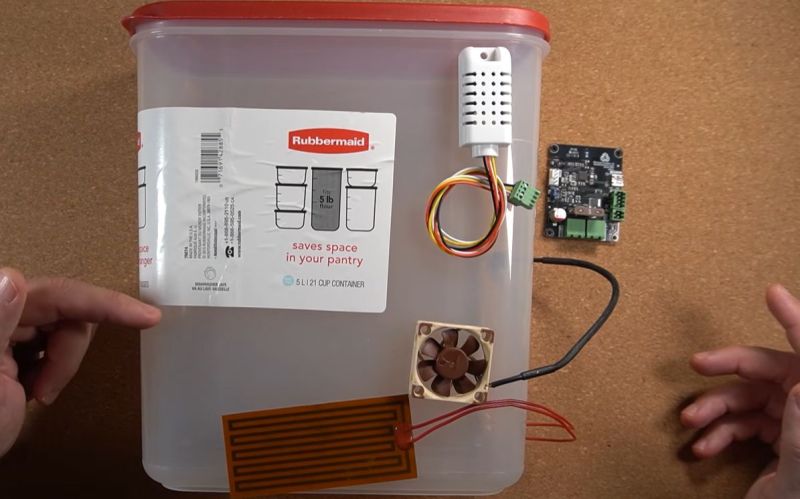
This technically-not-fully-DIY dryer got some feedback since then, and thus the V2 version is an example of how to better DIY such a dryer, including a custom PCB and a GitHub project for all the details.
Those who just want to dive into the documentation for assembly and the BOM can look at the available documentation. At its core the whole assembly consists of some kind of container like the shown 5L food storage type, along with an SHT30 temperature and humidity sensor and 100 K NTC temperature sensor. These connect to the controller board which then switches on or off the 12 V polyimide resistive heater.
One thing that could be improved here is that the saturated warm air has nowhere to go. This is a common issue with filament dryers and why it’s recommended with even commercial filament dryers like the common Sunlu types to leave them slightly ajar so that the moist air can be replaced with cooler air that can much more readily absorb moisture.


I never understood, why the filament dryers are designed without air exchange. There should be a fan moving air out of the container. Ideally this would be connected to a small (3d printed) counterflow heat exchanger, so the hot air going out gives the heat to the cold air coming in. The fan only needs to run every 30 mins or so.
Couple that with a simple double walled isolation and I bet that would even use less energy then what we currently have.
How about piping the heat from a propane salamander heater into a grow tent type structure with the filament shelf in it the weaker filament towards the bottom for a lower temperature and the more heat tolerant material up top and just blow the hot air in like you want to launch a balloon to see how high it will get you, well it’s just a thought!p
Not to put a damper on things but just find an old air fryer on the side of the road and drill a hole into its side or through the basket.
They’ve got built-in timers and if it doesn’t let you drop the temperature below a certain amount then look for either the “keep warm” button or “dehydrate” functions.
If it’s large enough you might even be able to fit larger spools like the 5kg ones or two spools.
The one I found in a literal ditch goes down to 45C on its “dehydrate” function and with a hole drilled into it I can print the various more finicky filaments.
An air fryer probably doesn’t have very good temperature regulation, especially at lower temperatures. That may result in melted filament. It would probably be more suitable for drying silica gel.
I bought a used dehydrator from a thrift store and cut out the trays. It fits two rolls of filament and gets hot enough for most materials. It probably won’t work well for Nylon or PC though.
it does… they just said it works and they used it.
ur not on reddit…
Air fryer for drying silica is a neat idea
Any filament that costs enough to cry at its loss is one that can handle higher temperatures.
Besides; your dehydrator’s just as bad if not worse. I’ve torn plenty down.
How good does it need to be? And do you imagine that the various other filament dryers out there are going to be more accurate?
I bought a used wine fridge slapped a shop light in it plugged into a thermostat. I can maintain 100degF at 10% humidity all day. I also put a little USB fan in it. I can store 25 rolls in there indefinitely. I have vent in the side near the top that allows air/humidity to come out and a tray of dessicant at the bottom. The whole thing cost about 75 bu ks to make. You guys over think it.
I’ve come to the conclusion that overthinking any given problem is the internet’s default state.
Just found a 8 bottle cooler for $30 on marketplace, thx for the idea!
I bought 1kg of desiccant beads for cheap and poured half into the big bucket I keep my filament in. When the humidistat reads over 20% I swap the desiccant out with the other half, then bake the portion I removed until it’s dry. Then I seal it in a different box and wait to do the swap again.
It lasts 2-4 months between swaps, depending on the environment and number of filament changes.
I’d automate it, but for keeping a few kg of filament dry this seems like an adequate solution. It was also really, really cheap.
For baking, I just use the heated bed of my printer. I pour the beads into a thin layer in a metal tray, place that on the bed, and run it at 90C for an hour while the chamber fans circulate air.
I’ve found a microwave to be the best option – about 10 minutes on high. Just be sure to use a pyrex bowl and be careful because the beads will get well above 100°
I don’t jnow if they still sell it but I picked up 20lb of silicate kitty litter. Dries out okay and the price per weight is phenomenal.
“saturated warm air has nowhere to go”
Isn’t that what the desiccant is for, to remove moisture from the air ? Instead of opening up the chamber, blow the saturated warm air over/through the desiccant bed and then, if really needed, over a heat sink to move heat, not air, to the outside. Or use a Peletier cooler ?
I’ve been printing PLA & PETG for over 10 years and live by the sea: never dried filament and sometimes a spool sits in the cupboard for months.
Tpu drinks moisture and will fail prints….petg and pla aren’t as responsive to moisture in the air
Would a dehumidifier in a large plastic bin work? Even the cheap peltier ones can collect moisture and they can heat up the air as well to help drive out moisture.
Could a peltier with a the cool side equipped with a heat-sink and a system to drain the condensation away keep energy costs down. The hot side would heat the now dry air from the condenser to extract water from the plastic. Put the whole thing in some insulation to keep the heat in.
I’ve been thinking about the peltier approach for a while but just have not pulled the trigger. That approach should definitely take the moisture out of the environment immediately, where the dessicant approach has delayed removal after entrapment.
That’s how humidity controlled cabinets for photography do it, although due to the condensing mechanism, they can’t get to as low humidity values as intelligently controlled intermittent air exchange can alone.
Its also due to delayed removal/entrapment of captured water just a different mechanism: Once you get down to around 25% RH, any condensate re-evaporates before it forms big enough droplets to drip down the drain tube.
A combination of the two techniques might work well, because the limit with heated air exchange is the humidity delta between fresh vs internal air.
I think 25% RH is a good humidity. Too dry makes some polymers brittle.
I built something similar using an 11qt Ikea 365 container with upside down, and 3D printed a Little smoke stack kind of thing for a blower fan with a cap on top of the stack, so every 30 minutes or so it blows the air out for a few seconds.