A HVTPI adapter plugged into a USBASP, with a an IDC10 cable plugged into it in turn

HVTPI Primer And Toolkit Equips You For BOM Substitutions

Novel programming interfaces for MCUs might catch us by surprise, but then we inevitably get up to speed with the changes required. Today’s bastion is HVTPI – a “12V reset” addition to the TPI we’ve just started getting used to, and [Sam Ettinger] has shared a simple circuit to teach us all about it, along with PCB files and detailed explanations of how it all works.

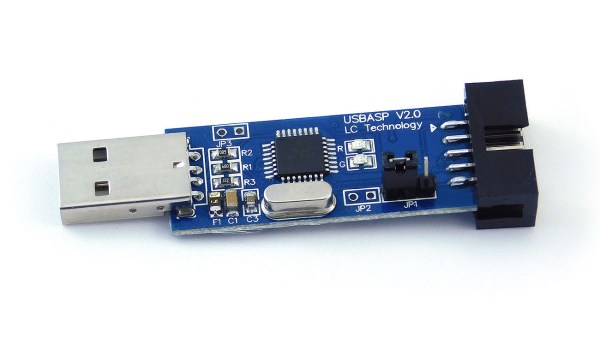
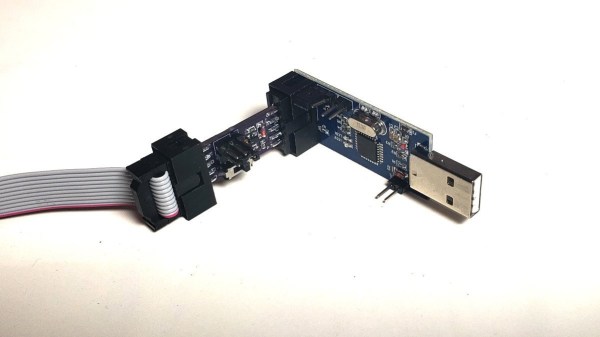
HVTPI is an add-on on top of TPI, for which, as Sam explains, you need to hold RST at 12V when TPI would have it be low logic level, and leave it at Vtarget otherwise. For that, he has designed a variety of interposer boards of various complexity and requirements; explaining the choices behind each one and clearing up any misunderstandings that might occur on your way. All of the board files (and the TPI write-up copy) are caringly shared with us in a git repository, too! As a result, if you have an USB-ASP or an Arduino available, now you also have everything to do HVTPI, thanks to Sam’s work and explanations.

We’ve been covering Sam’s exploits before, and can’t help but be grateful for the stop-and-explain detour along the way. HVTPI being used on very small ATTiny parts, we wonder if something new in the vein of his recent FPC board able to fit and function entirely within a Type-C cable end!

With chip shortages, investigating programming interfaces for small and obscure yet in-stock microcontrollers has been, quite literally, paying off, and if you got some projects that need a MCU but won’t consume a whole lot of resources, it could be time to give an ATTiny10 a go. What’s the worst that can happen – you make the smallest chiptunes ever?

Teaching A USBasp Programmer To Speak TPI

Last Fall [Kevin] wanted to program some newer TPI-only AVRs using an old USBasp he had kicking around his lab. Finding an “odd famine of information” and “forums filled with incorrect information and schematics”, he decided to set the record straight and document things correctly. He sleuthed out the details and succeeded in reprogramming the USBasp, although he did end up buying a second one in the process.

Designers who use AVR microcontrollers have no shortage of programming interfaces — we count at least five different methods: ISP/SPI, JTAG, TPI, PDI, and UPDI. We’re not sure whether this is variety is good or bad, but it is what it is. [Kevin] discovers that for the particular family of Attiny devices he is using, the ATtiny20, TPI is the only option available.

While he normally builds his designs around ARM Cortex-M chips, [Kevin] needed some glue logic and decided to go with an ATtiny20 despite its unique programming requirements. He observes that the price of the ATtiny20, $0.53 last Fall, was cheaper than the equivalent logic gates he needed. This particular chip is also quite small — only 3 mm square (a 20-pin VQFN). We would prefer not to use different MCUs and tool chains on a single board, but sometimes the convenience and economics steer the design in that direction.

If you’re not familiar with the USBasp, our own [Mike Szczys] covered the breaking story over ten years ago. And if you have a lot of free time on your hands, ditch all these nicely packaged solutions and program your chips using an old USB Hub and a 74HCT00 NAND gate as described in this bizarre hack by Teensy developer [Paul Stoffregen].

Breaking Out The ATtiny10

Atmel’s ATtiny10 is the one microcontroller in their portfolio that earns its name. It doesn’t have a lot of Flash – only 1 kilobyte. It doesn’t have a lot of RAM – only thirty two bytes. It is, however, very, very small. Atmel stuffed this tiny microcontroller into an SOT-23 package, more commonly used for surface mount transistors. It’s small, and unless your ideal application is losing this chip in your carpet, you’re going to need a breakout board. [Dan] has just the solution. He could have made this breakout board smaller, but OSHpark has a minimum size limit. Yes, this chip is very, very small.

Because this chip is so small, it doesn’t use the normal in-system programming port of its larger brethren. The ATtiny10 uses the Tiny Programming Interface, or TPI, which only requires power, ground, data, clock, and a reset pin. Connecting these pins to the proper programming header is easy enough, and with a careful layout, [Dan] fit everything into a breakout board that’s a hair smaller than a normal 8-pin DIP.

The board works perfectly, but simply soldering the ATtiny10 to a breakout board and using it as is probably isn’t the best idea. The reason you use such a small microcontroller is to put a microcontroller into something really, really small like ridiculous LED cufflinks. A breakout board is much too large for a project like this, but SOT23 test adapters exist, and they’re only $25 or so.

Either way, [Dan] now has a very, very small microcontroller board that can fit just about anywhere. There’s a lot you can do with one kilobyte of Flash, and with an easy way to program these chips, we can’t wait to see what [Dan] comes up with.

Programming The ATtiny10 With An Arduino

The ATtiny10 – along with its younger siblings that go by the names ATtiny 4, 5, and 9 – are the smallest microcontrollers Atmel makes. With only 32 bytes of RAM and 1 kB of Flash, there’s still whole lot you can do with this tiny six-pin chip. [feynman17] figured out a way to program this chip using an Arduino, allowing him to throw just about anything at this absurdly small microcontroller.

The ATtiny10 doesn’t use the familiar ISP programming header found on other Atmel-based boards. Instead, it uses the exceedingly odd Tiny Programming Interface to write bits to the Flash on the chip. [feynman17] realized he could use the Arduino SPI library to communicate with this chip and built a small programming shield with just a few resistors and a 8-pin DIP socket to mount an ATtiny10 breakout board.

After writing a sketch to upload a .hex file from the Arduino serial console, [feynman] had a programmed ATtiny10, ready to be dropped into whatever astonishingly small project he had in mind.

As for what you can do with this small microcontroller, chiptunes are always an option, as is making a very, very small Simon clone. It may not be a powerhouse, but there’s still a lot you can do with this very inexpensive microcontroller.

Making Chiptunes With 32 Bytes Of RAM

Ah, chiptunes. One of the few remaining human endeavours where less RAM, less storage space, and fewer capabilities are actually considered an improvement. [dop3joe] over at the Stuttgart hackerspace Shackspace sent in a tiny chiptune playing circuit using the most bare-bones hardware we’ve ever seen.

The Noiseplug, as [dop3joe] calls it, is based on a very, very small 6 pin ATtiny9. With 1 kB of Flash memory and only 32 bytes of RAM [dop3joe] was able to create a small device inside an RCA jack that plays chiptunes whenever it is powered by a battery.

If you’d like to make your own noise plug, [dop3j0e] put all the code up in his Git. There are two relevant pieces of software for this build: a Windows app to create the chiptunes, and the ATtiny9 firmware itself. Of course to program the tiny, you’ll have to deal with the Atmel TPI, so here’s the application note (PDF).

Oh, [dop3joe] won third place at the Evoke demoscene party last weekend with the Noiseplug. Awesome.