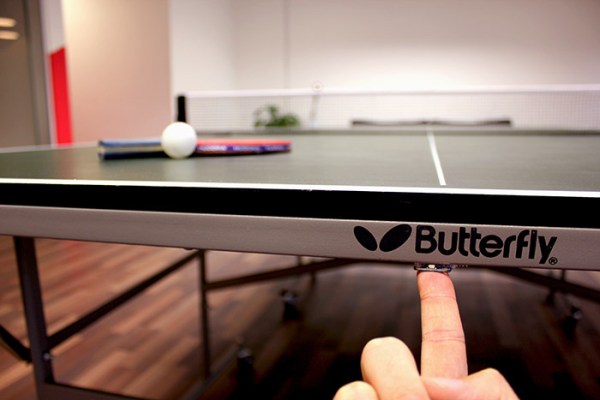
OLED display, blue LED and Smartcard

Developed On Hackaday: License Incompatibilities And Project State

mooltipass top pcb

It has been a while since we wrote an article about our ongoing offline password keeper project, aka the Mooltipass. Our last post was asking our dear readers to vote for their favorite card art, so what have we been doing since then?

For the last few weeks we’ve mostly been improving our current PCBs and case design for the production process to go smoothly. The final top PCB shown above has been tweaked to improve his capacitive touch sensing capabilities, you may even see a video of the system in action in the Mooltipass project log on hackaday.io. We’ve also spent some time refining the two most popular card art designs so our manufacturers may print them correctly. We’ll soon integrate our updated USB code (allowing the Mooltipass to be detected as a composite HID keyboard / HID generic) into the main solution which will then allow us to work on the browser plugin.

It’s also interesting to note that we recently decided to stop using the GPL-licensed avrcryptolib. Our current project is CDDL licensed, allowing interested parties to use our code in their own project without forcing them to publish all the remaining code they created. The GPL license enforces the opposite, we therefore picked another AES encryption/decryption implementation. This migration was performed and checked by our dedicated contributor [Miguel] who therefore ran the AES NESSIE / CTR tests and checked their output, in less than a day.

We’re about to ship the first Mooltipass prototypes to our active contributors and advisers. A few weeks later we’ll send an official call for beta testers, just after we shown (here on Hackaday) what the final product looks like. Don’t hesitate to ask any question you may have in the comments section, you can also contact us on the dedicated Mooltipass Google group.

Easy Capacitive Touch Sensors In Eagle

board

Capacitive sensing libraries for the Arduino and just about every other microcontroller platform have been around for ages now, but if you’d like to put a slightly complex cap sense pad in a PCB without a lot of work, you’re kind of out of luck. Not only do you need a proper education in how capacitors work, but a custom cap sense pad also requires some advanced knowledge of your preferred PCB layout program.

The folks over at PatternAgents have just the solution for this problem. They created an Eagle library of touch widgets that includes everything from buttons, linear and radial sliders, touchpads, and a whole lot more.

The simplest cap sense pad is just a filled polygon on the top layer of a board, but this simple setup isn’t ideal if you want to use Eagle’s autorouter. By playing with the restrict layers in Eagle, PatternAgents were able to create easy cap sense buttons that will work perfectly, without the problems of the autorouter placing traces willy-nilly.

There are more than enough parts to replicate a whole lot of touch interfaces – buttons can easily be made into a smallish keyboard, and the radial touch sensor will emulate the ‘wheel’ interface on an iPod. Very cool stuff, and we can’t wait to see these in a few more boards.

Capacitive Sensing Tutorial

[Bertho]’s submission for the 74xx logic contest is really impressive. He designed a capacitive sensing touchpad using only 74xx and 40xx logic chips. We’re impressed with the build and his writeup is one of the best resources we’ve ever seen for capacitive sensing.

There are two ways to go about designing a capacitive touchpad. The first option is put a voltage through an RC circuit. Measure the voltage-time curve, and you have a measure of the capacitance of the circuit. The second method is setting up an RC circuit to change polarity after a threshold for C has been reached. Microprocessors only use one of these methods (AVR uses the first, PIC uses the second), but [Bertho] decided to implement both methods for unknown reasons we still respect.

The circuit [Bertho] designed has a 30MHz clock using only 74xx logic chips, an amazing feat in itself. An 8×8 channel panel was fabricated and the whole build connects to a computer over RS-232.

The finished build is good enough has 64 points of resolution and is able to detect proximity very well. The touchpad is even able to recognize when a pen is placed on the panel. Check out the video after the break for the walk through and demo of this amazing build.

Continue reading “Capacitive Sensing Tutorial”