Electronic Embroidery Birthday Card Is A Celebration Of Skills

Hackers and makers can sometimes feel like they’re getting the short end of the stick when it comes to gift giving. You’re out there making thoughtful, intricate circuit sculptures, helpful software, or face masks for people, and what do you get in return? Okay, yes, usually gift cards or tools or other things that feed your creativity in the first place. But darn it, it would be nice to receive a handmade gift once in a while, right?

So here’s what you do: make friends with enough other makers that you find your birthday twin, or close enough that you both feel the warmth of the personal holiday you share. Then you get them to agree to trade handmade birthday presents with you. That’s more or less what happened between [Becky Stern] and [Estefannie], who seem to have found each other through the magic of sharing projects on YouTube.

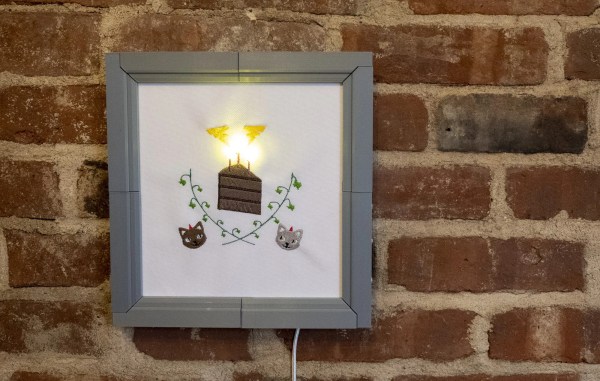
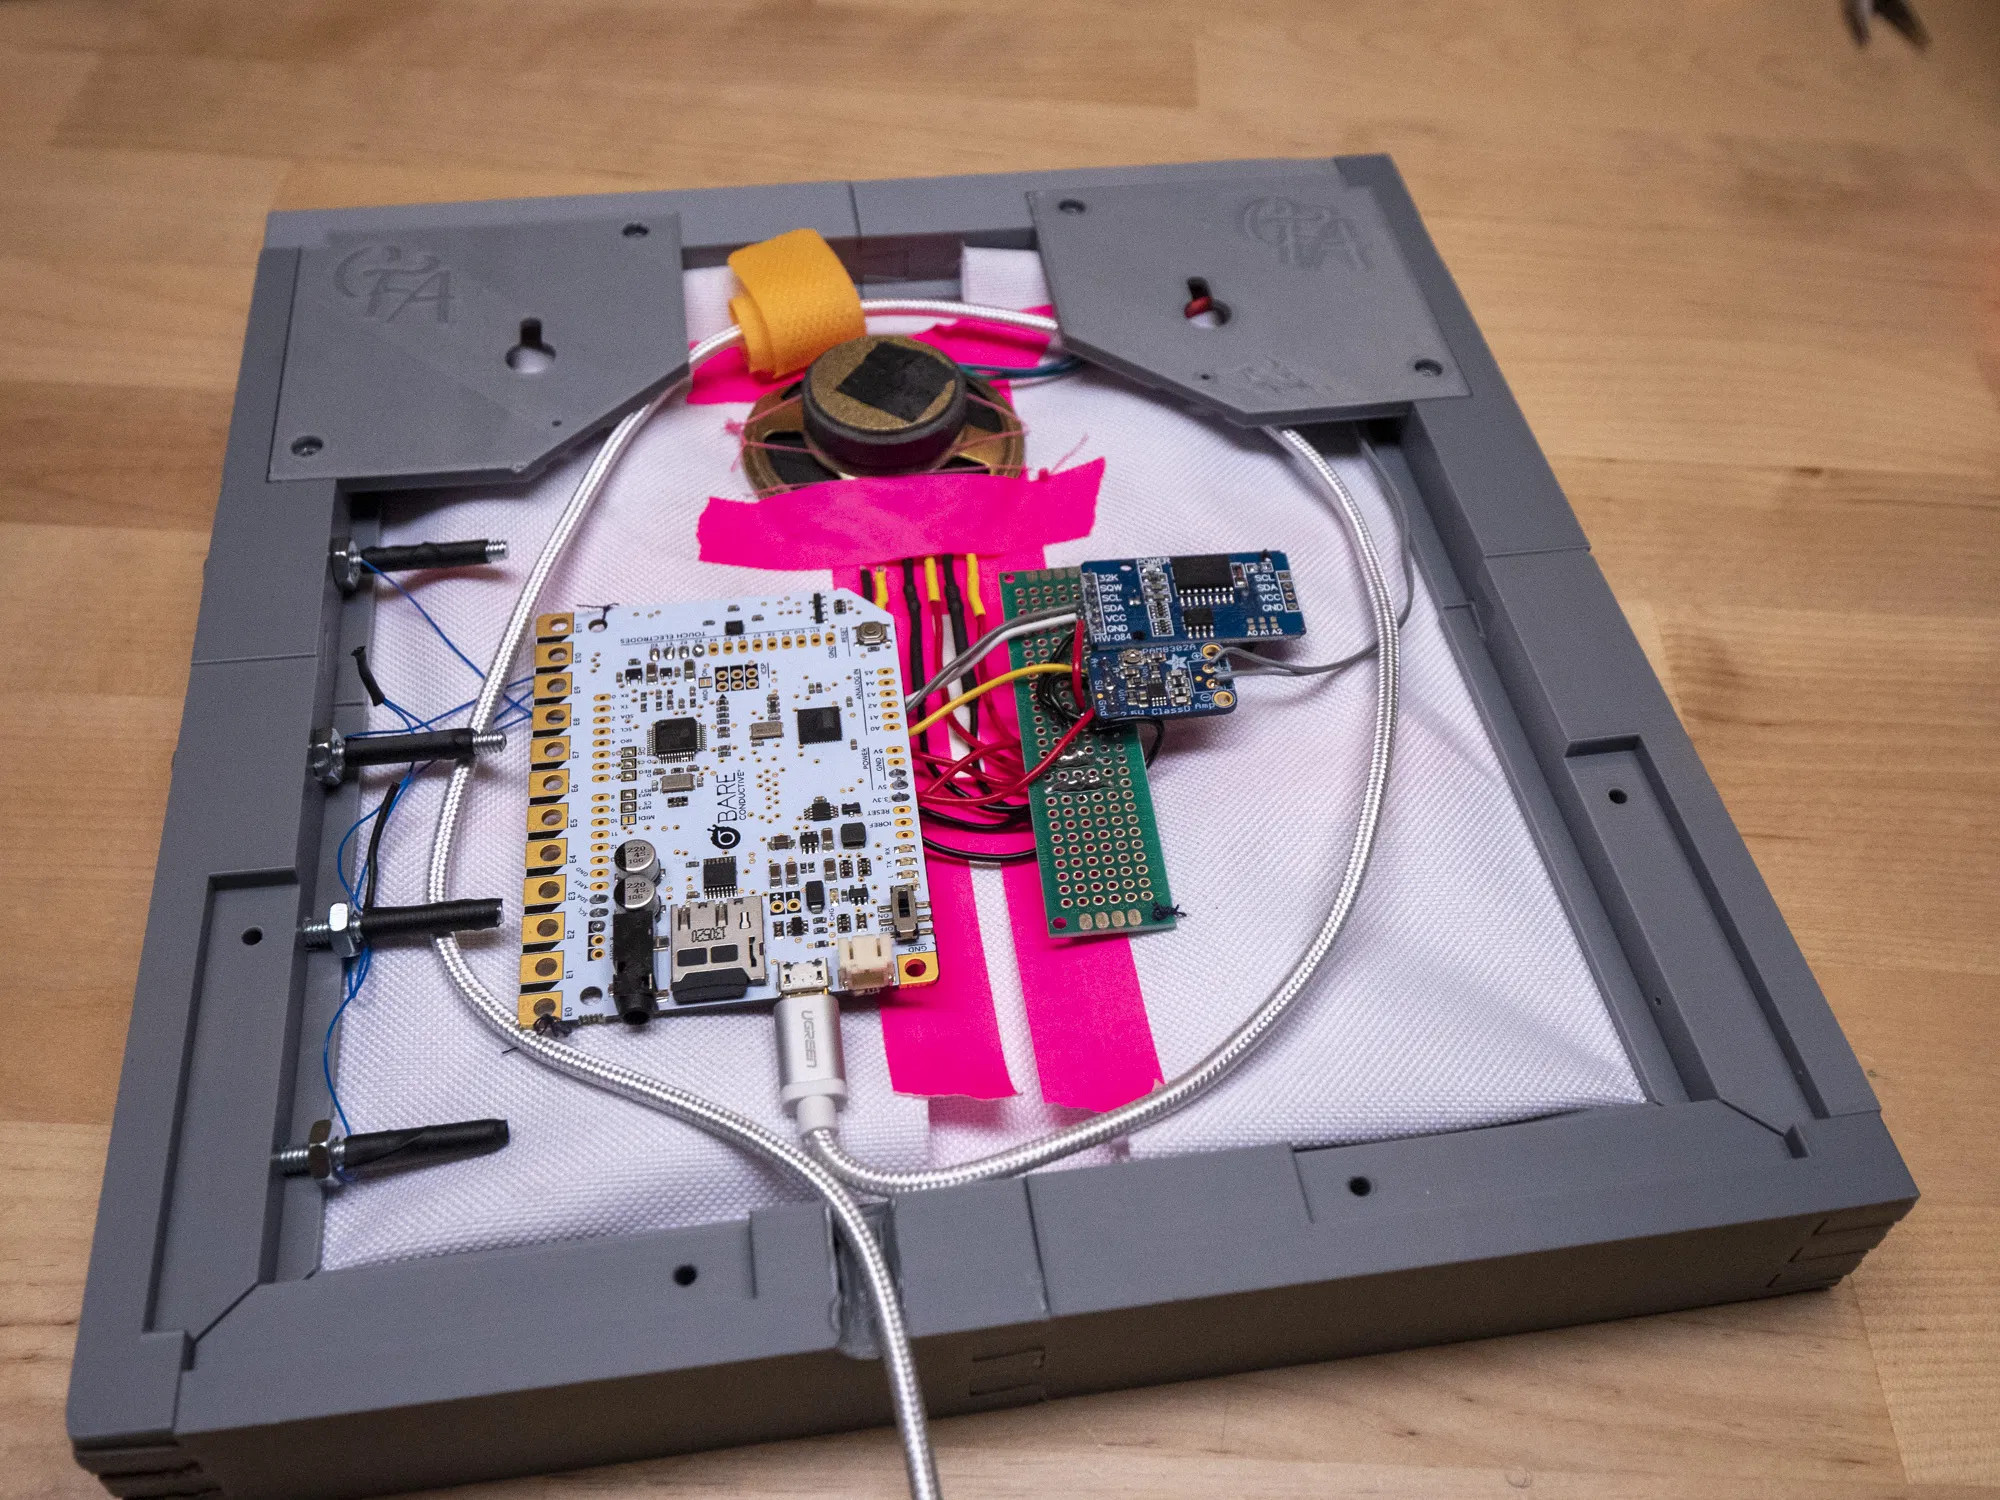
[Becky]’s gift to [Estefannie] is a busy intersection of maker elements including graphic design, embroidery, electronics, and 3D printing. [Becky] started with the embroidery, which was made possible thanks to a new open-source library for Processing called PEmbroider. Once that was done, she 3D printed the frame and added the electronics — candle flicker LEDs for the birthday cake, and a handful of songs that are accessible via touch contacts screwed into the side of the frame. [Becky] added a real-time clock module so it plays a few extra songs on [Estefannie]’s actual birthday.

The most thoughtful element here is personalization, and it’s amazing what can happen when you put 100% of yourself into something that is 100% about someone else. Every bit of the art is personal to [Estefannie], and every atom of the build is pure [Becky]. Check out the demo and build video and see what [Estefannie] made for [Becky] after the break.

[Becky]’s varied creativity has graced these pages many times before. See how she bid adieu to 2020, built a daily affirmation mirror, and gave a mask-making masterclass in the early stages of the pandemic.

Continue reading “Electronic Embroidery Birthday Card Is A Celebration Of Skills”

Ambience Lamp Ripples Like Water

After the year humanity has endured, we could all use a little more relaxation in our lives. This atmosphere lamp is just the thing to set a relaxing ambience for work, studying, or hanging out. Just touch the surface and the light ripples to life, resembling the concentric circles that form on the surface of still water when it is touched. When the light settles, it looks like an inviting pool that’s ready for a nighttime swim.

There aren’t really any surprises inside — the lamp is operated via capsense by touching the center of the top. Three NeoPixel rings and an RGB LED strip provide the lighting, and an Arduino UNO runs the show. [Qttting_F] used an inexpensive ceramic bowl with a piece of acrylic for a lid, but this could just as easily be printed in white PLA or something. Check it out in action after the break.

Ambience is nice, but sometimes you need something more functional. Those types of lamps can be printed, too.

Continue reading “Ambience Lamp Ripples Like Water”

Trill: Easy Positional Touch Sensors For Your Projects

Creating capacitive touch-sensitive buttons is easy these days; many microcontrollers have cap-sense hardware built-in. This will work for simple on/off control, but what if you want a linear, position-sensitive input, like you’d find on a computer touchpad or your smartphone screen? Not so easy — at least until now. Trill is a family of capacitive touch sensors you can add to your projects as a linear slider, a square touchpad, or by creating your own touch surface.

Trill was created by the same team that designed Bela, an embedded platform for low-latency interactive applications, especially with audio. The new trio of Trill sensors rely on capacitive sensing to track finger movement, and communicate over I2C with your microcontroller or development board of choice. The Trill I2C library targets Arduino and Bela, but should be easy to port to any I2C host.

The hardware and software are both open-source — or will be as the Kickstarter that launched this morning has already met its goal. The firmware for the Cypress CY8C20636A (PDF) controller that powers these sensors will be released CC-BY-NC-SA. But, starting with the controller itself sounds like a lot of work that Trill has already done for you, so let’s have a look at what we know so far, along with a healthy dose of speculation.

Continue reading “Trill: Easy Positional Touch Sensors For Your Projects”

Tiny Pinball Emulator Is Hugely Impressive

We were wondering what [Circuitbeard] has been up to lately. Turns out he’s been building a mini pinball cabinet to add to his arcade of self-built games.

[Circuitbeard] was forced to break out of his Raspi comfort zone this time. We’re glad he did because this is one impressive build. Finding the pinball emulation community lacking for Linux, he turned to the LattePanda, a tiny Windows 10 SBC with a built-in Arduino Leonardo. This was really the perfect board because he needed to support multiple displays with a minimum of fuss. That Leonardo comes in handy for converting button presses to key presses inside the Visual Pinball emulator.

The 3mm laser-cut plywood cabinet was designed entirely in Inkscape and sized around the two screens: a genuine 7″ LattePanda display for the playfield, and a 5″ HDMI for the back glass. The main box holds the Lattepanda, two Pimoroni mini speakers, and a fan to keep the board cool.

There’s a lot to like about this little cabinet thanks to [Circuitbeard]’s fantastic attention to detail, which you can see for yourself in the slew of pictures. Look closer at the coin drop—it’s really an illuminated button with a custom graphic. If you want to have a go at emulating this emulator, all the code is up on GitHub. Tilt past the break to watch some modern pinball wizardry in action, and then check out his mini Outrun machine.

If pinball emulators don’t score any points with you, here’s one that’s all wood and rubber bands.

Continue reading “Tiny Pinball Emulator Is Hugely Impressive”

Repent! The Church Of Robotron Accepts All!

Are you the mutant savior? Are you prepared for the robot uprising of 2084? Have you accepted robotron into your life? The Church of Robotron is now conducting training, testing, and confession at the new window altar in downtown Portland.

The Church of Robotron is the fake totally legit religion based on the classic arcade game prophecy Robotron 2084. In keeping with the church’s views on community outreach and missionary work, a Robotron altar has been installed at the Diode Gallery for electronic arts.

The altar consists of a system running Robotron 2084 with capacitive sensing controls built by DorkbotPDX’s own [Phillip Odom]. He’s using the same techniques featured in his capacitive sensing workshop, allowing the game to be played 24 hours a day. There are also monitors displaying the leaderboard and tenants of the Church of Robotron.

The Church of Robotron has also been showing up at Toorcamp for a few years now, with an even more spectacular altar that triggers physical events in response to game events. That’s a very cool use of MAME’s debugger, and a story worthy of its own Hackaday post.

Video of the altar below.

Continue reading “Repent! The Church Of Robotron Accepts All!”

Capacitive Sensing And Old IBM Keyboards

The pen is mightier than the sword, but the IBM Model M keyboard, properly applied, can knock teeth in. There are a few more IBM keyboards even better suited to blunt force trauma – the extremely vintage beam spring keyboards made for terminals and desktop publishers. Being so very old, there’s no easy way to connect these keyboards to a modern system, so when [xwhatsit] wanted to make his work, he needed to build his own controller.

The beam spring keyboards use capacitive switches, and with 122 keys, the usual method of reading capacitance – putting a capacitor in an oscillator – would be far too slow to be of any use in a keyboard. There is another method of reading capacitance: measuring the current going through the capacitive switch. This can easily be accomplished with an LM339 comparator.

[xwhatsit]’s keyboard controller uses this capacitive sensing circuit to read the four rows of keys, with a few shift registers taking care of the columns. An ATMega32u2 is the brains of the outfit, running LUFA to translate the key presses to USB.

If you’re lucky enough to have one of these ancient keyboards, [xwhatsit] is selling a few over on the usual mechanical keyboard forums. There’s also a controller for the Model F keyboard using the same basic circuit. If you need one just drop him a line or grab the gerbers and roll your own.

Easy Capacitive Touch Sensors In Eagle

board

Capacitive sensing libraries for the Arduino and just about every other microcontroller platform have been around for ages now, but if you’d like to put a slightly complex cap sense pad in a PCB without a lot of work, you’re kind of out of luck. Not only do you need a proper education in how capacitors work, but a custom cap sense pad also requires some advanced knowledge of your preferred PCB layout program.

The folks over at PatternAgents have just the solution for this problem. They created an Eagle library of touch widgets that includes everything from buttons, linear and radial sliders, touchpads, and a whole lot more.

The simplest cap sense pad is just a filled polygon on the top layer of a board, but this simple setup isn’t ideal if you want to use Eagle’s autorouter. By playing with the restrict layers in Eagle, PatternAgents were able to create easy cap sense buttons that will work perfectly, without the problems of the autorouter placing traces willy-nilly.

There are more than enough parts to replicate a whole lot of touch interfaces – buttons can easily be made into a smallish keyboard, and the radial touch sensor will emulate the ‘wheel’ interface on an iPod. Very cool stuff, and we can’t wait to see these in a few more boards.