A magnifying glass is seen behind a small tea candle. The magnifying image is projecting the shadow of a column of heated air.

Finding Simpler Schlieren Imaging Systems

Perhaps the most surprising thing about shadowgraphs is how simple they are: you simply take a point source of light, pass the light through a the volume of air to be imaged, and record the pattern projected on a screen; as light passes through the transition between areas with different refractive indices, it gets bent in a different direction, creating shadows on the viewing screen. [Degree of Freedom] started with these simple shadowgraphs, moved on to the more advanced schlieren photography, and eventually came up with a technique sensitive enough to register the body heat from his hand.

The most basic component in a shadowgraph is a point light source, such as the sun, which in experiments was enough to project the image of an escaping stream of butane onto a sheet of white paper. Better point sources make the imaging work over a wider range of distances from the source and projection screen, and a magnifying lens makes the image brighter and sharper, but smaller. To move from shadowgraphy to schlieren imaging, [Degree of Freedom] positioned a razor blade in the focal plane of the magnifying lens, so that it cut off light refracted by air disturbances, making their shadows darker. Interestingly, if the light source is small and point-like enough, adding the razor blade makes almost no difference in contrast.

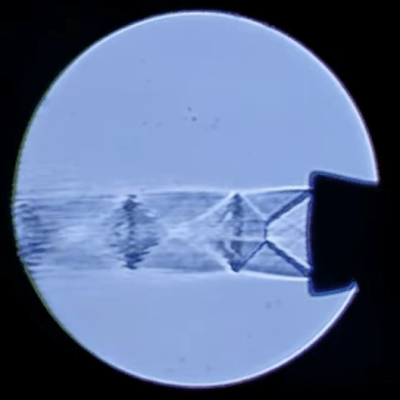
With this basic setup under his belt, [Degree of Freedom] moved on to more unique schlieren setups. One of these replaced the magnifying lens with a standard camera lens in which the aperture diaphragm replaced the razor blade, and another replaced the light source and razor with a high-contrast black-and-white pattern on a screen. The most sensitive technique was what he called double-pinhole schlieren photography, which used a pinhole for the light source and another pinhole in place of the razor blade. This could image the heated air rising from his hand, even at room temperature.

The high-contrast background imaging system is reminiscent of this technique, which uses a camera and a known background to compute schlieren images. If you’re interested in a more detailed look, we’ve covered schlieren photography in depth before.

Thanks to [kooshi] for the tip!

Budget Schlieren Imaging Setup Uses 3D Printing To Reveal The Unseen

We’re suckers here for projects that let you see the unseeable, and [Ayden Wardell Aerospace] provides that on a budget with their $30 Schlieren Imaging Setup. The unseeable in question is differences in air density– or, more precisely, differences in the refractive index of the fluid the imaging set up makes use of, in this case air. Think of how you can see waves of “heat” on a warm day– that’s lower-density hot air refracting light as it rises. Schlieren photography takes advantage of this, allowing to analyze fluid flows– for example, the mach cones in a DIY rocket nozzle, which is what got [Ayden Wardell Aerospace] interested in the technique.

Shock diamonds from a homemade rocket nozzle imaged by this setup.
Examining exhaust makes this a useful tool for [Aerospace].
This is a ‘classic’ mirror-and-lamp Schlieren set up.  You put the system you wish to film near the focal plane of a spherical mirror, and camera and light source out at twice the focal distance. Rays deflected by changes in refractive index miss the camera– usually one places a razor blade precisely to block them, but [Ayden] found that when using a smart phone that was unnecessary, which shocked this author.

While it is possible that [Ayden Wardell Aerospace] has technically constructed a shadowgraph, they claim that carefully positioning the smartphone allows the sharp edge of the case to replace the razor blade. A shadowgraph, which shows the second derivative of density, is a perfectly valid technique for flow visualization, and is superior to Schlieren photography in some circumstances– when looking at shock waves, for example.

Regardless, the great thing about this project is that [Ayden Wardell Aerospace] provides us with STLs for the mirror and smartphone mounting, as well as providing a BOM and a clear instructional video. Rather than arguing in the comments if this is “truly” Schlieren imaging, grab a mirror, extrude some filament, and test it for yourself!

There are many ways to do Schlieren images. We’ve highighted background-oriented techniques, and seen how to do it with a moiré pattern, or even a selfie stick. Still, this is the first time 3D printing has gotten involved and the build video below is quick and worth watching for those sweet, sweet Schlieren images. Continue reading “Budget Schlieren Imaging Setup Uses 3D Printing To Reveal The Unseen”