ESP8266 Makes A Wireless Card Reader

You can find commercial USB sticks that can also connect via WiFi. But [Neutrino] made his own using an ESP8266 married to a card reader. It all starts with the old trick of soldering a header to an SD card adapter. The USB port is still there, but it is only for power. A 3.3 V regulator and an ESP12E board round out the hardware.

Of course, the trick is the software. Starting from a few examples, he wound up providing an FTP server that you can connect to and send or receive files using that protocol.

Continue reading “ESP8266 Makes A Wireless Card Reader”

World’s Stupidest Solid State Disk Drive Hack

The title might seem a little harsh, but it is a direct quote from the video by [Linus Tech Tips] that you can see below. He picked up a board that is a RAID 0 controller for up to ten SD cards so you can use them as a conventional SATA SSD. Of course, the channel’s tag line is “impractical solutions for improbable problems” but even by his own admission, this is pretty impractical.

It is odd for us to scoff at any kind of hack, but honestly, it is hard to see the value to this, other than it is amusing to think some factory turned these boards out hoping to make a profit. Besides being amusing, though, it is also a good exercise in design trades. For example, when you design a car, you want it to be safe, but you can’t make the body out of four-inch thick steel because of cost, weight, and fuel consumption. So you balance these concerns by making tradeoffs.

Continue reading “World’s Stupidest Solid State Disk Drive Hack”

Hacking An SD Slot For WiFi

Back in the 1990’s moving files via a floppy disk was known as “sneaker net.” While floppies are a thing of the past, SD Cards are the modern equivalent and they still lend themselves to sneaker net operations.

But why? WiFi is everywhere now. Wouldn’t it be great if you could hack those devices with SD slots to use WiFi? Apparently 3D printer [extrud3d] thought the same thing and found a way to reconfigure a Toshiba FlashAir card to put his 3D printer on the network.

The card is aimed at consumers, so by default it creates a hotspot and waits for a connection, a rudimentary web app allows you to move files back and forth over the network to the SD card which is then read by the host device. However, [extrud3d] shows how to modify a file on the SD card’s file system to allow the device to hook up to an existing wireless network and also provides a Python script to make the file transfer easier.

Although this hack is for a 3D printer, it ought to work with most devices that have a full sized SD slot (or can be adapted to take a full sized card). Since the hack is nothing more than changing a text file, it is a lot easier than some other SD hacks we’ve covered. Over on hackaday.io, [Chris Jones] has recently done some hacking on the FlashAir and has a list of its shell commands if you want to go beyond the text file hacks.

Continue reading “Hacking An SD Slot For WiFi”

8-Bit Chip Rocks 16-Bit 44.1kHz Tunes

There’s a special place in our hearts for chip tunes generated with your favorite microcontroller. But why stop there? Full-featured audio is a great challenge and it’s not often we see examples of this caliber. It puts out CD-quality audio using not much more than a microcontroller.

How do you get 16-bit audio out of an 8-bit microcontroller. We’ll give you a hint: two pins are used. Not helping? Here it comes: two 8-bit DACs PWM outputs are used on this chip, the ATmega1284. One is used for the lower eight bits, the other handles the upper. The two are combined using carefully calculated precision resistor values and the results are beyond what you imagine. This is produced at a bitrate of 44077.135, slightly off from the 44100Hz standard but we challenge you audiophiles to tell the difference. The wave files are served from an SD card read by the chip using the Petit-FatFs library.

There are so many great things about this project. First off, following [Wancheng Zhou’s] example will let anyone with even basic microcontroller skills build a digital audio player for an [Andrew Jackson] and a couple of [Washingtons]. Secondly, those with a medium uC skill level will want to take the idea and implement/debug it for themselves. Bringing it home, [Wancheng] shows how to gauge the quality of the audio output using FFT.

If you didn’t figure it out by the time of year, this is yet another example of a Cornell ECE 4760 final project. Shout out to [Bruce Land] for inspiring awesome projects and requiring extensive documentation of the projects which itself promotes deeper understand all around.

Continue reading “8-Bit Chip Rocks 16-Bit 44.1kHz Tunes”

StereoData Maker


So you got CHDK working on your camera, and the histograms, raw image files, variable shutter speeds and other added functions are amazing, but stereo imaging is what you really want. If you have two or more CHDK-ready cameras, it’s cheap and easy to run StereoData Maker, a system that synchronizes the shutter and flash of multiple cameras.

The first step in getting SDM to work is installing the software on your SD card. You’ll need to find the correct version for you camera; a list is available on the main SDM page. If you are running Windows XP or Vista, run the installer in the zip file. Otherwise, load the files on the SD card and run the installer directly from the camera. Then decide whether this will be the right or left camera and repeat the steps for your second camera.

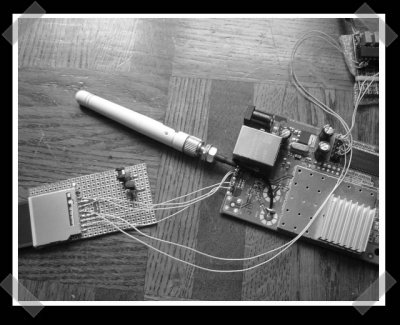
Next, you’ll need to prepare a switch unit, essentially a set of synchronized USB remotes. There are many ready made commercial units available, but building one on your own shouldn’t be much trouble, and a few ideas are provided on the SDM instruction page.

You’re basically ready to start shooting stereo images, just take a few test shots to get used to it and to customize the configuration on the cameras.

Eye-Fi Explore Review

[flickr video=http://www.flickr.com/photos/pauls/2611298593/]

The WiFi uploading Eye-Fi SD card made a big splash when it was first introduced, but now Eye-Fi has a whole line of different products. The top of the line is the Eye-Fi Explore, which supports geotagging without using a GPS. Instead of GPS hardware, it uses the Skyhook Wireless Wi-Fi Postitioning System, which correlates the position of the Eye-Fi’s access point to GPS locations, creating virtual GPS functionality. This allows photos taken with the Eye-Fi to be be geotagged. Of course, the accuracy of the system is noticeably lower than true GPS and seems to be affected by a number of external factors, but it is still accurate enough to tag the photo within the immediate vicinity of where it was taken.

WiFi positioning is great feature, but certainly not limited to photography. Since the Eye-Fi is at its core SD storage media, you could probably have it geotag data saved to the card, even if it wasn’t created by a digital camera..