SNES Mode 7 Gets An HD Upgrade

Emulating SNES games hits us right in the nostalgic feels, but playing SNES games on an 1920×1080 monitor is a painful reminder of the limitations of SNES hardware. [DerKoun] felt the same consternation, and decided to do something about it. He realized that some SNES games have much higher resolution textures that weren’t being taken advantage of. The SNES had a revolutionary video mode, mode 7, that allowed a game to set a relatively high resolution background, and then rotate and scale that background during gameplay.

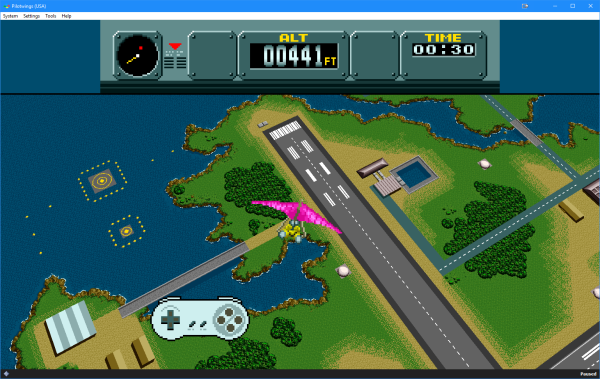
This pseudo 3d effect was amazing for its time, but taking a high resolution image and squashing it into a 320 by 240 pixel viewport makes for some painful artefacts. This is where [DerKoun]’s hack comes in. He wrote a modification to the bsnes emulator, allowing those rotations and scaling to happen in full resolution, vastly improving the visuals of mode 7 games.

The latest teaser for what’s to come is shown above, mapping the mode 7 backgrounds onto a widescreen viewport, as well as HD.

Come back after the break for some mind blowing SNES HD PilotWings action!

Update: Development discussion has continued in a new thread. Start with link above to get origin story and continue to the new dev thread for recent updates.
Continue reading “SNES Mode 7 Gets An HD Upgrade”

Reverse-Emulating NES: Nintendception!

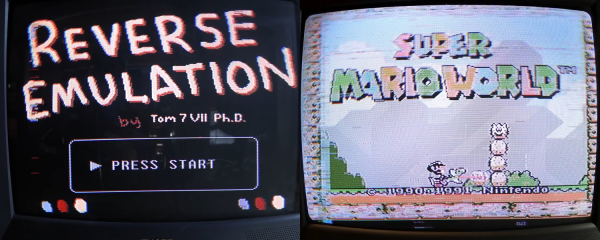
This is a stellar hack, folks. [Tom7] pulled off both full-motion video and running a Super Nintendo game on a regular old Nintendo with one very cute trick. And he gives his presentation of how he did it on the Nintendo itself — Nintendo Power(point)! The “whats” and the “hows” are explained over the course of two videos, also embedded below.

In the first, he shows it all off and gives you the overview. It’s as simple as this: Nintendo systems store 8×8 pixel blocks of graphics for games on their ROM cartridges, and the running program pulls these up and displays them. If you’re not constrained to have these blocks stored in ROM, say if you replaced the cartridge with a Raspberry Pi, you could send your own graphics to be displayed.

He demos a video of a familiar red-haired English soul-pop singer by doing just that — every time through the display loop, the “constant” image block is recalculated by the Raspberry Pi to make a video. And then he ups the ante, emulating an SNES on the Pi, playing a game that could never have been played on an NES in emulation, and sending the graphics block by block back to the Nintendo. Sweet!

The second video talks about how he pulled this off in detail. We especially liked his approach to an epic hack: spend at least a day trying to prove that it’s impossible, and when you’ve eliminated all of the serious show-stoppers, you know that there’s a good chance that it’ll work. Then, get to work. We also learned that there were capacitors that looked identical to resistors used in mid-80s Japan.

These are long videos, and the first one ends with some wild speculation about how a similar human-brain augmentation could take a similar approach, replacing our “memories” with computed data on the fly. (Wait, what?!? But a cool idea, nonetheless.) There’s also another theme running through the first video about humor, but frankly we didn’t get the joke. Or maybe we just don’t know what’s funny. Comments?

None of that matters. A SNES game was played in an NES by pushing modified graphics from a “ROM” cartridge in real-time. And that’s awesome!

If you want more Nintendo-in-Nintendo goodness, check out this NES ROM that’s also a zip file that contains its own source code. If you compile the source, you get the zip file, which if you unzip gives you the source to compile. Right?

Continue reading “Reverse-Emulating NES: Nintendception!”

RetroPie SNES Portable

RetroPie Portable Looks Like SNES Gameboy

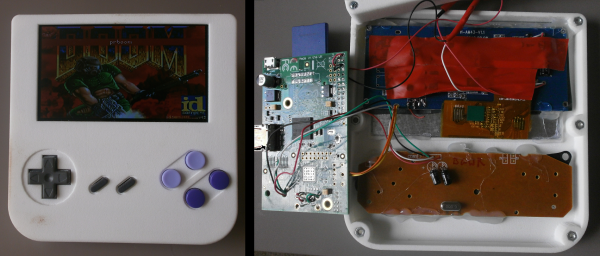
[Mat] wanted a portable RetroPie project he could take while travelling. He made one with a laser cut plastic housing and, according to him, it turned out to be a ‘hideous deformed beast’. In version 2 he took a different approach and we must say it came out looking pretty nice.

This time [Mat] went with a 3D printed case. He designed it himself in SketchUp. Unfortunately, [Mat] doesn’t have access to a 3D printer so he had to send it out to a professional printing company to the tune of £60 ($90). Although that was a large chunk of change, he was happy with the quality of the print. The final exterior dimensions of the case is 13 x 13 x 2.5 cm.

A quick look at the controls will remind anyone of an SNES controller. [Mat] took the innards of an SNES-like USB gamepad and modeled the new case around it. Not having to cut up or otherwise modify the controller PCB makes for an easy addition to the project. Conveniently, the width of the controller was just about the same as the 4.3 inch LCD used for the gamepad’s display. Both fit nicely together.

Under the hood is a Rasberry Pi running RetroPie. An internal 2600mAh Lithium Ion battery provides up to 3.5 hours of game play. Battery charging management is provided by an Adafruit Powerboost 500 which also has a micro USB port that makes connecting an external charger easy.