HoloLens NES Emulator For Augmented Retro Gaming

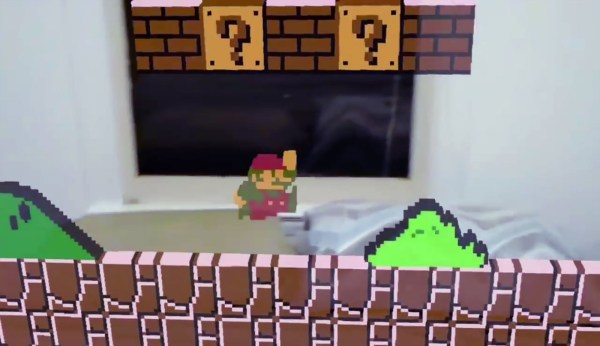
[Andrew Peterson] was looking for a way to indulge in his retro gaming passions in a more contemporary manner. His 3D NES emulator “N3S” for Windows brings Nintendo classics to the HoloLens, turning pixels into voxels, and Super Mario into an augmented reality gingerbread man.

To run NES games on the HoloLens, [Andrew’s] emulator uses the Nestopia libretro core. Since AR glasses cry for an augmentation of the game itself, the N3S re-emulates the NES’ picture processing unit (PPU), allowing it to interpret a Nintendo game’s graphics in a 3D space. [Andrew] also put together a comprehensive explanation of how the original Nintendo PPU works, and how he re-implemented it for the HoloLens.

The current version of the N3S PPU emulator automatically generates voxels by simply extruding the original pattern data from the game’s ROM, but [Andrew] is thinking about more features. Users could sculpt their own 3D versions of the original graphic elements in an inbuilt editor, and model sets could then be made available in an online database. From there, players would just download 3D mods for their favorite games and play them on the HoloLens.

According to [Andrew], the emulator reaches the limits of what the current pre-production version of the HoloLens can render fluently, so the future of this project may depend on future hardware generations. Nevertheless, the HoloLens screen capture [Andrew] recorded makes us crave for more augmented retro gaming. Enjoy the video!
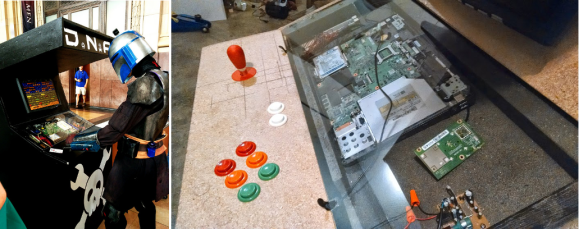
Raspberry Pi 2 Game Boy Brings Sexy Back From 1989

When the ever-versatile Raspberry Pi was released, the potential for cheap video game emulation was immediately obvious. Some of the very first Raspi projects to hit the internet were arcade cabinets, and it wasn’t long until people were making them portable. A purpose-build Linux distort called RetroPie has become very popular specifically because of the Raspi’s game-emulation potential. However, the actual hardware for these emulation systems isn’t always the most aesthetically (or ergonomically) pleasing. That’s where reddit user [Cristov9000] has managed to stand out from the crowd.

[Cristov9000] accomplished this by combining high-quality design (and 3D printing) with the careful use of original Nintendo parts. Game Boy and SNES buttons and elastomers were used to achieve the correct button feel. Other original Game Boy parts, like the volume wheel and power switch, ensure that the system feels as much like 1989 OEM hardware as possible.

Also impressive is the internal hardware, including 3 custom PCBs used to tie everything together to work via the Raspberry Pi 2 GPIO pins. The display is a 3.5″ TFT screen, and with the 6000 mAh it can handle gameplay for more than 7 hours. Other details, like the integrated mono speaker and rear shoulder buttons complete the experience. Combined with the RetroPie and an assortment of emulators, this is one of the most impressive portable gaming builds we’ve seen, especially among a crowded list of awesome raspi-based Game Boy builds.

nintendo

Nin10do Retro Game Console Stands Above All Others

If your living room entertainment area is not home to a Raspberry Pi based retro game console, you no longer have any excuses. Break out your soldering iron and volt/ohm meter and preheat the 3d printer, because you will not be able to resist making one of the best retro game consoles we’ve ever seen – The Nin10do.

It’s creator is [TheDanielSpies]. Not only did he make the thing from scratch, he’s done an extraordinary job documenting all the build details, making it easier than ever to follow in his footsteps and make one of your own. He designed the case in Autodesk and printed it out with XT Co-polyester filament. He uses a Raspi of course, along with an ATX Raspi board from Low Power Labs to make the power cycling easier. There’s even a little stepper that opens and closes a cover that hides the four USB ports for controllers. Everything is tied together with Python, making the project super easy to modify and customize to your liking.

All code, schematics and .stl files are available on his github. It even has its own Facebook page! Be sure to check out the vast array of videos to help you along with your build.

Continue reading “Nin10do Retro Game Console Stands Above All Others”

RetroPie SNES Portable

RetroPie Portable Looks Like SNES Gameboy

[Mat] wanted a portable RetroPie project he could take while travelling. He made one with a laser cut plastic housing and, according to him, it turned out to be a ‘hideous deformed beast’. In version 2 he took a different approach and we must say it came out looking pretty nice.

This time [Mat] went with a 3D printed case. He designed it himself in SketchUp. Unfortunately, [Mat] doesn’t have access to a 3D printer so he had to send it out to a professional printing company to the tune of £60 ($90). Although that was a large chunk of change, he was happy with the quality of the print. The final exterior dimensions of the case is 13 x 13 x 2.5 cm.

A quick look at the controls will remind anyone of an SNES controller. [Mat] took the innards of an SNES-like USB gamepad and modeled the new case around it. Not having to cut up or otherwise modify the controller PCB makes for an easy addition to the project. Conveniently, the width of the controller was just about the same as the 4.3 inch LCD used for the gamepad’s display. Both fit nicely together.

Under the hood is a Rasberry Pi running RetroPie. An internal 2600mAh Lithium Ion battery provides up to 3.5 hours of game play. Battery charging management is provided by an Adafruit Powerboost 500 which also has a micro USB port that makes connecting an external charger easy.