[Matt] noticed an overabundance of sous vide builds in the past week, so he decided to throw his Home made meat smoker into the ring. There’s not many things more delicious than a nice cut of smoked meat, and the fact that it’s very similar to the sous vide hacks we’ve seen is an added bonus.
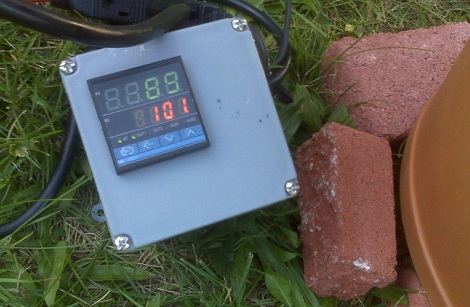
[Matt] decided to build a ceramic smoker like a Big Green Egg. He took a cue from [Alton Brown] and used two terracotta planters and a hot plate for the smoker. For controlling the hot plate, the cheap $35 PID controller we’ve seen in a few sous vide builds was used. The PID can’t control the 7 amps of AC that the hot plate needs, so [Matt] used a solid-state relay he had lying around.
A stainless steel mixing bowl was placed on the hot plate for wood chips. So far, [Matt] has run his smoker for more than 12 consecutive hours, and the results are really promising – there wasn’t much change in temperature between the chill of the morning and the heat of afternoon. [Matt]’s build is great and perfect for venison jerky now that deer season is coming up.


Link is borked!
Link is broken!
The link isn’t working – I just see the HAD Kitchen Hacks banner.
check the link
Yup – “home made meat smoker” links points to the “kitchen hacks” banner:
http://hackaday.com/wp-content/uploads/2011/11/theme-banner-kitchen-hacks.png?w=470&h=60…
please fix
fiiine, I guess I have to do it:
http://mhkaufman.blogspot.com/2009/11/home-made-electric-smoker-with-pid.html
You don’t want to dry jerky with heat. Heat encourages bacterial growth.
AFTER the meat has been smoked, you can dry/dehydrate it to make the jerky.
@ehrichweiss, a smoker isn’t for making jerky, it actually cooks the meat. it’s how you make barbeque
see: http://www.ehow.com/how-does_4578671_food-smoker-work.html
i dunno why HAD put that thing about deer jerky in there, he doesn’t mention it at all in his article
“i dunno why HAD put that thing about deer jerky in there…”
Editorial license? They like deer jerky? Because deer jerky (made well) is tons of awesome goodness? To encourage us to help police the sides of the road, removing “sleepers” as soon as they become available (civic pride)? Waste not, want not? Because Bambi, in spite of the liberal lawyers, was really a jerk, and killing and eating him is really the best solution?
I vote heavily in favor of “Because deer jerky … is tons of awesome goodness”.
I’ll have to find the $35 PID… oh man, I’ll get in trouble if I start another project. “Why did I get more electronics? Um. Hey, honey, remember the deer that got hit on the road behind our house? No worries, he’s not there any more! Love ya, hon!”
Of course, she won’t eat deer jerky — if I tell her it’s venison. NOW, it’s sirloin!
Seems like it’s time to bring home a new wife instead of new electronics :D
Oh, also, while I haven’t thought about jerky, I have been thinking about using this as an offset firebox and pumping the smoke through a tube to another, hot-plate-free pair of terracotta pots, to try cold-smoking fish. Might be a project for next spring.
Those “cheap” $35 PIDs could be replaced with a $1 AVR, a $5 thermocouple, a wall-wart or battery, and some acrylic and silicon caulk for a weather-proof box. If you’re not good at C, there’s a lot of example code on google that shouldn’t be too hard to modify. Atmel even has an application note and sample code for an AVR PID.
http://www.atmel.com/dyn/resources/prod_documents/doc2558.pdf
http://www.atmel.com/dyn/resources/prod_documents/AVR221.zip
Oh, and a couple of $1 7-segment displays and a $0.25 pot or a couple of $0.10 buttons to control it. You might also need a couple of $0.50 shift registers to control the displays if you dont want to deal with multiplexing.
I have one of these controllers. It’s a bit smarter then that. I use mine for Sous Vide. It has a mode where it learns/trains itself. It does this cycle where it determines the rate at which it can heat and some other voodoo stuff it does. I should also note that I ordered the voltage pulse model(12v output for triggering a relay or SSR), and they sent me the relay model instead(built in relay). The datasheet says it’s rated for 3A(not enough for my project), so I decided to take it apart so I could replace the relay with a higher rated one. When I opened it I discovered that the relay on the board is actually rated for 10A which is sufficient for my 9A load. I’m using the on-board relay now(until it burns down the house or something.)
I didn’t look at the sample code, but if it doesn’t do it already, it shouldn’t be too hard to make it “learn” how quickly it heats up and cools off and adjust the timing. Also, I saw some $5 10A relays controlled by 5v on mouser, which most microcontrollers can handle without any extra hardware. That brings the price up to ~$15, which saves enough, IMO, to be worth coding yourself, but I could understand spending the extra $20 if you don’t want to bother messing with the code.
I paid $21 with free shipping for my controller off eBay. :)
I don’t know much about AVR, but yeah, you can replace the control box with an arduino as well, there’s a whole PID library. For this project, i chose a relatively cheap and easy off the shelf solution. I’ve been messing around with the arduino solution, adding on features like onboard data logging and web access/control, but I haven’t finished that yet. So in the mean time, it’s chinese process control electronics that heat my meat.
Arduinos are basically glorified AVR dev boards, so if you had a good PID sketch developed on an arduino you could load it and the arduino bootloader onto the AVR hardware setup I described above and use your Arduino for other projects.
oh, also, i replaced the jury-rigged thermocouple with a nice 8 foot thermocouple with a stainless braided sheath, which has handled the elements very well so far.