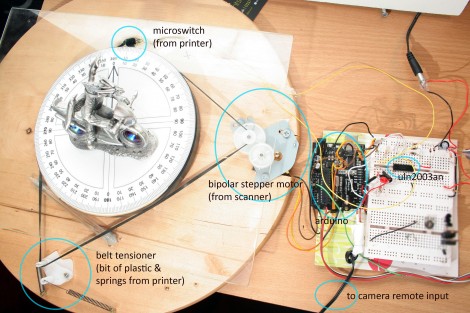
This turntable can automatically digitize objects for use in 3D rendering software like Blender3D. [James Dalby] built it using a high-quality DSLR, and some bits and pieces out of his junk box. The turntable itself is a Lazy Susan turned on its head. The base for the spinning model is normally what sits on the table, but this way it gives him an area to rest the model, and the larger portion acts as a mounting surface for the drive mechanism.
He used the stepper motor from a scanner, as well as the belt and tension hardware from a printer to motorize the platform. This is driven by a transistor array (a ULN2003 chip) connected to an Arduino. The microcontroller also controls the shutter of the camera. We’ve included his code after the break; you’ll find his demo video embedded there as well.
The concept is the same as other turntable builds we’ve seen, But [James] takes the post-processing one step further. Rather than just make a rotating gif he is using Autodesk 123D to create a digital model from the set of images.
http://www.youtube.com/watch?v=BF7QUtghGi8
int camera = 13;
int startButton = 3;

long stepCount = 0;
long stepErrorCount = 0;
int callibrated = LOW;
int photos = 10;
int turns = 0;

int buttonPrep = 0;

unsigned long actualStepsPerRevolution = 1; //keep this at 1 or it gets confused somewhere.

unsigned long serialMode = 0; //to store serial data pulled from void getSerial()
int inbyte;

#include <Stepper.h>
int stepsPerRevolution = 13546; //13546 is about right if you can't be bothered to callibrate.
Stepper myStepper(stepsPerRevolution, 6,8,7,9);

void setup() {
  pinMode(camera, OUTPUT);

  myStepper.setSpeed(1); // set the speed in rpm based on stepsPerRevolution

  Serial.begin(9600);
  Serial.println("DalbySpin9002, contact@jamesdalby.co.uk");
  Serial.println();
  Serial.println("Photos required? (eg, '36/')");

  serialMode = 0;
  while (serialMode == 0) getSerial();
  Serial.println();
  photos = serialMode;
  Serial.print(photos);
  Serial.println(" photos to take.");

  if(photos > 360){///////////////////////warn if asked to take too many photos
  Serial.println("Hmm, taking this many photos probably wont go to well but you're probably going to try anyway so good luck with that!");
  delay(2000);}

  Serial.println();
  Serial.print(" Positioning for Calibration...");
}

void loop() {

//CALLIBRATION
 while (turns < 2){
   while (digitalRead(startButton) == LOW && turns < 2){
    stepAdv(1,0);//go one step
   }

   if (digitalRead(startButton) == HIGH){
     while (digitalRead(startButton) == HIGH) stepAdv(1,0);//go one step
     turns = turns + 1;
     if (turns == 1){ Serial.println(" Done.");
     Serial.print(" Calibrating...");}

     if (turns == 2){
       stepsPerRevolution = stepCount;//  divide one rotation up into a series of photos

       Serial.println(" Done.");
       Serial.print(" Recorded steps for one revolution = "); Serial.println(stepCount);
     }
     stepCount = 0;
     delay(5000);
   }
 }
//END OF CALLIBRATION

//GO CODE:

 if (turns >= 2 ){
   Serial.println();
  Serial.println("Capturing:");
  delay(9999);

  int photoCount = 1;
  for (int i=1; i <= photos; i++){

    Serial.print(" Photo "); ///"Photo x of y"
    Serial.print(photoCount);
    Serial.print(" of ");
    Serial.print(photos);

    /*Serial.print(" Steps = ");
    Serial.print(stepCount);*/

    delay(2000);
    digitalWrite(camera, HIGH);  //trigger SLR
    Serial.println("   CLICK!");

    delay(2000);
    digitalWrite(camera, LOW);
    photoCount = photoCount + 1;

    stepAdv(stepsPerRevolution/photos, 0); //divide one rotation up into a series of photos
  }
    delay(10);
    while(photoCount >= photos){}

  }

  ///////////////////////////END

 }

void stepAdv(int steps, int mode){
  go(steps);
  stepCheck();

}

void go(int steps1){
  for (int i=1; i <= steps1; i++){
    myStepper.step(1);
    stepCount = stepCount + 1;
   stepCheck();

  }

}

void stepCheck(){

  if (digitalRead(startButton) == HIGH ){
    actualStepsPerRevolution = 0;
   }
  if (digitalRead(startButton) == LOW && actualStepsPerRevolution == 0){
    actualStepsPerRevolution = stepCount;
  }

 }

long getSerial() ///to set number of photos
{
  serialMode = 0;
  while (inbyte != '/')
  {
    inbyte = Serial.read();
    if (inbyte > 0 && inbyte != '/')
    {
      serialMode = serialMode * 10 + inbyte - '0';

    }
  }
  inbyte = 0;
  return serialMode;

}


This is cool. It’s nice to see that everything can be controlled from the one Arduino. I’ve needed to make 3d models before, and I’ve just used a microwave oven turntable motor (~ 4 RPM). But this certainly gives complete control.
Far out as far as it goes, but I may be expecting too much. For example no “under boob” view if a woman model was on the turn table.
This is easily fixed by scanning a second or third pass and changing the height of the camera, or in a professional rig you would have multiple cameras at varying heights and angles to give you better coverage.
Hehe, nerd pewter to ‘puter.
Good old IKEA.
All you need is a series of pictures and 123D will create a 3D model? That is amazing!
I just started looking at 123D today. I love how it can ‘slice’ up the model into cardboard layers. Anybody know if you can do the same with acrylic?
(I could just model it in cardboard, but I want to be able to preview it with a different material.)
1st….it doesnt slice cardboard…it creates interlocking slices at a specified thickness and angle outputting it in a non overlapping layout of the layers. This file can then be used as path data to guide a tool that could cut whatever.
you could use a waterjet, a laser, a vinyl plotter etc to cut anything from paper to marble if you were so inclined and funded.
so…yes
I wasn’t talking about the physical object – I was talking about the software. I know you can use whatever material you want once you get the file to give to the laser cutter. (For extra, further clarification, I’m also aware a laser cutter has a limited range of materials it can process. So when I say “whatever material you want”, I mean whatever material the laser cutter is compatible with. I didn’t think I had to be so verbose with a bunch of intelligent hackers…)
I was under the impression the 123D software could take a 3D model and then ‘slice’ it up into individual layers of material. Looking at the model gallery, that’s what it appears to be. I would like to design a solid 3D model of something (lets say…a cube) and have the software automatically generate the slices for me.
Are you sure the pieces are actually interlocking or do you just glue them together? I didn’t see any interlocking parts in the couple pictures I saw…
Also, you didn’t have a 2nd point so your “1st” was not necessary. Thanks.
tl;dr – Anybody have a link to a good tutorial for 123D, specifically the cardboard layering technique?
Sorry!
I retract my entire comment and all questions. Figured it all out in a couple minutes.
I truly am an idiot.
Cool! This + 3D printer = read write
Whoa! I’m an Autodesk employee, and I’d never even heard of this 123D thing until this article. Now I can’t wait ’til Monday to see if they do an employee discount, haha.
free: http://www.123dapp.com/catch
Asks for an autodesk ID to sign up, and I do not have such a thing, nor do I have a facebook or such account, so to hell with it I guess.
Unless they mean a selfmade username?
Seems they do, sigh, I’m used to such ‘ID’s to be serial numbers and such and was confused by their terminology.
NextEngine scanner does this but it’s about $2000.
I’d love to see this sort of thing applied to online retail. 360-degree views are okay, but a 3D model with enough surface definition would let you see *any* angle. Kind of pointless for DVDs, but it could be useful for things like digital cameras (so you can see where all the controls are).
+1 for Bonobo
This is really cool!
Respect to James for building (and publishing!) this project. However, at this moment, I am even more impressed by the Autodesk software that he feeds his images into! Apparently I am not the only HaD reader who was completely oblivious to this.
Going through the tutorials, it seems like a turntable is not needed, or even the best way to take pictures (though it makes for easy automation).
Having a static object with lighting in a constant direction (and no flash) seems to work better with the software.
I would have liked to see more of the resulting model.
I’m surprised the changing light angles (due to fixed lights and a rotating subject) don’t adversely affect the digitization. Then again, maybe it actually enhances it… Either way, great hack!
Ninja’d by @foogoid :P
They actually do influence it a lot but he made sure he had even lighting. If you have any hint of shadows then putting it on a turntable will ruin the scan.
is there a website for this? a writeup?
Too bad Autodesk only supports Windows.
To be fair it works fine in Wine, and they are working on a fully browser based system.