Just because you have a fancy new 3D printer doesn’t mean that innovation should stop there. Almost everyone has had a print go foul if the first layer doesn’t properly adhere to the printing platform — to say nothing of difficulty in dislodging the piece once it’s finished. Facing mixed results with some established tricks meant to combat these issues, [D. Scott Williamson] — a regular at Chicago’s Workshop 88 makerspace — has documented his trials to find a better printer platform.
For what he had (a printer without a heated plate), painter’s tape and hairspray wasn’t cutting it, especially when it came time to remove the print as the tape wouldn’t completely come off the part. How then, to kill two birds with one stone? Eureka! A flexible metal covering for the printing plate.
The first test was with some aluminium flashing, once rolled out and cleaned, double-coated with hairspray and dried with a heat gun, and secured to the printing platform with clips. Unfortunately, that failed, along with a test using a wet coat of hairspray. However, the same plate with a coat from a glue stick worked almost perfectly!
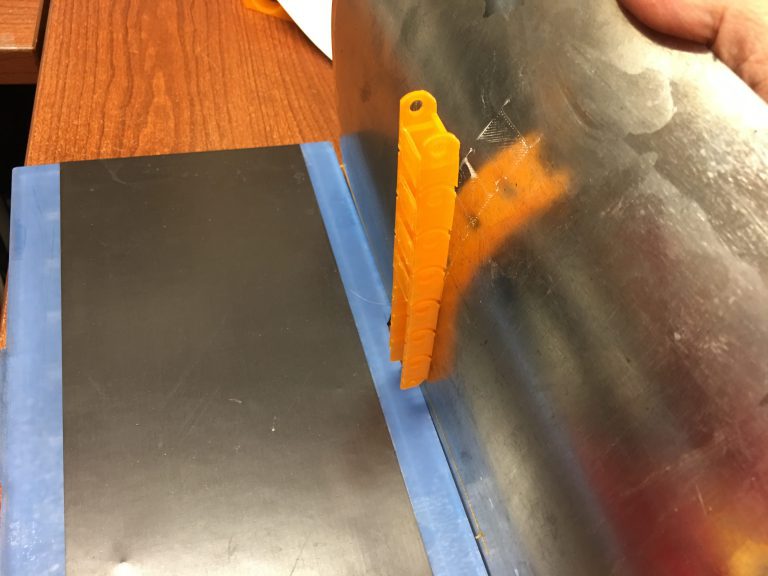
 Next up was a steel plate using the glue-and-clip-down method, which yielded similarly successful results. The catch with using the clips is that it subtly warps the steel, which could cause printing deformities. How to mitigate the problem? Magnets, obviously.
[Williamson] used a sheet of “refrigerator magnet material” secured to the printing platform with double sided tape, and the steel plate laid on top. A quick coating from a glue stick and test print later produced his most successful results. The method is reliable as long as the glue was cleaned off every few prints. The only caveat is that if the print does somehow get snagged by the print head, the relatively weak magnet doesn’t stand a chance, with the entire plate becoming dislodged!
A few years ago, we featured a home-built manufacturing line that used a similar concept, allowing a robot to replace printing platforms while the owner was out.


I’ve recently switched to using an Ultem(tm) sheet on one of my printers (MP Select Mini), and it works great. For my SeeMeCNC Orion, I stick to hot, clean glass for PLA.
“`the relatively weak magnet doesn’t stand a chance“` Use better magnets then, like hard drive magnets. Consistent thickness would be a must.
There’s a balance between ‘holds well’ and ‘can’t be removed by mortal hands’.
Lol. Damned if it isn’t a bit of a pain to seperate one of those hdd magnets off the stack.
What about electromagnet(s) installed under the bed. When print is finished, switch it off, and remove the print.
I really love these early days of this tech and the innovaton, but I dont think actual adjustment and calibration is stressed enough. In my 3 years printing I never truly got good results until I sat down and adjusted everything to be aligned. Really really aligned, not auto aligned or the “piece of paper height” adjustment method. I thought too that I needed a sticky bed, but once I checked everything using the pin height gauge and checked all axes for as little deviation as possible, I don’t need anything to make it stick. Straight to the glass. Its a painful, difficult process and you will lose all hope along the way, but it is all worth it in the end. I don’t fear walking away from big prints now . Its shocking how far off your rig can be and “work” enough to get a mediocre print with enough aquanet . If you take the time you will be rewarded with excellent prints and you will also learn about your machine in intricate detail that allows you to better plan your prints and maintenance. Sure I still lose a print every now and again, but its almost always a slicer problem or my own mistake not catching a small detail/error in the drawing (or if the air conditioner vent is too close!). Take the time and get it right and you wont need to do all of this. This might make it simple (which is probably many peoples only goal and I understand this) but if you want a printer that really works and are a tinkerer, roll up your sleeves and really get in . Its really satisfying in the end, I promise :D
Unfortunately it seems as if everyone just expects a tool to work out of the box. We are not talking a cordless drill here. Have fun using a mill without properly setting it up and expecting your final piece to be to the dimensions and specs you set in your design.
I use a glass plate, no heated bed, PLA @190 to 205 and UHU Color Changing Glue Stick. Either Purple or Blue. Blue is slightly better. No more warping. Ever. I’ve read on a forum that any glue stick would work but Pritt (or other brands) etc is toxic when heated, which I’ve chosen to avoid. Additionally, apparently it works due the chemical formula of the glue and PLA. So i haven’t tried with ABS.
https://ultimaker.com/en/community/17432-glue-stick
somewhere on the forum there is a test of the glue stick and the amount of force required to remove the print
I too use the UHU stick-to-glass method, however, I found that wiping the UHU with a damp sponge (effectively making a UHU slurry) and spreading it over the glass, works much much better. When done, squeeze any remaining liquid into a mason jar for reuse in later prints. For subsequent prints I only need to re-apply a thin coat from the remainder of the slurry. Every 2 or 3 prints I perform a full clean and wipe of the glass, though this may not be necessary.
pritt stick is made from tapioca,starch, sugar. Can’t find any links about it being toxic. Source please ?
http://www.justprint3d.com/uhu-vs-generic-glue-stick-getting-pla-to-stick-to-the-print-bed/
i’ll retract the toxic part of the comment as I can’t find the source. in addition to the link i’ve posted there is another test where they use the glue sticks and test the amount of force required to remove the print from the glass when a heated bed is also used (with the bed at a different range of temperatures). I’m pretty sure the general gist was that the uhu was ok heated, pritt was not so good (due to minimal if any effects, I’ve mistakenly quoted previously), and both were fine at room temp. But I can’t find the source so will retract.
Water-soluble glue stick is great. If the print won’t come loose at the end, you can just squirt a bead of water around the perimeter and wait a few minutes.
Looks similar to the BuildTak flexplate system. One issue is that magnets are damaged by heat and the cheap stuff is likely to fully demagnetize at ABS printing temperatures.
What about an electromagnet?
As long as you’re going that route, why not electropermanent magnets?
Otherwise, some inductive prox “edge keepers” just in case it does dislodge. That would be the simple safety option during testing.
Get a sheet of PEI and be done with it.
http://reprap.org/wiki/PEI_build_surface
The only problem I have with PEI is it can be wicked hard to remove the print since it sticks so well, especially PETG. At least it solved all my warping problems.
Yep, PETG sticks to PEI very well, I find that you can adjust the nozzle height to adjust how well PETG sticks to PEI, on my 3D printer I have an easy Z height adjustment knob, and adjust the nozzle to start the print higher above the print bed for PETG, it works well but you might have to do a small test print or two before getting the sweet spot.
With ABS I still seem to need a brim no matter how I adjust the nozzle, but I don’t need anymore hairspray like I was using on the glass bed I had before.
For ABS on a heated aluminium bed, a thin layer of 10:1 diluted PVA glue. Perfect adhesion at 110C, perfect release below 50C.
I’ve been printing onto a lightly sanded 3/16″ thick 12″x12″ sheet of polycarbonate (lexan) regularly for about a year, and could not be any happier with it. For those interested in trying it out, here’s my observations:
– This works perfectly with PLA, PETG, and bendlay (a modified butadiene), without a heated bed, without any warping or corner lifting, and without any fuss. No glue, no tape, no films, no slurry, no hairspray, nada. Makerflex (TPEE; similar to ninjaflex) stuck a little too well, but could be detached using a razor blade (especially given how flexible it is). I’ve not tried to print ABS on it (grew tired of the scent), but it might work, given that bendlay does. Nylons are also on the list to try.
– Bending the sheet back and forth detaches the part cleanly and with a satisfying “pop!” virtually every time. The consistency of this is utterly magical. For large parts that won’t detach as easily, the flexibility of the sheet makes it easy to slip a putty knife under a corner to finish the job. For a 12″ x 12″ sheet, any thinner than 3/16″ is too thin and is liable to be bent during the print by the cooled part (I clamp mine down using 2-1/2″ harbor frieght spring clamps), and any thicker woudn’t be flexible enough to easily detach a small part.
– In my experience, if the sheet isn’t sanded, a print will adhere too well and be much too difficult to detach. Sanding in circular patterns with 180-grit sandpaper (lightly and by hand) until the surface is uniformly cloudy works well. If you keep it in use long enough, you might eventually need to re-sand.
– I’ve not found it to be sensitive to contamination, and have never needed to clean it.
Hope this helps someone!
FWIW I concur – sheet of polycarbonate is perfect for PLA and ABS.
We tried numerous anecdotal solutions, and most of them end up barely working. Out of all the methods students tried, there is one reliable solution for holding ABS on glass. Use the following process in a well ventilated area, or ensure your heated chamber has a fume extractor to outdoors… glasses, gloves, and a mask couldn’t hurt either… ;-)
1. Heat the glass bed to 98 to 103’C (keeps ABS objects flexible during build)
2. Apply 6 drops of Krazy glue (Cyanoacrylate also likes greasy fingerprints), and spread a thin layer using metal edge putty knife
3. Allow surface to dry for 30 seconds (note the glue will vaporize to form a thin white-fog-coating)
4. Print (raft is still recommended on smaller objects, or add mouse ears to sharp corners)
5. Important, allow bed to cool to 20’C before trying to remove as the glass will break before you get that ABS off
(slowly cooling also seems to reduce ABS warping in the heated build chambers)
6. Remove object with paint scraper push razor… it usually will just slide off, as the glue will shear as it cools
I will remind the users, do not try to remove objects while the bed is still heated as it can actually damage/crack the glass,
I replaced the bed on my printer with a little shallow tray. I fill it with water with just a bit of hair spray mixed in and freeze it in the freezer. You have to make sure it sits perfectly level in there! I suppose a self-leveler would be a good addition to my printer.
Anyway.. printing on ice is awesome!
The hair spray makes it stick really well. The surface is always smooth and new because I freeze a new one every time. And.. parts are easy to remove too! Just let it melt!
In the event you are in a hurry to get pop your build off the bed… an eyedropper with some Ethylene Glycol does the job fast!
What happens if you have a long print (12H+) and the ice melts ?
I would like to see DIY 3D printer using a Mig welder, you could print metal structures.
I’ve got a Makerbot Rep 2. Would you recommend moving to a glass build plate ?