
Eager to get deeper into robotics after dipping my toe in the water with my BB-8 droid, I purchased a Raspberry Pi 3 Model B. The first step was to connect to it. But while it has built-in 802.11n wireless, I at first didn’t have a wireless access point, though I eventually did get one. That meant I went through different ways of finding it and connecting to it with my desktop computer. Surely there are others seeking to do the same so let’s take a look at the secret incantations used to connect a Pi to a computer directly, and indirectly.
Why connect to the Pi from my desktop computer? After all, there are small monitors and keyboards that hackers frequently use to make Pi laptops and Pi tablets. Since I was going to be embedding the Pi in various robots, I saw no need to purchase a separate monitor and keyboard for it, but I did look a little into doing so.
My desktop’s monitor uses a VGA connector but the VGA-to-HDMI adapter I bought along with the Pi didn’t work. Also, my desktop’s ancient KeyTronic keyboard uses a PS/2 connector so that wasn’t usable either. Though PS/2-to-USB adaptors do exist, my research showed that I’d need the one that has USB smarts in it, as my keyboard predates USB and has no such electronics of its own. (But it does have sweet, deep tactile keys!) My Pi would remain headless, and I’d program it by connecting to it from my desktop computer.
Connecting Directly Via Ethernet Cable
My home modem was also ancient, having no wireless. It also had only one Ethernet port. That meant I could connect my desktop computer either to the modem or to the Raspberry Pi but not both at the same time. So on unboxing the Pi, the only way to connect it to my computer was to unplug the Ethernet cable from the modem and plug it into the Pi instead. That meant no internet access while working with the Pi, hardly ideal, but good enough to see if the Pi worked at all.
But for my computer to talk to the Pi, I needed the Pi’s IP address. For those not familiar with IP addresses, they consist of 4 numbers ranging from 0 to 255 separated by dots. For example:
169.254.95.208
It’s really a 32-bit number but it’s written that way for readability.


Going to the Windows control panel on my desktop and then the Network and Sharing Center, I could see that a network now existed.
Clicking on View Status and going deeper I found some useful information. The first was the IP address of the desktop computer, 169.254.95.208. The IPv4 tells me that it’s using Internet Protocol version 4. The IP addresses in IPv6 differ at least in that they’re four times as long.
Further, the presence of the IPv4 Subnet Mask, 255.255.0.0 told me that a subnet, or subnetwork, had been formed between the two machines. A subnet is a group of machines making up a smaller network that may or may not be a part of a larger one. Their IP addresses all start with the same binary values, though just how many bits at the beginning they have in common varies. How do you know which bits are common?

That’s where the subnet mask comes in. To find out which bits, take the subnet mask and do a bitwise AND with the IP address of a machine on that subnet. As the diagram shows, the result in my case was 169.254.0.0, meaning that the Pi’s IP address must start with 169.254. Another way of writing the subnet mask is in CIDR notation. In CIDR notation the IP address is followed by a / and then the number of shared bits. In this case it would be 169.254.0.0/16. The last two numbers are zeros but they need not be since the 16 tells you what to keep. This CIDR notation will come in handy shortly.
Though the 169.254 was shared, that still left 65,536 (256×256) possible combinations for the two remaining numbers. To scan the network, going through every possible combination of numbers, I used nmap, downloadable from nmap.org.
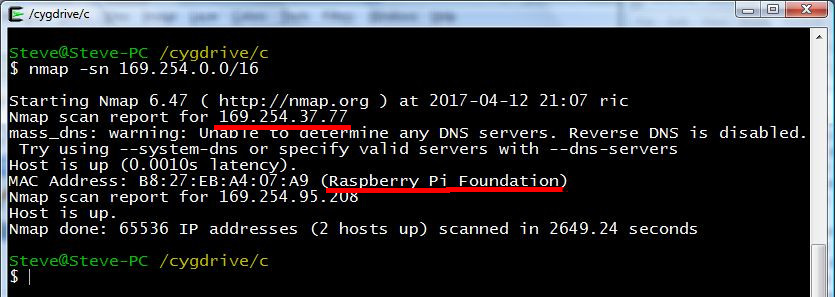
As shown in the snapshot, I ran it in a cygwin window though there are GUI versions available too. I used the following command line.
nmap -sn 169.254.0.0/16
Note that the subnet mask is given using CIDR notation. The section about the Raspberry Pi that you see in the snapshot appeared after around 10 minutes, meaning that it took that long to scan from 169.254.0.0 to 169.254.37.77, the Pi’s IP address. Even though that was what I was looking for, I left it going anyway and the full scan took just over forty-four minutes. During that time it also found my desktop computer, the host from which it was doing the scan. Had the Pi’s IP address been 169.254.255.255 then it would have taken the full forty-four minutes before finding it.
The Pi’s IP address continued to be 169.254.37.77 across shutdowns and so scanning again was not necessary.
Starting Up A Terminal And VNC Desktop


Now that I had it connected, I needed a terminal running a secure shell (SSH) into the Pi on the desktop computer. Setting up the terminal was simply a matter of downloading the popular PuTTY program and running it. In the Session section, I filled in the Pi’s IP address, port 22, and made sure SSH was selected. That opened up a terminal window with a login prompt. The default username is pi and the password is raspberry. Of course the first thing I did was run the passwd utility to change the password.
Alternatively you can get a graphical terminal instead using VNC. This is a graphical desktop that runs in a window on you desktop computer but is really a terminal into the Pi.
Connecting via Ethernet Using A Wireless Router
It wasn’t long after getting my Pi that I decided to switch to a wireless router / fiber modem combo. As a bonus, this upgrade also includes multiple Ethernet ports. I set up my desktop computer to use wireless, but I couldn’t do the same for the Pi just yet. I had to do some configuration on the Pi to set up the wireless, and so I had to connect using Ethernet first.
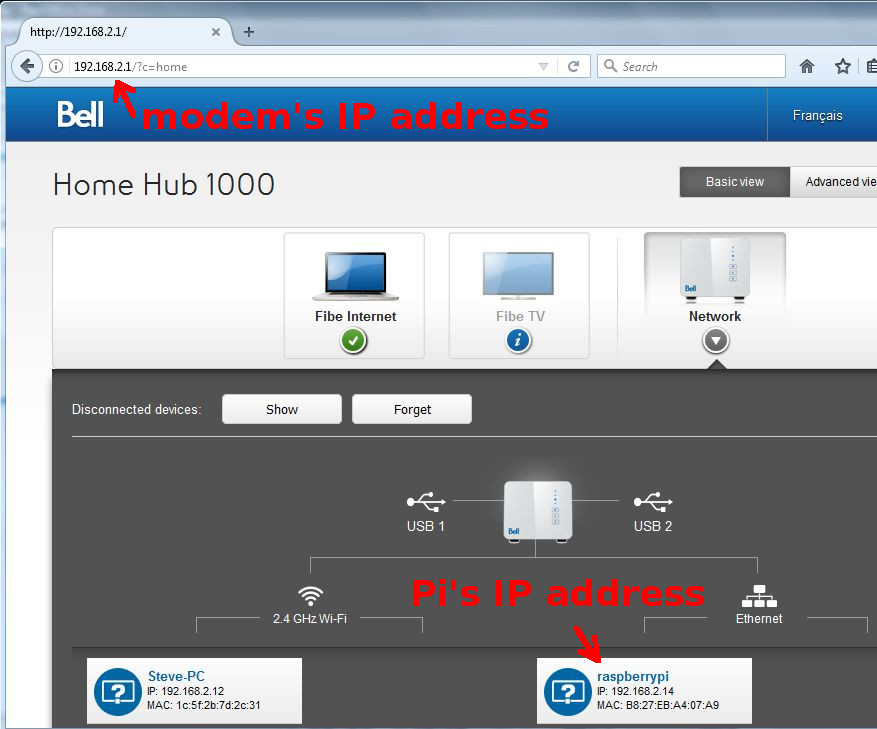
Connecting to the router with Ethernet was far easier than the direct-connection method covered above since no scanning was involved. Once I’d connected the Pi using an Ethernet cable, I simply brought up a browser on my desktop computer and typed the router’s IP address into the browser’s URL bar at the top. This is an address like 192.168.1.1 or 192.168.2.1, but with http:// in front of it, though some browsers don’t need the http://. Check your router/modem manual.
What you see depends on your modem, but mine displayed a network graph at the bottom with the Pi’s IP address, 192.168.2.14. With that I was able to bring up a terminal using PuTTY as described above.
If you want to remain using Ethernet between your Pi and the modem then you’re done. But I wanted to go wireless so that my robots could wander around without a trailing Ethernet cable. Now that I had a terminal into the Pi I could go on to the next step.
Connecting Wirelessly
The Raspberry Pi 3 Model B has wireless built-in, but if you have a version without wireless then you can also buy a wireless dongle that plugs into one of the Pi’s USB ports. Before you can connect to the headless Pi wirelessly, you’ll still need to connect to it using one of the above methods first, and do some configuration on the Pi.
I brought up a terminal and logged in as described above. I needed to put my wireless network name and network password into the configuration file /etc/wpa_supplicant/wpa_supplicant.conf. But for security reasons, I didn’t want the password to be in plain text.
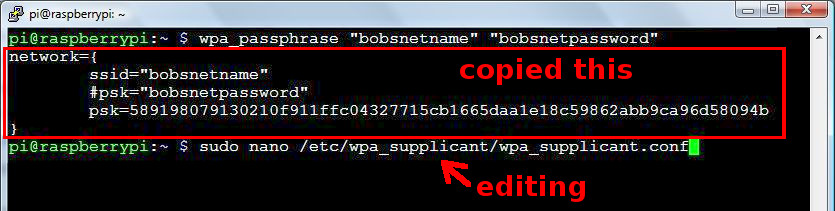
So I ran wpa_passphrase "bobsnetname" "bobsnetpassword" and highlighted the output, which in this terminal, copies the highlighted text to the clipboard. "bobsnetname" and "bobsnetpassword" are of course fictitious.
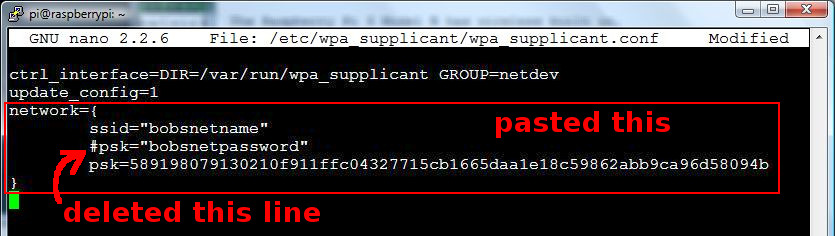
I then edited /etc/wpa_supplicant/wpa_supplicant.conf and pasted from the clipboard by right-clicking. The pasted text still included a line with the password in clear text. It was commented out but nonetheless, visible, so I deleted it.
After saving, and exiting the editor I disconnected the Ethernet cable. A running program called wpa-supplicant should have taken only a few seconds after the file was changed to notice it and get the wireless going. And so after waiting a few seconds I ran ping google.com. It worked. The Pi was connected wirelessly.
Had it not been then I could have restarted it manually by running sudo wpa_cli reconfigure. This also reports the interface name, wlan0 in my case.
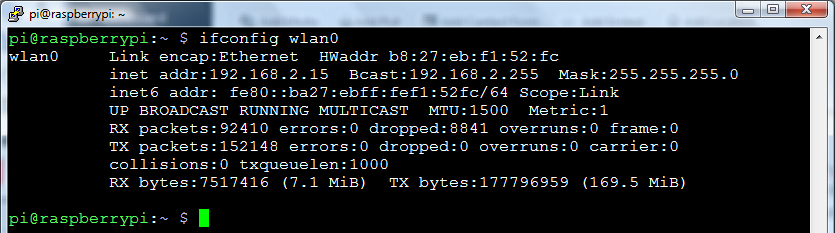
To further test it, and to get the Pi’s IP address, I ran ifconfig wlan0 and looked for the IP address beside the inet addr. It was there and with it I could connect to the Pi and start programming robots.
Those were my experiences in connecting to my Raspberry Pi, but we know that there are many Raspberry Pi users on Hackaday. What methods have you used, what traps have you found and what tips do you have for getting out of them? Let us know in the comments so that others don’t fall into them too.


Or you could just use pyLCI with a 5$ shield ;-)
It’s dead simple, if you want to see your IP – click a few buttons and here it is. Want to connect to a wireless network – sure, you can even enter its password right through pyLCI, and it’s all supported in latest Raspbian.
Don’t you have to install PyLCI for that to work? Wouldn’t you then have to talk to the Raspberry PI in the first place, something this article is talking about?
Yeah, but it’s an one-time install, and you can do that with keyboard+mouse or UART.
Did you not read the part about his PS/2 keyboard not being compatible?
Great article, very helpful for people getting started or who suddenly find themselves without an HDMI display and keyboard.
I ran into a similar situation a while back. Instead of Ethernet, I used a spare USB-FTDI-TTL serial adapter and connected it to the COM port on the Pi’s GPIO header. By default, it functions as a serial terminal.
Not on the Pi3, the UART is disabled by default:
https://www.raspberrypi.org/forums/viewtopic.php?f=28&t=141195
Thanks for the heads up!
Why not a serial connection to your computer and using a terminal emulator to talk to the RPI ?
Then you would have not lost your PC internet connection.
you could try an ‘arp -a’ from the command prompt on windows instead of nmap. It will tell you the current ethernet MAC to IP mappings you. I believe raspberry PI has B8-27-EB for it’s MAC prefix.
With direct connection, ‘arp -a’ didn’t work until I cheated. I had to use the known IP address from my previous efforts with nmap, ssh to the pi and then ping back to my desktop computer. Only after that did the pi show up in ‘arp -a’. Maybe there had to be network activity, other than the initial figuring out of the IP addresses? Come to think of it, possibly the ssh without the ping might have been enough.
In my experience, ‘arp -a’ only works if the pi is already physically connected to the other machine before/when it boots. The pi will send out an arp packet asking if any other device has the link-local address it has chosen. If you connect the two after it boots, the other machine may not see an arp packet from the pi for a *long* time, unless you do something to trigger it
That makes sense to me but, even with the pi physically connected before booting, it’s been around a half hour and still no pi IP address in the ‘arp -a’ output. Seems like that should work. Possibly the desktop machine isn’t configured to add to it’s table in that case, or maybe the pi isn’t sending back the IP address that it’s chosen.
I’ve experienced unreliability of “arp -a” as well… hence why i documented several alternative mechanisms in a link below. But as others have pointed out, usually “ssh pi@raspberrypi.local” on a fresh distro Just Works It even works to connect to fresh pi-zero over usb if it’s been configured to emulate an ethernet device using usb OTG. When it doesn’t work, in my experience some form of arp-scanning is the best bet. arp-scan worked faster than nmap for me.
@Jay Clegg I’ve tried the “ssh pi@raspberrypi.local” and variants as you guys suggested. I’ve confirmed from the pi that raspberrypi is the hostname. A google search turned up some avenues to explore as to what’s not configured on mine by default but I’ll have to get back to it later.
Yes, I too have experienced the proscribed way sometimes not working. Oh, when I said a long time, that might be “maybe never”. I was too impatient to to wait for a second arp packet.
Rather than try finding the ip of the pi you could use raspberrypi.local as long as you didnt change the hostname
+1
ssh pi.local – or ssh pi
Then you can use ifconfig or any other UNIX command to find the ip.
I am not sure that would work. On a regular network, that should work fine. However, that assumes a central DHCP server someplace.
Just hooking two machines together will not give you DHCP, so each machine will probably assume some default IP address, and if the two machines are not on the same subnet, you are stuck.
For anyone who has a decent local network with more than one port, the raspberry pi has a good default config :
Step 1 : Plug your pi anywhere.
Step 2 : “ssh pi@raspberrypi”
It probably also works in link local (direct Ethernet on your PC), but I didn’t try.
For direct connections with ethernet (link local), usually “ssh pi@raspberrypi.local” works just fine. For times when it doesn’t for whatever reason, I have a link below for alternative mechanisms
I’ve documented several alternative to connect to a headless pi with an unknown (link-local) address here https://github.com/planetclegg/Jays-HOWTOs/blob/master/IP-Discovery.md
Some sometimes work better than others. Sorry for the poor for formatting
Seriously – no wireless AP, no monitor with better than VGA and no USB keyboard? The Pi isn’t the problem. Your generally sucky collection of 90s hardware is the problem.
Nah, it’s just you that, it seems, hasn’t done anything outside of “use Pi as a desktop”. Monitors are huge, so are keyboards, and you can’t always carry a monitor&keyboard combo with you, this was the reason for me to start pyLCI. Also, HDMI monitors aren’t even 2000s hardware, more like 2010s,
Also, yes, not everybody has suitable hardware – mostly financial reasons. I, for example, didn’t have a suitable monitor just two years ago, and its been four years since I’ve been doing Pi stuff. Wanna sponsor somebody, or would you rather continue talking shit about other people?
DVI monitor, connects with pin adaptor to HDMI (no components in adaptor), I find monitor for $5-10 or free (last one was a 23″ headed to the dump, but of course I needed to replace the capacitors). Adaptor comes with video cards of a certain vintage, or $1-$3 on ebay
Point taken on unnecessary bulk, especially with a Pi Zero on your keychain, maybe OTG USB gadget serial console then.
Not sure why the regular Pi don’t have the OTG gadget function enabled or at least on pins.
It does not have OTG functions because there’s a whole USB hub between the SoC’s OTG port and the actual (non-OTG) USB ports. There’s no way to use OTG on a regular Pi without either desoldering the USB hub chip and connecting directly to the USB pins (involves fine-pitch soldering and removes Ethernet functionality), or getting a Model A which has no built-in hub (though a Model A is basically a bulkier and more expensive Pi Zero).
Haha i had to laugh out loud literally…. I’ve never posted or replied to a forum before. But i had to reply to this, well delivered.. it’s exactly what i was thinking when i was reading irjya
How to troll:
Step 1: Be 0xfred
Step 2: That’s it. You’re now a troll.
You can’t get me, trollhunter. I’m twenty years into your future! It’s a utopian future where USB keyboards are cheap as anything, and a decent monitor for your desktop PC is not huge extravagance. You can attach them to your Pi for 5 minutes before you then use it headless. Come join me in the future!
If your future was post-scarcity, sure. But you fail to realize that some people have to choose between buying modern components and eating this week. You can’t eat a USB keyboard (well you can, but then you don’t have a USB keyboard and now are bleeding internally).
I’ve been where the author is, nothing but hand-me-down components. My first computer was a TRS-80 in 1993; it could play Dungeons of Daggorath and do absolutely nothing else worth powering up for, yet I learned how to program on it, and when its power supply died I learned how to fix it. I didn’t get a “real” computer until much later, but I took what I learned on the Trash-80 and applied it.
If you’re going to judge someone based on what tools they have access to, then I’m going to tell you you’re a piece of shit not worth spitting on because you don’t drive a Tesla and you don’t have a mansion with 15 rooms. Or, actually, I’m not going to do that, because that would be a shitty thing to do to someone.
You know that a USB keyboard costs less than a Raspberry Pi, don’t you? If you can’t afford to eat then you can’t afford a Raspberry Pi. That kind renders the “how to work with it headless” rather moot.
I didn’t start by trolling but I’m now starting to enjoy annoying you. As you brought up the Tesla and mansion, I feel that I need to point out that just in the past month I have bought an electric motorbike (better than a Tesla IMHO) and a house worth over £1m. (It has 11 rooms and 3 garages. Not quite 15 rooms. Sorry). Feel free to call me whatever you like.
https://github.com/adafruit/Adafruit-Pi-Finder
When I got mine, I had no hdmi cable and no monitors that supported hdmi. Being impatient as I am, I used the wired ethernet and figured out the ip address with the admin interface on my WRT54G. SSH was enabled by default and I was in. Then I set up VNC desktop. Worked like a charm.
Yup. for my use cases, if I’m setting up a pi to run headless anyway, I have no desire to round up the parts to boot it with a monitor/keyboard for single boot session just to configure it…. if there is an easy way to avoid it (and there is).
BTW, SSH is no longer open by default with newer raspbian distros. But you can turn it on by creating an empty file called “ssh” in the root of the shared fat partition before booting it the first time
Crazy, I got bunch of those Tp link WR703N .. Joining things pointlessly over wireless or Ethernet is no hassle.
Thus SSH is fine control rpi’s with phones via ssh.
Are you using SSH on a phone?
I ssh to my home PC using ConnectBot on Android, works great.
I did have to set up a forwarded port from my router to port 22 of the PC I want to connect to.
Try PiBakery for your pre-configuration settings. It will install Raspbian and some configuration parameters such as WiFi and hostname. I was able to to provide my wireless settings and give it a hostname and viola! I was able to SSH right into the Pi after it boot up.
That looks pretty slick, thanks for the tip. I may not use it, but I can see recommending that for beginners
I came to this article JUST to post a pointer to PiBakery. It has really solved this problem for me. I just wish there were more things it knew how to do.
I have been trying to get my RPi3 to access my wireless printer on a local network. I have CUPS installed and it thinks it is talking to my printer but when I print nothing happens. CUPS says it occurred but… I turned the printer off and CUPS says it is still there. Maybe my printer is somehow getting goofed up with my PC or ???
Stick the Raspbian SD card in your computer, add `enable_uart=1` to /boot/config.txt. Connect a FTDI or similar USBSerial adapter to the serial and ground pins on the RPi. Connect the USB to your computer and open a serial port at 115200 baud. Put the SD card back in the Pi and boot the Pi. You should be greeted eventually with a serial login terminal.
I just connect a monitor and a keyboard once, get my script to send me an email on ifup which contains the ip addresses and it’s done.
What you stumbled across with the IP address is APIPA – Automatic Private IP Addressing, when a device (usually Windoze although other OSes will do it as well) can’t find a DHCP server, it’ll auto-assign an address in the 169.254.0.0/16 subnet. It’s pseudo-random in how it’s determined, some devices will generate it based on the last 2 octets of the MAC address although this does not seem to be the case with the RPi..
It should theoretically be possible to edit the Pi configuration file to set a static IP, although I think you’d have to mount the SD card on a Linux machine (or have Windows tools that will access ext file systems) since IIRC you have to edit the /etc/network/interfaces file in order to set this
One could also send a broadcast ping to 169.254.255.255 although not sure if a Pi will respond to a broadcast ping by default, but that’s usually faster than an nmap scan.
Great writeup though, always like reading how people solve different problems, especially ones where others would’ve given up!
I can’t believe Wireshark hasn’t been mentioned! This is one of my favorite use cases.
Identify the remote IP using this 3-step process:
1) Fire up wireshark, select your network interface controller, and start capturing
2) Plug in the ethernet cable
3) Identify the IP address by looking at the source an destinations
Or just learn2gentoo
https://youtu.be/VjGSMUep6_4
I dig your article! It totally brought me back to my hacking Linux boxes back in the 90’s!
I do know of one other solution to connect to a Raspberry Pi with your desktop/laptop PC with the same scenario you listed above:
Install the DHCP server in Windows, connect, (preferably a cross over cable, but after further reading, a standard network or patch cable will do the trick), a network cable between your PC and your PI. Boot up the PI and note the address that your DHCP server has assigned. Fire up Putty and SSH right in.
Crossover cables are so…90s. Wait, my phone is ringing. It’s the 90s calling, they want their cabling back.
There is absolutely no reason to use crossover cables. There hasn’t been for years now. Well, unless you’re using some reaaaally old hardware on both ends. But even the raspi itself supports auto-mdix.
It should be noted here that new Rasbian installs will not enable SSH by default. If you’re flashing a fresh image and want to connect to it over network without logging in with a keyboard and monitor first, you should drop a file named ‘ssh’ into the ‘boot’ folder (or the root of the fat partition that Windows sees on the SD card). This will enable SSH on the next boot.
It’s a relatively recent change (good for security), but I didn’t know about it until I couldn’t connect to a new project one day and had to google it.
This, +1.
Using VNC for headless development might be overkill. I prefer using SSH possibly with X11 forwarding. This allows you to run individual GUI apps remotely without having to run the entire desktop remotely. Under Linux (on PC) this just works if you have the ssh client/server installed. Under windows you need the XMing X server software along with Putty.
An older version of XMing is available for free: https://sourceforge.net/projects/xming/files/Xming/6.9.0.31/
You’ll have to pay for the latest version however: http://www.straightrunning.com/XmingNotes/
No AP? You have a cell phone, right? That’s how I connect all of my Pi’s at the local User Group meetings.
you can even set the RPI itself as an AP. It won’t have internet, but you can login to the RPI-AP from your PC and then SSH into it.
Don’t even need the PC, can SSH right into it from the phone.
I just thought of that last night. The phone should be perfect for when bringing pi driven robots to local meetups.
Wondering why you didn’t connect your router (not a modem) to a switch and just go wired all the way. This would ensure a more stable connection
I kind of feel like we need to throw you a JustGiving page… No DVI monitor, a PS/2 keyboard and no switch/ap. On the other hand you have fiber broadband so I’m just feeling confused! Hopefully hackadays new overlords are paying you enough that you can afford a few of those overdue upgrades!
The article was …interesting reading? The simplicity of the things you are doing and the references to your old hardware and networking made it feel very anachronistic. It marks me as ‘old’, but I first did this fifteen years ago with recycled UNIX boxes and it’s kinda weird to see someone describe the process in detail from the perspective of never having seen this stuff before. Over all, I enjoyed it.
Oh, I’m keeping my PS/2 keyboard. It’s this type

and I’m never letting go! :-) I tend to hang on to things until I have a real need to switch… hence, as a result of this pi, I now have a wireless AP.
For a very long time (until 2013) I connected to the internet through a proprietary USB modem which only worked on Windoze and required 15 minutes to connect (that’s right, 15 minutes). No WiFi, no Ethernet, just a glorified USB dialup modem with black-box drivers and vendor lockout. Yes, I never used WiFi before 2013.
The nmap trick is the ticket. I have a few ESP8266’s configured as esp-link (https://github.com/jeelabs/esp-link) devices scattered around the house. I forget their names/addresses all the time. But one thing they all have is an open telnet port.
Try the same with port 80 if you’re looking for HTTP servers, etc.
a quicker way of determining the initial address of your Pi would be to plug it into your LAN and look at the DHCP leases on your router ( assuming they are available to you )
OP wasn’t using a router or a DHCP server. He was plugging the pi ethernet directly to the PC.
Not sure if this is any easier but what I do is :
The first time i get a new R-pi, i power it up with the basic install. find the MAC address for both connections.
Then go to my router and assign the MAC address to an IP (wifi gets even, cable gets odd IP address) then i just physically number each PI.
So no matter what OS I use, or how ever many time i re-flash it, i will always know the Assigned IP address when it’s powered on my network
Oh dear… wrote my first real program (a generalized algebra 2 homework ‘tool’ in 1969. Been on Linux since 1980. Programmed a bunch of boxes for other academics in assembly. Currently working on AI with Tensorflow/Pythonic stuff or Julia.
I think the problems here would be solved with medications I’m not qualified to recommend. C’mon, just stick some static IPs in /etc and spend the money on a therapist.
Not that DHCP might be easier…
On the other hand, I’ve got an Apple 2e that’s been in the garage for… almost 40 years. I think the floppy drive cable is dented. It does have a 6800 coprocessor. 4 boxes including manuals. As is. Make me an offer…
You missed a scenario.
MacBook Pro –> USB-C Ethernet adapter –> Raspbery Pi
The ethernet adapter has it’s own ip and doesn’t route packets, so no DHCP or NAT.
netstat -rn doesn’t see the Rpi
ifconfig doesn’t see the Rpi
All the computer can see is the Adapter, not the Rpi.
If you happen to know the Rpi’s ip you can ssh into it.
What do you do when you don’t know the ip of the headless Rpi connected as above?
How do you discover it’s ip?