This Week In Security: Putty Keys, Libarchive, And Palo Alto

It may be time to rotate some keys. The venerable PuTTY was updated to 0.81 this week, and the major fix was a change to how ecdsa-sha2-nistp521 signatures are generated. The problem was reported on the oss-security mailing list, and it’s quite serious, though thankfully with a somewhat narrow coverage.

The PuTTY page on the vulnerability has the full details. To understand what’s going on, we need to briefly cover ECDSA, nonces, and elliptic curve crypto. All cryptography depends on one-way functions. In the case of RSA, it’s multiplying large primes together. The multiplication is easy, but given just the final result, it’s extremely difficult to find the two factors. DSA uses a similar problem, the discrete logarithm problem: raising a number to a given exponent, then doing modulo division.

Yet another cryptography primitive is the elliptic curve, which uses point multiplication as the one-way function. I’ve described it as a mathematical pinball, bouncing around inside the curve. It’s reasonably easy to compute the final point, but essentially impossible to trace the path back to the origin. Formally this is the Elliptic Curve Discrete Logarithm Problem, and it’s not considered to be quantum-resistant, either.

One of the complete schemes is ECDSA, which combines the DSA scheme with Elliptic Curves. Part of this calculation uses a nonce, denoted “k”, a number that is only used once. In ECDSA, k must be kept secret, and any repetition of different messages with the same nonce can lead to rapid exposure of the secret key.

And now we get to PuTTY, which was written for Windows back before that OS had any good cryptographic randomness routines. As we’ve already mentioned, re-use of k, the nonce, is disastrous for DSA. So, PuTTY did something clever, and took the private key and the contents of the message to be signed, hashed those values together using SHA-512, then used modulo division to reduce the bit-length to what was needed for the given k value. The problem is the 521-bit ECDSA, which takes a 521-bit k. That’s even shorter than the output of a SHA-512, so the resulting k value always started with nine 0 bits. Continue reading “This Week In Security: Putty Keys, Libarchive, And Palo Alto”

Networking: Pin The Tail On The Headless Raspberry Pi

Eager to get deeper into robotics after dipping my toe in the water with my BB-8 droid, I purchased a Raspberry Pi 3 Model B. The first step was to connect to it. But while it has built-in 802.11n wireless, I at first didn’t have a wireless access point, though I eventually did get one. That meant I went through different ways of finding it and connecting to it with my desktop computer. Surely there are others seeking to do the same so let’s take a look at the secret incantations used to connect a Pi to a computer directly, and indirectly.

Continue reading “Networking: Pin The Tail On The Headless Raspberry Pi”

Volvo Phone Holder

DIY IPhone Mount For A Volvo

[Seandavid010] recently purchased a 2004 Volvo. He really liked the car except for the fact that it was missing some more modern features. He didn’t come stock with any navigation system or Bluetooth capabilities. After adding Bluetooth functionality to the stock stereo himself, he realized he would need a secure location to place his iPhone. This would allow him to control the stereo or use the navigation functions with ease. He ended up building a custom iPhone mount in just a single afternoon.

The key to this project is that the Volvo has an empty pocket on the left side of the stereo. It’s an oddly shaped vertical pocket that doesn’t seem to have any real use. [Seandavid010] decided this would be the perfect place to mount his phone. The only problem was that he didn’t want to make any permanent changes to his car. This meant no drilling into the dash and no gluing.

[Seandavid010] started by lining the pocket with blue masking tape. He then added an additional lining of plastic wrap. All of this was to protect the dashboard from what was to come next. He filled about half of the pocket with epoxy putty. We’ve seen this stuff used before in a similar project. He left a small opening in the middle with a thick washer mounted perpendicular to the ground. The washer would provide a place for an off-the-shelf iPhone holder to mount onto. [Seandavid010] also placed a flat, wooden paint stirrer underneath the putty. This created a pocket that would allow him to route cables and adapters underneath this new mount.

After letting the epoxy putty cure for an hour, he removed the block from the pocket. The stick was then removed, and any gaps were filled in with putty. The whole block was trimmed and smooth down for a more streamlined look. Finally, it was painted over with some flat black spray paint to match the color of the dashboard. An aftermarket iPhone holder allows [Seandavid010] to mount his cell phone to this new bracket. The cell phone holder allows him to rotate the phone into portrait or landscape mode, and even is adjustable to accommodate different sized phones.

Kindle Hack

Unlock Your Demo Kindle Paperwhite

If you’ve been holding off on upgrading your kindle, this project might inspire you to finally bite the bullet. [WarriorRocker] recently saved quite a few dollars on his Kindle upgrade by using a demo unit. Of course, it’s not as simple as just finding a demo unit and booting it up. There’s some hacking involved.

[WarriorRocker] found his Kindle Paperwhite demo unit on an online auction site for just $20. Kindles are great for reading but also make popular displays for your own projects. This used display model was much less expensive than a new unit, which makes sense considering it had probably received its share of abuse from the consumers of some retail store. The problem with a demo unit is that the firmware that comes with it is very limited, and can’t be used to sync up with your Amazon account. That’s where the hacking comes in.

pwdu-01
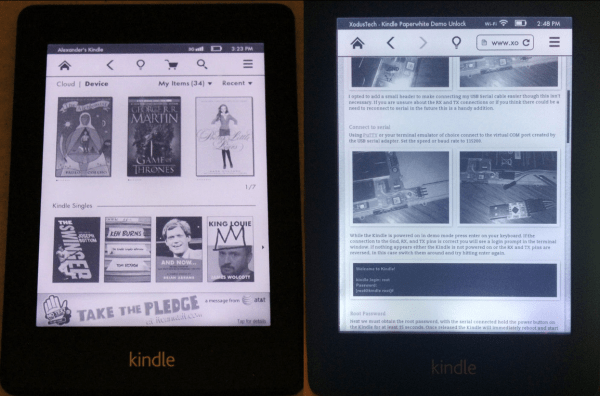
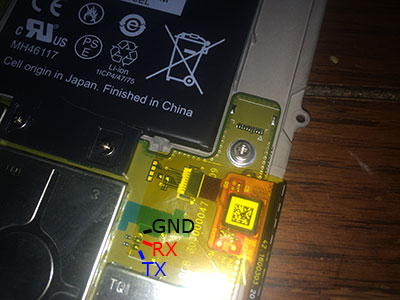
The first step was to crack open the case and locate the serial port. [WarriorRocker] soldered a small three pin header to the pads to make it easier to work on his device as needed. He then connected the Kindle to his PC using a small serial to USB adapter. Pulling up the command prompt was as simple as running Putty and connecting to the correct COM port. If the wires are hooked up correctly, then it just takes a press of the enter key to pull up the login prompt.

The next step requires root access. The root password for each unit is related to the unit’s serial number. [WarriorRocker] obtained the serial number by rebooting the Kindle while the Serial connection was still open. The boot sequence will spit out the number. This number can then be entered in to an online tool to generate possible root passwords. The tool is available on [WarriorRocker’s] project page linked above.

Next, the Kindle needs to be rebooted into diagnostic mode. This is because root logins are not allowed while the device is booted to the system partition. To enter diagnostic mode, [WarriorRocker] had to press enter over and over during the boot sequence in order to kill the automatic boot process. Then he checked some environment variables to locate the memory address where the diagnostic mode is stored. One more command tells the system to boot to that address and into diagnostic mode.

The last step of the process begins by mounting the Kindle as a USB storage device and copying over the stock Kindle firmware image. Next [WarriorRocker] had to exit the diagnostic menu and return to a root command prompt. Finally, he used the dd command to copy the image to the Kindle’s partition bit by bit. Fifteen minutes and one reboot later and the Kindle was working just as it should. [WarriorRocker] even notes that the 3G connection still works. Not bad for $20 and an hour or two of work.

Squishy Circuits For Tiny Tinkerers

squishy_circuits

Getting kids interested in electronics at a young age is a great idea. Feeding their developing minds via creative projects and problem solving is not only rewarding for the child, it helps prepare the next generation of engineers and scientists. University of St. Thomas professor [AnnMarie Thomas] along with one of her student [Samuel Johnson] have put together a winning recipe for getting kids started in electronics tinkering at a very young age.

While some 5-year-olds can wrangle a soldering iron just fine, some cannot – and younger kids should probably stay away from such tools. This is where the the team from St. Thomas comes in.

They scoured the Internet looking for Play Dough recipe clones, testing the resistance and useability of each before settling on two formulas. The first formula incorporates salt, and has a very low resistance. The second contains sugar and has about 150 times the resistance of the first formula. If you use them together, you have very simple conductor and insulator substrates that can be manipulated safely by tiny hands.

As seen in the demo video below, a small battery pack can be wired to the conductive putty easily lighting LEDs, turning small motors, and more. We can only imagine the delightful smile that would emerge from a child’s face when they power on their putty circuit for the first time.

While only two different types of putty have been made so far, we would be interested to see what other materials could be integrated – how about homemade peizo crystals?

[Thanks, Spence]

Continue reading “Squishy Circuits For Tiny Tinkerers”

Blueberry Squishee? Mechanically-separated chicken? Nope! It’s Oogoo!

Oogoo, A Home-made Sugru Substitute

If you follow Instructables.com, it might seem like every third article lately is about Sugru, the nifty air-drying silicone putty that’s good for all manner of repairs and custom parts. It’s fantastic stuff (and we love their slogan, “Hack things better”), but one can’t (yet!) just drop in on any local hardware store to buy a quick fix…so [mikey77] has cooked up a recipe for a basic Sugru work-alike. His “Oogoo” (a name likely inspired by oobleck) is a simple mix of corn starch and silicone caulk.

A two-ingredient recipe would hardly seem adequate material for an article, but [mikey77]’s left no stone unturned, providing an extensive tutorial not only on mixing the compound, but how to add colors, cast and carve custom shapes, and how his home-made recipe compares to the name brand product. As a bonus, the article then drifts into a little Halloween project where he demonstrates etching conductive cloth, how to make conductive glue, and other hands-on shenanigans.