An important distinction between equipment used for caving, climbing, biking, and other outdoor activities is the level of stress that’s generally applied. For instance, while climbing helmets are built to withstand the impact of sharp rocks, they’re not made to protect a biker’s head from suddenly hitting the ground. Likewise, while camping headlamps may be able to survive a light rainfall, they’re probably not made to shine at the 800 lumens after being submerged underwater.
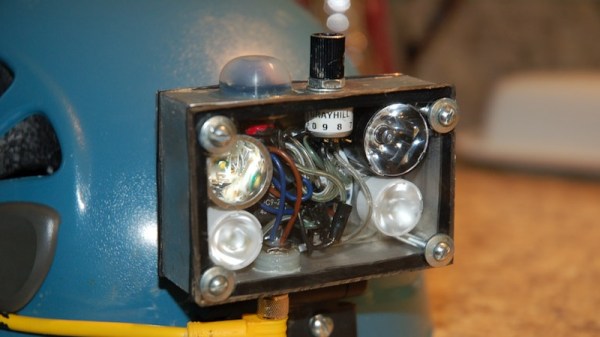
[LukeM] built himself a caving headlight, after being “fed up with what was available on the market”. While his project is a bit older, it’s still pretty helpful for any newer hobbyists looking to try their hand at building a custom headlamp. Many cavers have to carry around a few primary – one main light for general visibility and a secondary light for focusing on specific objects. These are typically worn on the helmet, attached somehow to prevent the light source from falling off mid-climb. From tricky operations, varying distances, cost, and ease of battery replacement, there are a number of reasons why a caver might want to build their own customizable head lamp.
The result is rugged, waterproof, reliable, bright enough to supplement flashes in caving photos and also dim enough for general use (30-700 lumens). It has options for wide and narrow beams, displays a neutral to warm color, and is relatively upgradeable without too much trouble. At the same time, it’s also fairly compact, with all of the components packed inside of a short section of 3″x2″ aluminum tubing, protected at the back and front by aluminum and acrylic backings. The LEDs used are four Cree XP-E R2 bin LEDs and a hipFlex driver from TaskLED with programmable settings for max output, thermal protection temperature, warning voltage, and lighting modes. I’m personally already smitten with the level of customizability of this build.
On top of all of that, it’s been cave tested and approved!

![The 3D scan of a small cave near Louisville (source: [caver.adam's] Sketchfab repository)](https://hackaday.com/wp-content/uploads/2016/06/bildschirmfoto-2016-06-27-um-20-02-11.png)


