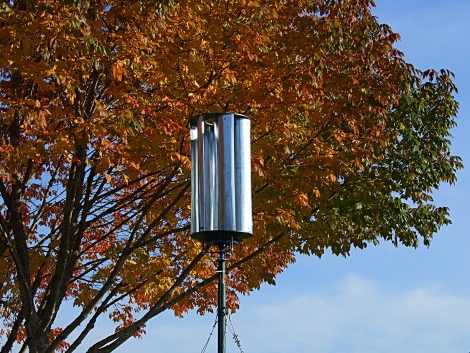
You can build a copy of this vertical wind turbine in a weekend and it won’t cost you all that much. Applied Sciences developed the hardware and they’re sharing all for the build details. You will be taken through every part of the build starting with the fin assembly which is made from stove-pipe material. This is a perfect raw material because it is already curved and suited for aerodynamic use in much the same way that PVC pipe is for making fins and we would expect it to be a bit lighter in weight. You will also need to turn your own coils when assembling the stator. This particular build process uses nine coils embedded in fiberglass. They remain stationary while two different discs, each containing a dozen rare earth magnets, rotate in close proximity to induce a current. It outputs three-phase AC current which can be turned to DC using a bridge rectifier and then further regulated for storage in batteries.
[Thanks Miguel]


Looks like a nice project, and well presented. My gut reaction was “I want to build one!”
However, they don’t even try to make an estimate of power output. No calculations, no empirical data. With all the work that went into making the PDF describing the build look pretty, I’m surprised that they don’t address performance at all.
I’d like to see some numbers too. Output is a factor I consider when taking on a project. That said, I suppose I could build n 1 if one isn’t enough. :)
That’s n plus one. It stripped out the plus sign for some reason. :|
from what ive seen out there it looks as if the motor and blades fit together and give you the power output based on your area and the wind you get as well exsposure to that wind then you can estimate the size. looks like i see alot of 250-1000 watt hour little home owner specials. I like the way you descrfibe the interest you base this on.
the real question… who is going to mod it into a bird house?
Handy unidirectionality.
Most challenging bit is smoothing the power and buffering it in a cost-effective way I expect.
PDF is very slow in loading so I don’t know the details.
I’m thinking that one of the motorcycle stators and regulator/rectifier that I have laying around would be perfect for this
Here are some mirrors for the 27MB pdf file:
http://dl.dropbox.com/u/12006908/zoetrope-wind-turbine.pdf
https://docs.google.com/leaf?id=0B1opB37XdjBeNjZmNjQ2YmQtNmJmOC00MDAxLTg3MTAtMzc1Y2UyNjA4Yzgy&hl=en
In looking at a couple of the reference sites, a 4 foot tall turbine with 2 foot diameter appears to be about 50 watts.
It is a nice build, but you need at least 10x that to make a dent in power usage and 50-100x for an off-grid solution.
None the less, this is very nice system and would be a great way to get started before committing to a major 1KW+ system and all of the tower/mounting work that it entails.
@Sonkan: remind me to never put you into my scheduling team.
For optimum efficiency you’ll want several cascades of these, all of which converting the mechanical rotation in to different forms of energy.
#1 Stored Water Pressure Turbine:
Mechanical energy can pump a working fluid to store energy as pressure.
->Energy stored as pressure can be accessed by converting it to mechanical rotation in a turbine.
–>Pumps can be replaced with CD-ROM tesla turbines, which can also be used as the generator turbines.
further reading:
http://en.wikipedia.org/wiki/Rankine_cycle
http://en.wikipedia.org/wiki/Carnot_cycle#Efficiency_of_real_heat_engines
#2 Compressor Driven Heat Pump
->Thermal energy can be generated from pressure through the use of a heat exchanger immersed in a material with desired heat capacity(molten salt, paraffin, etc.).
–This same Heat Pump can be used in reverse to refrigerate a gas via the Siemens cycle.
Conclusion: By using low cost turbine materials and bearings(such as skateboard bearings & PVC) -> You get the benefits of economies of scale, and drastically reduce your costs allowing you to cascade the system.
High tension wires & turnbuckles can be used to further reduce the costs of building elevated turbine blades. This concept is known as “tensegrity”.
All of this combined, the only questions which remain are:
1. Where are the lowest cost electric motors/alternators
2. How can differences in temperature be maximized in a Rankine Cycle to improve efficiency.
I expect scrap yards and starter motors are the best answer to the first question, unless Hobbyking reduces their shipping costs.
Digging holes to use soil as a heat sink is a proven method of achieving cooler than air temperatures, and by digging even deeper, geothermal energy can be tapped to achieve the opposite. Another source of warmer than air temperatures is black trashbags, Mylar solar collectors, and ETFE green houses.
You mission is to combine these tools in the most efficient way possible. There’s no reason not to.
Ebay is a cheap source of car parts.
Their DIY alternator looks cool, but is terribly documented. All I see is a blurry picture and no BOM.
when you want to get serious about diy wind/solar/hydro may I suggest http://www.otherpower.com.
8 )
I just have grown tired of all the comments on almost every article that aims at knocking down others projects, when a lot of readers use what use this to learn more about electronics and what can be done for themselves.
Could it have been done better? Sure. But didn’t we all learn from some “easy” “project” somewhere?
Re; Duane
I don’t see how you figure you’d need 50 to 100 of them to go offgrid, at 50 watts each- that would be up to 5kw for the wind array! My wife and I live in an offgrid solar cabin with 30 amps of pv array at 12v nominal, and we have a (very efficient) electric refrigerator, both use laptops 8+ hours a day, long distance wireless internet link, and both run sufficiently bright lights until 2 or 3 am, plus a blender, sewing machine and other moderate draw appliances.
The big issues with wind are energy storage and long term survivability (for example, dust devils are highly electrically charged, and ice loading can lower high wind survival, etc). Often its best to have both wind and solar since cloudy times tend to be windy and vice versa. My experience is that solar panels are much more reliable.
Three phase coil configuration with even number of permanent magnet pairs will produce incoherent voltages across the coils in series connection reducing the available power at low wind speeds.
It might be better to use half-bridge on every single coil and common pair of capacitors to reduce voltage drop across rectifiers and double the voltage.
This clip has nice tutorial and important safety tips about making / assembling the rotor:
http://www.youtube.com/watch?v=Ahs2pM10xQU
I’ve seen this design before. See the original and some of the performance calculations here:http://www.windstuffnow.com/main/lenz2_turbine.htm The guy calls it a Lenz Turbine. Good design and good information on his site.
Nope, its NOT a Lenz turbine. The lenz2 is a combination lift and drag design where this is a drag design (ie: the wind hits the curved surface and causes the hawt to turn, like a water wheel)
RE: Thebes
This is a great project to learn on. What I meant about the 50-100x is that currently, my lowest usage in a month is about 30KWH/day (about 60WKH/day in the summer). I currently have a small solar array (1KW grid-tied), but there are no rebates or incentives in this area, so I am essentially “pre-buying” 23+ years of electricity.
Wind is a much better source here (SE Kansas). My estimate was based on the fact that while we do get a lot of wind, often, the wind quits blowing at night or slows significantly. I need about 10 hours of generation time at 3KW to meet my full needs.
To that end, as I move to more self-sufficiency, we are reducing our electrical needs. Currently, we have 3 computers, 2 laptops, a PS3, and LCD TV that run much of the day as we homeschool our 3 children. We downsizing everything from house to cars to computers, etc.
I really applaud this article as it is very complete and has some really nice suggestions. I always find the magnets vs coils to be confusing. I have read a number of articles, but I haven’t really seen a definitive definition of what it takes to make a decent generator with minimal cogging. There seems to many opinions but little in the way of testing.
PS – yeah, my power usage is pretty high. When I started looking at alternate power six years ago, my lowest usage was 100KWH/day and nearly 180KWH/day in the summer for a 5000 sq. foot house. Down sizing the house cut our usage to 1/3 the original. A new house would do more as our current house (that we just moved into this month) is a 110 year old farm house with numerous remodels and only 1 outlet in each room).
I do not have much “hacking” experience, but I really enjoyed this wind turbine manual because it was easy for me to understand. I think it will have a wider appeal than many of the hacks on this site because it is pretty user friendly even for people who do not have a lot of electrical or engineering experience. The part list was a little long and intimidating, but the pictures and graphics were well used to help make the directions easy to follow.
Thanks for the post!
I found this from Thailand
http://natee2007.thaiza.com/blog_view.php?blog_id=1875
Hey, great job man! i am gonna try and build one.
i want vertical wind turbine full report
do it yourself , go to inplix page and learn how .