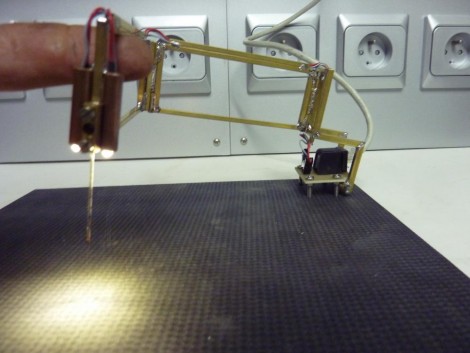
Make sure those tiny parts know their place by using this surface mount solder assistant (translated). It’s like a clamp for small packages; gravity and a needle to hold them in place while you do some hand soldering. [Red Devil] started the built by soldering together some brass rails into a hinged frame with a clamp to accept the needle tip. Next, a pair of tubes were added to accept LEDs which light the work area (we think that’s a fantastic touch). Finally, the assembly was mounted to the corner of a square base that makes up the work surface.
This is basically a complex version of a simple gravity clamp. But if you’re doing some assembly line soldering this would be indispensable. For this kind of work, custom jigs are often built. That would still be the case, but this armature removes the need of building something into each jig to hold the SMD components in place.


*Applause*
Looking good. Could an artists pentograph be used instead, with a weight and a bunch of LED’s?
/R
The absolute worst part of soldering SMT components, IMO, is having to hold them in place while perfectly aligned. So… I love this!
Nice title :D
Nevertheless, this could be a lot better than my current method of using poster putty to hold chips in place while soldering one side of the package…
While I hadn’t thought of adding additional lighting. What has come to mind before;is the idea of making small scale versions of the aids that are used used by welders, that also use gravity to keep pieces in place as they are tack welded, before the final weld is laid down. A lever with a U or V shaped fulcrum on one end. The other end is made into a point, and bent 90 degrees. Or other variations thereof.
What the hell? The hackaday post appears to have been edited during the time I was writing my original comment to include a link to something similar to what I was writing of. I swear the only URL I seen was the one to the production jigs. Sorry if the accusation is out of line, I could be loosing it.
Hmm, I have never really had trouble keeping chips held in place. I must confess though, we usually use an IR heat pen for surface mount chips like the QFN48 packs I do at work, but they are definitely possible to do with hot air. For other components with only a few leads, A pair of soldering irons used in tandem works great. The stereo microscope helps too. hehe. Yeah, my home setup sucks ass in comparison.
Chips usually are not a big deal…but this could make soldering smaller SMD resistors and caps a whole lot easier…they have a tendency to come with the soldering iron when you pull the tip away.
It looks like it’s being held up by a penis
Better technique will do you more justice than a setup like this. Pre-solder one pad and using a fine pair of tweezers, offer the component into the soldered pad while applying heat. It should attach quite nicely. while the solder is fluid, keep the SMD component straight with the tweezers then remove the iron. You then just need to solder the other side as you have an anchor point ;)
Oooh, looking forward to following this build. Very useful.