Make Any Photo 3D Using The Gimp

Put your face close to the screen and cross your eyes until the two images above become one. You may need to adjust the tilt of your chin to make it happen, but when they come together you’ll see [John Lennon] pop out in 3D. This was made using a 3D rendering script for The Gimp.

The process is not entirely automatic, but it won’t take too long to mask off the outlines for different depth layers. The script makes three different layers from the image. One of them is a color-coded depth map that uses a custom color palatte to choose distance for each item. If you paint the background dark blue it will be processed at the furthest distance from the viewer’s cross-eyed perspective, yellow is the nearest.

[Don] mentions a parallel output and a cross-eyed output in his write up. We understand the cross-eyed version, but are just guessing that the parallel version would be used in a stereoscopic viewer that puts a partition between the two images so that each eye sees a different frame. You know, like a View-Master.

DIY Quadcopter For Around $200

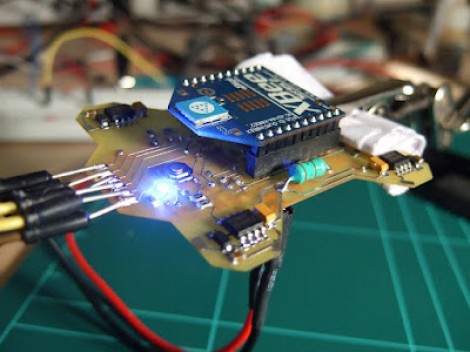
We think [FlorianH] did a bang-up job of prototyping his Minima Quadcopter on the cheap. The total bill comes in right around $200 and we’re very happy with the quality of parts as well as the results.

Here you can see the top of the double-sided board which he etched to host all of the components. At each corner there is a power MOSFET which drives the motor. At first glance we thought that the Xbee module was acting as the radio control and processer as well. But on the underside you’ll find an ATmega32 which is responsible for reading the Gyroscope sensor and Accelerometer, processing these signals and driving each MOSFET via PWM lines to provide stability.

You can see some flight tests after the break. [FlorianH] mentions that there is some oscillation in the feedback loop when both the gyro and accelerometer are used. But cut the accelerometer out of the equation and the platform is rock-solid.

This build uses carbon tubes to mount the motors, which we think will be a little more robust than the all-PCB designs are.

Continue reading “DIY Quadcopter For Around $200”

Light Painting With A String Plotter

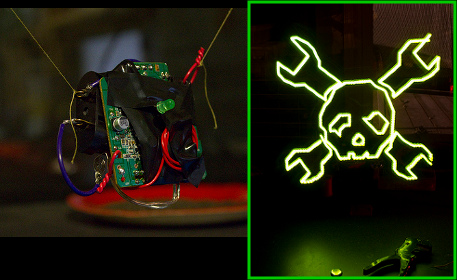
[Matt Bell] sends a shout-out to Hackaday by creating a light-painting of our logo with his string plotter. He starts off by setting up a pair of stepper motors which each have a spool to wind and unwind a string. The plotter is made by suspending a stylus between these two strings. In this case, he’s using a wireless LED board (seen above) built from the remote control receiver/transmitter from a toy car. The link above is part of a Flickr set from which you can get the whole story by reading the captions of each image.

After the break we’ve embedded a clip of an in-progress light painting. You can see there’s some oscillation of the LED unit that makes it a bit less precise than the CNC light painter we saw a couple of weeks ago. It seems like string plotters usually don’t have this issue if the stylus has something to helpĀ stabilizeĀ it. We wonder if a piece of acrylic would help get rid of the shakes? Continue reading “Light Painting With A String Plotter”