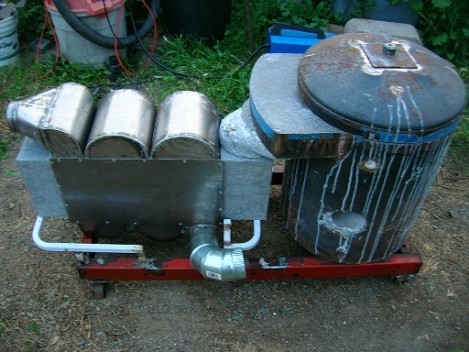
This completely DIY casting furnace turned out just great thanks to all the work [Biolit11] put into it along the way. He wanted to replace his older furnace with one that was more efficient, and to that end he built a heat exchanger into the design. This way the exhaust will preheat the intake air.
The furnace itself started with the shell of an old electric water heater. Excluding the design process, the majority of the build involved mold making. For circular parts he’s using quick tube, the paperboard forms used for pouring concrete footings. For more intricate parts he shaped polystyrene. They are layered in place and high-temperature cement is poured to form the permanent parts. After it hardens the polystyrene can be removed in chunks.
The heat exchanger is the part to the left. It includes several wide, flat pipes made of cement for removing the exhaust. Around those pipes a snaking metal chase carries the intake air which picks up the heat as it passes over the exhaust pipes.
For his first run with the new furnace he melted down a bunch of scrap aluminum and poured ingots.
[Thanks DC3]


surprised the unsupported refractory does not crack.
Very cool.
I wonder how much the heat exchanger improves the efficiency? Both basic measurements like heat rise, but also how much time and fuel it saves when doing a pour.
I would blow my self and backyard up! I want!
“the polystyrene can be removed in chunks.” My ass. He’s going to crank it up and dispose of it with FIRE!! Mwahahaha!!
Sorry. The above post is why my wife won’t let me play with flamethrowers. Anymore.
Same thought: They polystyrene will just not be there any more, if it’s fired up for the first time. :-)
You could even run the exhaust gas into a chamber for preheating the scrap metal to remove any water or other residue. You could even use the heat exchanger for heating the house/workshop… Very nice thanks for posting.