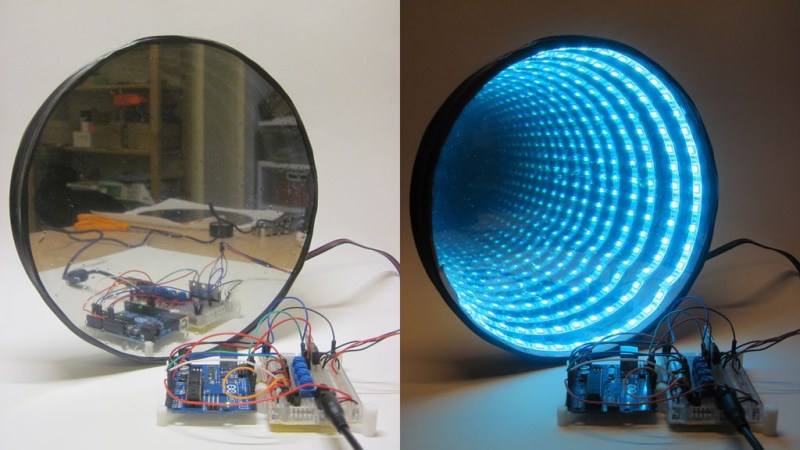
If you’ve been waiting for a more detailed guide before you set off to work on your own Infinity Mirror, [Ben]’s write-up is perhaps the most approachable one you will find. This build uses a set of four potentiometers to control an analog RGB LED strip (these lights are not individually addressable: but that makes coding simpler). [Ben] powers everything from a 12V 5A DC adapter, which is more than enough to run the 12V RGB strip along with the Arduino.
The mirror has two different ‘modes:’ individual channel color control and color-fade. In the first mode, three pots drive the RGB channels respectively. The color-fade mode has a mind of its own, sliding between all possible colors; you can spin the fourth potentiometer to control the speed of the transition.
The video below better illustrates the different modes. We definitely recommend [Ben’s] excellent guide as an ideal first project for anyone who has yet to take the plunge beyond simple microcontroller exercises. Check out Freeside Atlanta’s Infinity Mirror prototype for more inspiration.


If you got a digital LED strip you could program a mode where you would get really crazy. You could create a sort of knightrider light, where the led strip lights up at the begin, and moves on to the end. I think that would create a quite hallucinating effect hehe
CHALLENGE ACCEPTED!
it has been done before, but don’t let that stop you because they are epic: http://www.youtube.com/watch?v=8XaDgpnTyAg
http://www.instructables.com/id/Infinity-Mirror-Clock/
“Time Tunnel” anyone?
More like the Gate of Time from Skyward Sword.
For the Time Tunnel, you’d need “rings” – different light levels at different depths. At the very least, instead of 2 mirrors sandwiching 1 set of LEDs, you’d need 3 mirrors and 2 sets of LEDs ie. a triple sandwich.
To get a good illusion of movement, go up to 4 mirrors and 3 sets of LEDs.
And the moral of this story is: Don’t buy LED strip from SparkFun. WS2811 RGB strip should be purchasable for about the same as this ($25) if not less, will run from a 5V power pack, doesn’t need N FETs and run from a single IO pin. It’s also individually addressable.
I’m currently building a custom 2 foot by 4 foot infinity mirror with individually addressable RGB LED’s with the embedded WS2811 chip. I’m having a custom frame built that will hold the mirrors at a distance of 4 inches apart. It should give me 3-4 feet of depth.
Just add some servos to the front mirror, so the mirrors won’t need to be parallel all the time. You can make even cooler effects that way (by turning the “tunnel”).
Or just make it with a bit of flexibility in, so you can do the same thing by hand.
Really though nothing beats the camera / monitor combo. Especially on a PC cos then there’s more of a delay between each frame feeding back. With mirrors the delay is the speed of light over an effective path of a few feet before it fades out. Having a time delay in it is awesome.
I wrote a program ages ago that had a similar feedback effect. Feeding a screen back on itself, but shrunk or part-transparent or whatever can lead to all sorts of groovy effects, especially if it’s controlled in realtime with mouse or keyboard swirling.
You can do analogue fractals too! Not on a computer, obv. Take a monitor, and put a smaller monitor aside or on top of it. Point a camera at them, and feed the image to both. That’s all you need! I once heard of a guy who had a setup like this, but fed through a video mixer, so he could tweak the chroma and luma into insane, non-NTSC-standard places. Sort of thing I could spend hours with.
Worth saving an old TV or two for, and plenty of cheap digicams have analogue video output, or security cameras are completely cheap. Mix a few together with a mixer or just by pointing them at each other, the combinations are endless! A bit of scavenging could produce something amazing.
I’m curious…how would it look like if the mirror was spinning,like a led POV ?
Pretty much the same, I think. As I said earlier, the speed of light, and limited number of reflections, means delay-based effects don’t really do anything on mirrors like this. You’d just get an ordinary POV, but more of them.