Diesel Bike Build: Round 2

alexDieselBike02

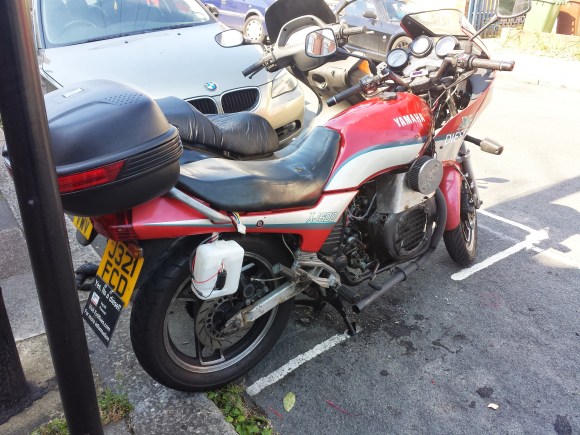
[Alex] has been hard at work on his second vegetable-oil-powered diesel bike build. The last time we checked in, he was finishing off work on his Honda CB400. Unfortunately, he felt it wasn’t quite big enough to ride comfortably, and as most first builds go, it was burdened with its share of problems. Now he’s snagged a Yamaha XJ600 off eBay, cleaned it up and started the modifications. [Alex] extended the frame to accommodate a new engine, rebuilt the gearbox, and perhaps most daunting: turned down the pulleys with a vintage 1950’s lathe.

Now that [Alex’s] bike has passed the MOT inspections, he can enjoy cruising around while doing his part to save the environment. His build log details the process, and is packed with enough pictures to keep you busy for a few hours while it walks you through each step. You can watch the bike’s test-run video below. For you off-road types, check out the all-wheel drive motorcycle from last month.

Continue reading “Diesel Bike Build: Round 2”

Solar Power For Your Bike

After the headlight on his bike died, [Patrick] decided this was the best time to hack the remains and solve a few problems: namely a constantly drained battery from accidentally forgetting to turn the light off. He opted for a solar solution, as he already had both an Adafruit solar lithium charger and a Seeed Li-po Rider. [Patrick] picks the Adafruit board for its extra safety features like temperature sensing to prevent the cell from overheating.

The build uses 9 eBay-sourced 2V mini solar panels attached neatly on the bike’s mudflaps. Three groups of 3 panels in series provide the needed 6V into the Adafruit lithium board which safely charges a spare 900mAh Nokia phone battery from the junk drawer. [Patrick] admits this solar setup may be overkill. He decided to include a USB jack to keep his phone charged for some Google maps navigation. The Adafruit board does not step up to 5V, however, so [Patrick] tacks on a Mintyboost kit to kick the Lipo’s output up high enough to charge the phone.

Solar’s not the only alternative way to power your bike’s lights. Check out the RattleGen from earlier this year if you missed it.

Git With Eagle: Add Meaning to Diff

a-glimpse-of-git-with-eagle
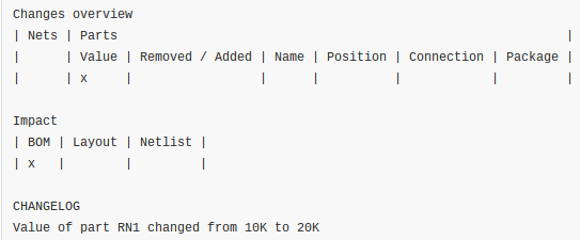
We love Git. We know everyone has their favorite version tracking tools. But even those that don’t care for Git should see the value of getting meaningful Diff data from tracking Eagle layout files.

Was that last sentence just gibberish to you? Let’s take a step back. A few years ago it was impossible to use version control with Eagle at all because the schematic and PCB layout software used to save its files as binaries. But then Cadsoft transitioned to saving Eagle files as XML. This opened the door for things like scripting to rename parts en masse and to track the files under version control. One problem with the latter has been that performing a Diff on two different versions of a file results in XML changes that are probably not human readable. [Patrick Franken] wrote this script to add at least a glimmer of meaning.

We’d love to see some kind of side-by-side highlighting on the schematic or board renderings themselves. But that’s quite a ways off if we ever actually see it. For now his script will take the Diff and print out the tables seen above denoting which types of changes were made from one version to the next. It’s a start, and we hope it inspires even more work in this area.

Modifying The HC-05 Bluetooth Module Defaults Using AT Commands

The HC-05, a Bluetooth to serial bridge, can be found for around $5 on the internet and therefore may be the cheapest way to add Bluetooth connectivity to your project.

However, its default settings may need to be changed depending on your application. [Hazim] explains a way to enter the HC-05 AT command mode to benefit from the rich set of features that the device can provide. The process is fairly simple as it only consists of maintaining the key pin of the HC-05 high while powering on. The device then boots in AT command mode with a default 38400bits/s speed and listens for all of the AT command set (PDF). As an example [Hazim] provides a sketch allowing you to write the AT commands directly in your favorite terminal.

With the basics out of your way you may want to further research the hardware, especially if you will be using modules from different sources. They don’t always come with the same firmware.

Laptop To All-in-one PC Conversion

laptop2allinone

You probably have an old laptop shoved into a far, dark corner of your closet, gathering dust as it sits there alone and unwanted. Show it some love like [Oakkar7] and hack it into a desktop all-in-one PC. He had his work cut out for him, though: dead motherboard, busted case, worthless battery. [Oakkar7] starts by taking the case apart and removing the LCD screen. He removes the motherboard to discover two toasted capacitors in need of replacement. A short solder job later and the computer springs to life.

[Oakkar7] needs the LCD to face outwards while sitting against the rest of the laptop. The connecting cable doesn’t reach, so he carefully removes it, and flips it around to get the extra length needed. The final step is to fashion some aluminum support bars that attach to the bottom of the case, which mount onto another aluminum stand holding everything upright. At this point [Oakkar7] has tossed the battery, the keyboard, both the CD and floppy drive (yes it’s that old), and moved the speakers into the battery’s former home. For the finishing touch, a USB hub provides connections for the new keyboard, mouse and a Wifi dongle.

[Oakkar7] shared his project with us after reading [Elad’s] ground control station laptop conversion. Maybe these two projects can convince you to save a neglected laptop.

RGB Infinity Mirror

If you’ve been waiting for a more detailed guide before you set off to work on your own Infinity Mirror, [Ben]’s write-up is perhaps the most approachable one you will find. This build uses a set of four potentiometers to control an analog RGB LED strip (these lights are not individually addressable: but that makes coding simpler). [Ben] powers everything from a 12V 5A DC adapter, which is more than enough to run the 12V RGB strip along with the Arduino.

The mirror has two different ‘modes:’ individual channel color control and color-fade. In the first mode, three pots drive the RGB channels respectively. The color-fade mode has a mind of its own, sliding between all possible colors; you can spin the fourth potentiometer to control the speed of the transition.

The video below better illustrates the different modes. We definitely recommend [Ben’s] excellent guide as an ideal first project for anyone who has yet to take the plunge beyond simple microcontroller exercises. Check out Freeside Atlanta’s Infinity Mirror prototype for more inspiration.

Continue reading “RGB Infinity Mirror”

Screaming Fast RC Hovercraft

Of all the homemade RC Hovercraft floating around out there, this build is not only one of the better looking: it’s also unexpectedly quick. [ScratchBuiltAircraft] sourced foam board from the local dollar store to construct the hovercraft’s body and a heavy-duty garbage bag with a hole cut in the center for the skirt. Air reaches the skirt area from the hovercraft’s EDF (Electric Duct Fan — the big one on the back) which pumps the air through a rectangular hole in the base.

A servo mounted behind the fan controls the rudders, while the rest of the electronics and the battery are cleanly tucked away beneath foam body pieces. We’re not sure what kind of top speed the Turnigy motor provides, but it’s probably impressive assuming it can keep from flipping over. Watch it blast off with a bit too much lift in the video below.

For something a bit slower, there’s always the solar powered hovercraft from earlier this summer.

Continue reading “Screaming Fast RC Hovercraft”