 Calligraphy is a rewarding hobby that is fairly inexpensive to get in to. For someone just starting out, poster nibs are a great way to practice making letterforms without worrying about applying the proper pressure required to use nibs that split. With a few tools, you can even make your own poster nibs like [advicevice] does in this Instructable.
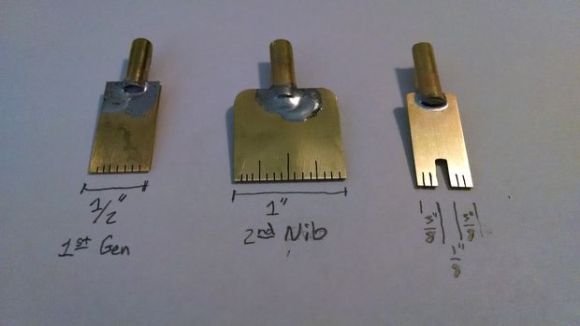
Poster nibs are typically made with a single piece of brass that’s folded at the point where the nib touches the paper. The backside forms a reservoir that holds the ink. The other end is formed into a semicircular shank that is inserted into a nib holder. The nibs that [advicevice] made consist of two pieces of flat brass stock plus a section of brass tubing for the shank of the nib. One side of the nib is slightly thinner than the other to act as a reservoir. This keeps ink clinging to the nib through the magic of surface tension.
Nib construction is fairly simple. [advicevice] cut the brass stock to the desired length and width, cut notches with a jeweler’s saw to allow the ink to flow, and cut a piece of tubing that holds the nib snugly. He recommends using three grades of sandpaper on the edges of the brass stock and tubing. After soldering the nib to the shank, he beveled the business end by rubbing it on 150-grit sandpaper. He followed this with 350- and 600-grit papers to avoid injury and tearing the paper when writing.
If you simply must spend more money, build a machine that writes calligraphy for you.


Well, its always nice to build something yourself; but I would not spend so much work and money on something that costs 50cents in any good art store. Still its a nice project, and at least this way youve got something to do!
The art stores by you must be really good. Online smaller poster nibs seem to cost $2.45 a piece. They stop at 9/16″ too.
Heh, I just found this. This is the second time I’ve found something I made on this site.
The reason I decided to make my own is because the art stores in my area are a bit sparse on calligraphy stuff, particularly nibs. Most of them only carry speedball nibs if they do at all. If I wanted poster sized nibs like those featured in the how-to, I would have to order them online, pay shipping and all that crap. Besides the tool investment, the material cost is about $1 for each nib and they take 45 minutes to an hour to make and finish.
So, if I want a new nib that I don’t already have, I can make it in an hour and be writing with it, instead of waiting 7-10 days for it to arrive in the mail.
I wonder if you could etch the nibs (like a PCB) instead of cutting them with a jewelers saw (mentioned).
EDM would probably be easier to control given the large choice in wire diameters. Etching and chemical means are all dependent on being able to effectively mask off the areas.
It seems like over complication for something that was mass produced with 1850’s technology.
Why EDM?
Thin metal sheet is perfect for electrolytic etching…cover a piece of metal with non-conductive paint of choice, scrape in the outline of the shape you want, connect it to the positive terminal of a power supply, mix up some salt water, dip it in and wait…
Thin sheet gives an incredibly sharp image, quality is on par with EDM but without the pricy/complicated wire mechanics…
Or you could, like, I dunno, rub a saw on it a little bit and be done?
With the little notches in the edge, I assumed he had used sections of a brass ruler.