
We preempt this week’s Hacklet to bring you an important announcement.
Hackaday.io got some major upgrades this week. Have you checked out The Feed lately? The Feed has been tweaked, tuned, and optimized, to show you activity on your projects, and from the hackers and projects you follow.
We’ve also rolled out Lists! Lists give you quick links to some of .io’s most exciting projects. The lists are curated by Hackaday staff. We’re just getting started on this feature, so there are only a few categories so far. Expect to see more in the coming days.
Have a suggestion for a list category? Want to see a new feature? Let us know!
Now back to your regularly scheduled Hacklet
There are plenty of cameras on Hackaday.io, from complex machine vision systems to pinhole cameras. We’re concentrating on the cameras whose primary mission is to create an image. It might be for art, for social documentation, or just a snapshot with friends.
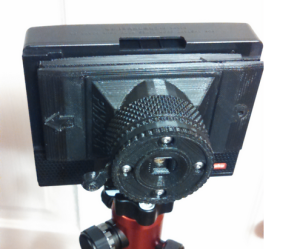 [theschlem] starts us off with Pinstax, a 3D Printed Instant Pinhole Camera. [theschlem] is using a commercial instant film camera back (the back for a cheap Diana F+) and 3D printing his own pinhole and shutter. He’s run into some trouble as Fuji’s instant film is fast, like ISO 800 fast. 3 stops of neutral density have come to the rescue in the form of an ND8 filter. Pinstax’s pinhole is currently 0.30mm in diameter. That translates to just about f/167. Nice!
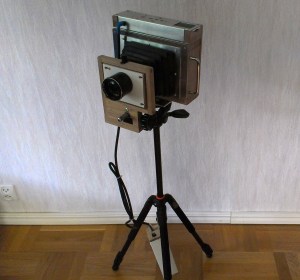
Next up is [Jimmy C Alzen] and his Large Format Camera. Like many large format professional cameras, [Jimmy’s] camera is designed around a mechanically scanned linear sensor. In this case, a TAOS TSL1412S. An Arduino Due runs the show, converting the analog output from the sensor to digital values, stepping the motor, and displaying images in progress on an LCD. Similar to other mechanically scanned cameras, this is no speed demon. Images in full sunlight take 2 minutes. Low light images can take up to an hour to acquire.
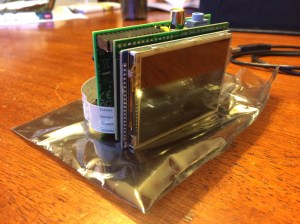 [Jason’s] Democracycam aims to use open source hardware to document protests – even if the camera is confiscated. A Raspberry Pi, Pi Cam module, and a 2.8″ LCD touchscreen make up the brunt of the hardware of the camera. Snapping an image saves it to the SD card, and uses forban to upload the images to any local peers. The code is in python, and easy to work with. [Jason] hopes to add a “panic mode” which causes the camera to constantly take and upload images – just in case the owner can’t.
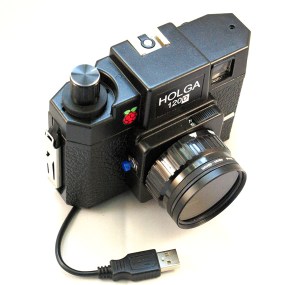 The venerable Raspberry Pi also helps out in [Kimondo’s] Digital Holga 120d. [Kimondo’s] fit a Raspberry Pi model A, and a Pi camera, into a Holga 120D case. He used the Slice of pi prototype board to add a GPIO for the shutter release button, a 4 position mode switch, and an optocoupler for a remote release. [Kimondo] even added a filter ring so he can replicate all those instagram-terrific filters in hardware. All he needs is to add a LiPo battery cell or two, a voltage regulator, and a micro USB socket for a fully portable solution.
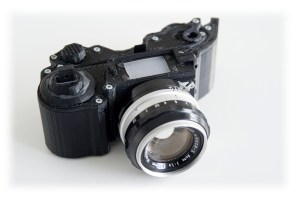
Finally, we have [LeoM’s] OpenReflex rework. OpenReflex is an open source 3D printed Single Lens Reflex (SLR) 35mm film camera. Ok, not every part is 3D printed. You still need a lens, a ground glass screen, and some other assorted parts. OpenReflex avoids the use of a pentaprism by utilizing a top screen, similar to many classic twin lens reflex cameras. OpenReflex is pretty good now, but [Leo] is working to make it easier to build and use. We may just have to break out those rolls of Kodachrome we’ve been saving for a sunny day.
That’s it for this week’s Hacklet! Until next week keep that film rolling and those solid state image sensors acquiring. We’ll keep bringing you the best of Hackaday.io!




In my opinion all protests (or better said – riots) should be instantly broken by police or military, with deadly force if required. Those pathetic left winged pricks don’t realize that by shouting some stupid thing they might disrupt normal commute or work for hundreds of people.
Sorry to rain on your parade, but Kodachrome can no longer be developed. It used a chemical bath called K-14 that was different than standard color film which used C-41. As such, after they stopped making the film, the supplies of chemicals ran out in 2010. An interesting documentary was made about a NatGeo photographer named Steve McCurry who was asked to take the pictures for the last roll ever developed.
https://www.youtube.com/watch?v=DUL6MBVKVLI
There has been talk of developing old Kodachrome as B&W using Rodinal developing on various photography forums, but as for the color K-14 developing, you are correct.
Here’s another video on the subject that I like. It was produced in 2010, during the last year Kodachrome was around. http://vimeo.com/22543258
That remjet backing is a pain, I’d rather just use any other B&W film available.
I think it was mostly for people that had exposed K64 that they forgot to send in before the end of 2010. So their photos wouldn’t be completely lost.
Sadly I know K-14 is gone. There was talk of one guy in Australia who figured out a compatible process. However, nothing ever came of it.
http://www.kodachromeproject.com/forum/showthread.php?t=790
Haha. I’ve talked to that guy extensively, always more talk than anything. Also last I heard from him he was closing down his lab.
It’s a crying shame that nobody has cracked it yet. I wonder if Kodak would be willing to release the formula and process to make it as open source. Probably not though.
Problem is is that there were chemical components to the process that only Kodak produced and only produced it for K-14.
The patents for K-14 are available, and the chemistry is a bit tough to understand but not beyond 2nd year organic chem with a bit of inorganic (focus on the metals) added in.
The problem with recreating the chemicals is myriad. The worst, though, is the yellow. Why? Cadmium and Chromium. Kodachrome used lots of chromium to get that metallic shine, and the earliest film used cadmium in the dyes (see cad yellow, red, blue, and so on). Later they reduced it as they found other dyes, (I think magenta got rid of Cd completely, maybe even the cyan) but yellow, I believe, stayed Cd yellow till the end.
So recreating the process? Not that hard with all the historic patents available. Recreating the chemicals in modern day where we care about what ends up in drink water? Not very likely. And getting the permits to develop it? Never gonna happen. The shop that did developing didn’t stop because they couldn’t get developer or dyes, they stopped because the EPA gave them extension after extension for toxic waste disposal, and finally said “30 years is enough, no more heavy metals going down the drain or into the ground.” Vastly oversimplification, the shop was obeying the law, but the fees for ‘proper’ disposal of Cd are so insane, and the normal time between rolls showing up so far apart, that ‘storing on site’ wasn’t an EPA option anymore. Each customer would have had to foot the bill for new chemicals, and the whole disposal fee; not going to happen.
*all according to my memory and reading of things. probably wrong on many levels.
I think the big issue is that Kodachrome K-14 process actually includes the color dyes in the developing chemicals and not in the film stock (which is why it had the attributes it did and why people loved it so much). So in order for Kodak to “open source” the K-14 process they would need to share the chemical formulas and recipes for those dyes (which would give their competitors access to some of their secret sauce for how they make dyes for their films more generally)
Oh and its best to assume anyone who says they can do color development of Kodachrome is full of BS unless they can demonstrate that they have found a solution for the dyes in question.
the dye patents are there between the lines of other patents. look at the modified K-14 process for handling Kodachrome 2, and you can get some idea of what was in the original dyes. What was in them, though, was loads of Cadmium.
RIP Kodachrome. (I know there are still some techniques to develop it as black-and-white, but the official K-14 process for color Kodachrome processing is no more).
I want a Hasselblad SWC. Kinda badly. That lens.
If you pinhole camera needs an ND filter, you’re doing it wrong.
I wondered about that. I had a homemade pinhole camera in a oatmeal carton. Focal length was about 3″, pinhole was ragged and not measured but it couldn’t have been smaller than f100. Using paper which was probably 50, I exposed for about 2 minutes.
so, let’s meander…100 to 127 is about a stop less light. but my paper was 4 times slower. So, 3 times faster, meaning his camera should get a picture in . . . 40 seconds? Maybe it’s just to correct for being used to the picture that shooting 100 from a pinhole gets, so certain things blur more or disappear; 40 seconds is short enough that a person or car or bug would be a blur instead of being near invisible.
I would say “print/drill a smaller pinhole” but there is a limit to these things. Too small and the vignetting on the edges might be nasty. And this is what ND filters are made for.
That’s an interesting statement. If you were curious as to the why of that particular design decision, you could always ask.
But that works both ways – How am I doing it wrong?
PS I posted an update to the project that discusses various design considerations. I tried to limit the polysyllabic words. http://hackaday.io/project/211/logs
Don’t let the trolls get to you too much, theschlem. One question I had was your pinholes. Are you drilling your own? (I’m guessing from PCB drills).
Ha ha I tried to stifle the slight indignation I felt. Fail…
That’s a good question. I “drill’ my own pinholes using a calibrated “needle awl” (my term) per this article: http://www.withoutlenses.com/articles/how-to/drill-your-own-precision-pinhole-apertures
I haven’t precisely measured them, but I get consistent results in the darkroom and they look pretty good under a digital microscope or a high power lens.
Hope that helps!
The changes to the feed are horrible.
I already know what my project looks like. Isn’t the whole point of the feed is to keep a *quick* and simple summary for your own projects as well as other ones that you are interested in. I don’t need to see the same few pictures of my own project cogging up that page and have to scroll more pages. If you want pictures, at least make them thumbnails size, not front page size. Ideally the optional picture/thumbnails should be something that you can set in your profile.
Not sure what the new “like” links does no on that feed. Do I “like” the person for giving me positive feedback or is that meant for something else? A help or something to explain the extra things that you have randomly changed would be nice.