PID Controlled Glue Gun

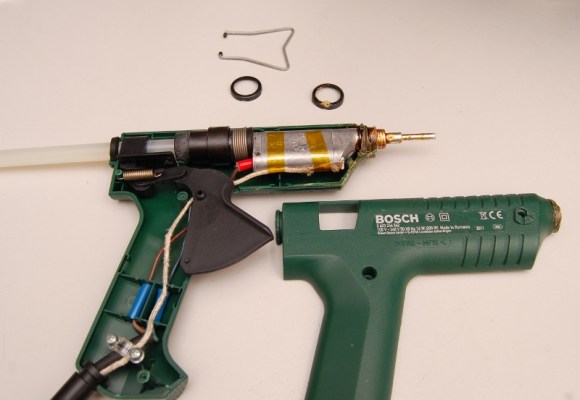
Internals of a glue gun controlled with a PID controller

Hot glue falls into the same category of duct tape and zip ties as a versatile material for fixing anything that needs to be stuck together. [Ed]’s Bosch glue gun served him well, but after a couple of years the temperature regulation stopped working. Rather than buying a new one, he decided to rip it apart.

With the old temperature regulation circuit cooked, [Ed] looked around for something better on eBay. He came across a cheap PID temperature controller, and the Frankengluegun was born.

A thermocouple, affixed with some kapton tape and thermal paste, was used to measure the temperature of the barrel. Power for the glue gun was routed through the PID controller, which uses PWM to accurately controller the temperature. All the wiring could even be routed through the original cord grips for a clean build.

Quality glue guns with accurate temperature control are quite pricey. This solution can be added on to a glue gun for less than $30, and the final product looks just as good.

Bluetooth Low Energy Beacons In A Flock Of Birds

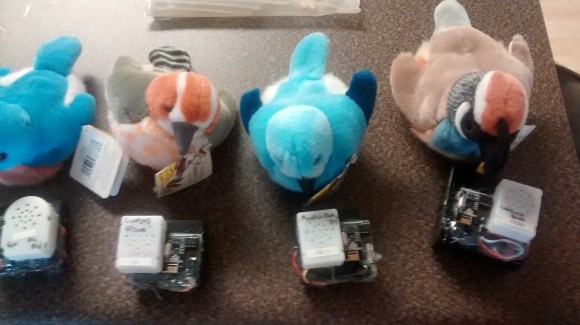
birds_ready

No, not real birds! [Kyle] works in operations at a web company and needed a way to send alerts to his fellow coworkers, so he modified a flock of Audubon Society plush birds to respond to a Bluetooth beacon.

Using NRF24L01+ Bluetooth Low Energy modules, [Kyle] installed one each in these battery-powered singing birds. The devices are presumably powered off of the battery that comes with the birds, but the use of the BTLE module means the batteries won’t discharge as rapidly.

[Kyle] also built an API that works over HTTP or IRC, which means that the employees in the office can activate everyone else’s birds over a simple and intuitive interface. The birds can be activated one at a time, or all together in “panic” mode as one giant flock (in case of an emergency in the office). They can also be activated one at a time on a specific hour to simulate the Audubon Society’s bird call clock.

He calls the device equail and it’s a very unique notification system with a lot of applications. All of [Kyle]’s code and documentation of his project are available on his github site. He also used this primer on BTLE to get started, and this guide on sending data over BTLE to help get the project in the air.

Thumbnail that say The Hacklet

Hacklet #11- Cameras

11

We preempt this week’s Hacklet to bring you an important announcement.

Hackaday.io got some major upgrades this week. Have you checked out The Feed lately? The Feed has been tweaked, tuned, and optimized, to show you activity on your projects, and from the hackers and projects you follow.

We’ve also rolled out Lists! Lists give you quick links to some of .io’s most exciting projects. The lists are curated by Hackaday staff. We’re just getting started on this feature, so there are only a few categories so far. Expect to see more in the coming days.

Have a suggestion for a list category? Want to see a new feature?  Let us know!

Now back to your regularly scheduled Hacklet

There are plenty of cameras on Hackaday.io, from complex machine vision systems to pinhole cameras. We’re concentrating on the cameras whose primary mission is to create an image. It might be for art, for social documentation, or just a snapshot with friends.
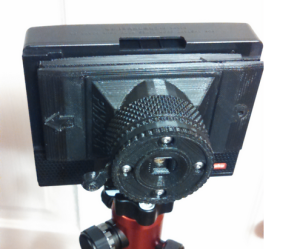
pinstax[theschlem] starts us off with Pinstax, a 3D Printed Instant Pinhole Camera. [theschlem] is using a commercial instant film camera back (the back for a cheap Diana F+) and 3D printing his own pinhole and shutter. He’s run into some trouble as Fuji’s instant film is fast, like ISO 800 fast. 3 stops of neutral density have come to the rescue in the form of an ND8 filter. Pinstax’s pinhole is currently 0.30mm in diameter. That translates to just about f/167. Nice!
largeformat

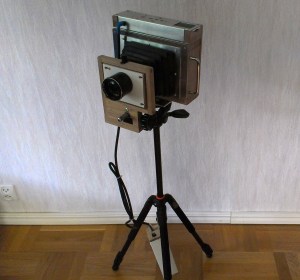
Next up is [Jimmy C Alzen] and his Large Format Camera. Like many large format professional cameras, [Jimmy’s] camera is designed around a mechanically scanned linear sensor. In this case, a TAOS TSL1412S. An Arduino Due runs the show, converting the analog output from the sensor to digital values, stepping the motor, and displaying images in progress on an LCD. Similar to other mechanically scanned cameras, this is no speed demon. Images in full sunlight take 2 minutes. Low light images can take up to an hour to acquire.
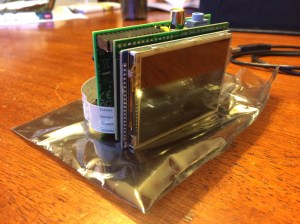
democracy[Jason’s] Democracycam aims to use open source hardware to document protests – even if the camera is confiscated. A Raspberry Pi, Pi Cam module, and a 2.8″ LCD touchscreen make up the brunt of the hardware of the camera. Snapping an image saves it to the SD card, and uses forban to upload the images to any local peers. The code is in python, and easy to work with. [Jason] hopes to add a “panic mode” which causes the camera to constantly take and upload images – just in case the owner can’t.

digiholgaThe venerable Raspberry Pi also helps out in [Kimondo’s] Digital Holga 120d. [Kimondo’s] fit a Raspberry Pi model A, and a Pi camera, into a Holga 120D case. He used the Slice of pi prototype board to add a GPIO for the shutter release button, a 4 position mode switch, and an optocoupler for a remote release. [Kimondo] even added a filter ring so he can replicate all those instagram-terrific filters in hardware. All he needs is to add a LiPo battery cell or two, a voltage regulator, and a micro USB socket for a fully portable solution.
openreflex

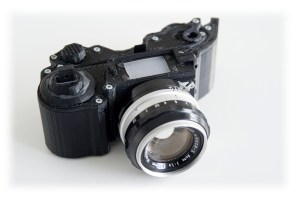
Finally, we have [LeoM’s] OpenReflex rework. OpenReflex is an open source 3D printed Single Lens Reflex (SLR) 35mm film camera. Ok, not every part is 3D printed. You still need a lens, a ground glass screen, and some other assorted parts. OpenReflex avoids the use of a pentaprism by utilizing a top screen, similar to many classic twin lens reflex cameras. OpenReflex is pretty good now, but [Leo] is working to make it easier to build and use. We may just have to break out those rolls of Kodachrome we’ve been saving for a sunny day.

That’s it for this week’s Hacklet! Until next week keep that film rolling and those solid state image sensors acquiring. We’ll keep bringing you the best of Hackaday.io!

Why Should You Enter The Hackaday Prize? Because [Ben Heck] Says So.

[Ben Heck] is well-known in the circles we frequent for being a consummate modder, tinkerer, builder, and hacker. We’ve seen his XBox 360 laptops, portabalized PS3s, the ultimate glue gun, and shutter shades that are too cool for [Kanye]. Now he’s telling us about something else that’s really cool – The Hackaday Prize.

All you need to be in the running for prizes that range from a thousand dollars in electronic components to milling machines to a trip to space is build a project that is open, connected (smoke signals count), and documented on hackaday.io. Think you don’t have time to submit an entry before the first round cutoff next week? You’re wrong. You can sit down and hit all the requirements in an hour. All you need is an idea at this point, and you have until November to actually build it.

Talking to Hackaday readers IRL gives us the impression that a lot of you have an idea for something cool and spaceworthy, but you just need a kick in the pants to write it down and start building it. Here it is. Go.

Pivena – The Open Source Raspberry Pi Case

Raspberry Pi Laptop

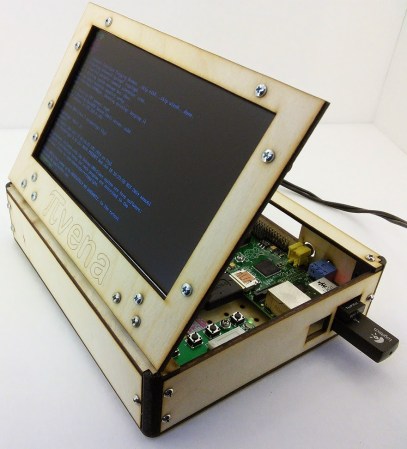
Still not too sure how to house your awesome Raspberry Pi B model? Don’t worry, [Timothy Giles] has got you covered! He’s just finished this very sleek open source PIvena case for anyone to use.

Why is it called the PIvena? He’s basing it off of [Bunnie’s] Novena project which is a hobby-based open source laptop! For more information you can checkout the recent interview we had with [Bunnie] himself!

Anyway, back to the hack — it features a laser cut case which has plenty of room for the Pi and any additional hardware you want to add. Like the Novena, the screen also functions as a lid, opening up to reveal the electronics, allowing for easy tinkering. All the files can be acquired over at Thingiverse, and he has assembly instructions available on Instructables. Continue reading “Pivena – The Open Source Raspberry Pi Case”

sketch of f117 fighter flying

Ask Hackaday: How Did They Shoot Down A Stealth Aircraft?

It was supposed to be a routine mission for U.S. Air Force Lt. Col. Darrell P. Zelko, a veteran pilot of the 1991 Gulf War. The weather over the capital city of Serbia was stormy on the night of March 27th, 1999, and only a few NATO planes were in the sky to enforce Operation Allied Force. Zelco was to drop 2 laser guided munitions and get back to his base in Italy.

There was no way for him to know that at exactly 8:15pm local time, a young Colonel of the Army of Yugoslavia had done what was thought to be impossible. His men had seen Zelco’s unseeable F117 Stealth Fighter.

Seconds later, a barrage of Soviet 60’s era S-125 surface-to-air missiles were screaming toward him at three times the speed of sound. One hit. Colonel Zelco was forced to eject while his advanced stealth aircraft fell to the ground in a ball of fire. It was the first and only time an F117 had been shot down. He would be rescued a few hours later.

How did they do it? How could a relatively unsophisticated army using outdated soviet technology take down one of the most advanced war planes in the world? A plane that was supposed be invisible to enemy radar? As you can imagine, there are several theories. We’re going deep with the “what-ifs” on this one so join us after the break as we break down and explore them in detail.

Continue reading “Ask Hackaday: How Did They Shoot Down A Stealth Aircraft?”

Astronaut Or Astronot: Somebody Won Something!

It’s time once again for our weekly installment of people complaining about our community voting system for The Hackaday Prize! The theme this week – as it was last week – is ‘too cool for Kickstarter’. We’re looking for projects that are so awesome they would never see any mainstream appeal. If you’re still wondering what we mean by that, if this amazing project doesn’t make the top ten in this round of voting, I’ll be terribly disappointed.

Just like last week, we’re trying to give away a goodie bag of programmers, dev boards, and essential bench tools (prize list here) to someone on hackaday.io who has voted for a project that is too cool for Kickstarter.

This week one of you got lucky. Because [Eric] is such a good sport and was kind enough to click a few buttons during this round of community voting, we’re sending him a boat load of dev boards, all the programmers he’ll ever need, a meter that will last him for the rest of his life, and a pretty good power supply. Awesome. Now go congratulate him.

There’s only five days left until the cutoff, so get your project into The Hackaday Prize. At this stage the requirements are extremely minimal, and you can knock everything out in a few hours.