A few years ago, [Mitch Altman] from Noisebridge came up with the idea of a Hackerspace Passport. The idea behind it was not to hinder or monitor travels but to encourage visiting other hackerspaces. These passports can be purchased for just a few dollars or, in true open source fashion, be made with nothing more than a computer printer… the Hackerspace Passport design files are totally free and available here.
So next time you’re visiting a new hackerspace, bring your passport and get it stamped to document the trip…. and that brings us to the point of this post: The Stamp. At around $25, having a custom ink stamp made at an office supply store isn’t that much money, but buying a stamp is not as fun as making one! That is what we are going to do today; make a stamp… or more specifically, several stamps using different techniques. Then we’ll compare the performance of each method.
DESIGN


Since this is Hackaday, we will be making a Hackaday Logo stamp. Back a couple years ago we ran a contest asking folks to make unique things with the Hackaday logo. To make it easy for the entrants, the Hackaday logo was made available in SVG format. We’ll start with that, since it is available, and make a minor change by adding some lettering, as most soon-to-be stamp makers will probably want letters on their stamps too. This is easily done in the FOSS vector graphic editor software: Inkscape.
The stamp size is important. A Hackerspace Passport page has room for 4 stamps up to 41 x 47mm and we’ll try to keep our stamp within those limits.
MATERIALS
As stated before, we are going to use several methods of making stamps and compare them. Certainly, there are countless ways to make a stamp and we will experiment with methods and tools that a hackerspace would typically have access to.


Stamp Rubber
This can be bought at a hobby or craft store. It is specifically made for stamping and we’ll use it as a base line. We’ll be making 4 total stamps out of Stamp Rubber. The first two will be a standard Hackaday logo but each will be made with a different tool; Laser Cutter and a Mini CNC Router.
The 3rd and 4th stamps, also made from stamp rubber, will have ‘lined’ shapes. Large flat solid shapes have caused problems in the past by not transferring ink well, leaving an inconsistent splotchy pattern. Again, we’ll do one on the Laser Cutter and one on the CNC Router.
Hobby Foam
This material will be cut easily with a laser cutter. It is softer and more flexible than the rubber and comes in 2mm thick sheets. It is extremely inexpensive material available at any craft store.
Wood
This will be cut out using a laser cutter. Everyone has access to a small piece of wood, let’s see if it is a reasonable material for making a stamp.
3D Printed Plastic
The 3D print will be used as the stamp itself. Printed plastic is hard and slippery. Our past experience is that this method won’t look good but 3D printers are a very common tool found at hackerspaces, so let’s try it! Our stamp will printed with ABS.
3D Printed Flexible PLA
This 3D print will be printed in the same manner as the plastic stamp but the material is significantly more rubber-like and flexible. It will be interesting to see how well this material works out. This stamp will be printed using Form Futura Flexible PLA filament.
3D Printed Mold with Caulk Casting
3D Printers are a great tool but we expect that the 3D printed stamps may not perform well due to the material properties. For this test, a mold will be printed and filled with silicone caulk. The cured caulk will then be removed and hopefully result in a usable stamp. Like the 3D printed plastic stamp, this mold was also printed with ABS.
MAKING WITH A LASER CUTTER


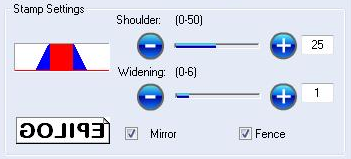
We started with the Hackaday Logo SVG file and modified it in Inkscape. It was then opened in Corel Draw for sending to the Laser Cutter, which in this case was an Epilog. Lucky for us the Epilog print driver has a stamp feature. After opening up the SVG file, verify the stamp is the correct size. Then draw a rectangle around the stamp geometry and make the line type ‘hairline’. The software’s stamp feature will need this rectangle to bound the relieved (lasered) portion of the stamp. To turn on the stamp feature, in the Corel Draw print dialog box click on ‘print properties’ to get to the Epilog driver dialog box. Click the ‘advanced’ tab to show the stamp options. Checking ‘mirror’ will reverse the image so the image on the physical stamp is reversed but the ink stamping will come out in the correct orientation. The stamp feature also will put what Epilog calls shoulders around the artwork, stiffening thin areas of the physical stamp. We used 30% speed and 100% power and had to do 3 passes to get a deep enough cut.
Physically, the lasered stamp rubber came out well but it also became burned. Even the non-lasered area became discolored from the fumes. Scrubbing with soap and water didn’t make any perceivable difference. This discoloration had no effect on the stamp’s performance.
We then moved on to the Hobby Foam which cut like butter. Typically that is a good thing but it also melted the foam and left a wide kerf, so wide in fact that the letters end up just being holes.
MAKING WITH A CNC ROUTER


Starting with the SVG file from Inkscape, we need to save it in a format for use in a CAM (Computer Aided Manufacturing) Software which will take the image geometry, generate tool paths to cut out the stamp and save a g-code file. Saving as a DXF file resulted in some compatibility errors so we went with PDF and it worked great. Before exporting the file from Inkscape, the image should be reversed. Nothing is worse than cutting a nice stamp then finding out the stamping is backwards! The CAM software requires you to indicate what type of tool is being used as well as how deep to cut. We will be using a 30 degree pointed engraving bit and cutting 0.060 inches deep. The 30 degree bit has 2 benefits over a straight end mill:
- The angle will provide some support to thin stamp features (similar to the Epilog’s shoulder feature).
- The point of the bit can be used to make very fine details in the stamp.
We are using a program called VCarve to generate our g-code. It is an easy to use program but not cheap, starting at $350. A free CAM Software alternative is CAMBAM Free. Even though our opinion is that CAMBAM Free is the best free CAM Software available, it is reasonable to expect a long learning curve and many ‘net searches for how to use it.
Machine Control Software such as LinuxCNC or Mach3/4 will be able to load the g-code file created by the CAM Software and subsequently control the CNC Machine to cut the stamp. We are using LinuxCNC, which is free and open, for this project but Windows-only Mach3 ($175) is equally as functional.
The CNC Machine used for making the stamps is a generic unbranded machine typically referred to as a CNC3020. A search of that term will return a plethora of vendors on eBay selling the machine for about $600.
We only expected to do two cuts: remove most of the material with a 0.060 inch straight end mill and move in for the detail cuts with a 30 degree v-bit. After finishing the first two passes there was quite a few ‘rubber burs’ leftover. These first passes were done in a climb-milling direction. Two more programs were then created and run to do the same cuts but in a conventional-milling direction. This cleaned up a lot of the unwanted rubber but it still needed a good rubbing and scrubbing with a tooth brush to clean up the stamp to a satisfactory point. Watching the v-bit closely as it cut, the rubber was clearly moving out of the way as the v-bit passed by, then popping back to its original position. This behavior wasn’t expected and is the reason for some unclear features, such as the nose on the solid skull or the gap between the skull and wrenches.
MAKING WITH THE MOLD


Using a 3D printed mold with silicone caulk did not work… at all. The mold printed great but the caulk did not cure in the center of the ‘stamp’ and it was not able to be removed in one piece. This method was a complete failure. It just happened that we did have some Impression Material kicking around. It’s not common to have this type of material so readily available but we did so we’re going to use it! The impression material is a two-part mixture that will cure regardless of how thick the application is. The impression material worked well filling most of the voids and was very easy to remove from the mold. One problem we noticed is that it took a very good replication of the top surface of the 3D printed mold, meaning the stamping part of the stamp had ridges from the textured 3D print top surface.
FINISHING UP THE STAMPS
The soft stamps were glued to a backer plate to prevent the stamp from flopping around in the breeze and to equalize force across the entire stamp while stamping. Anything can be used for a handle; we are mostly using some old wide-based drawer knobs and short pieces of small-diameter PVC pipe. These handles were hot glued to the backer plates.

RESULTS
The stampings are in and they certainly exhibit a wide range of quality. Click on the photo to check them out in detail.
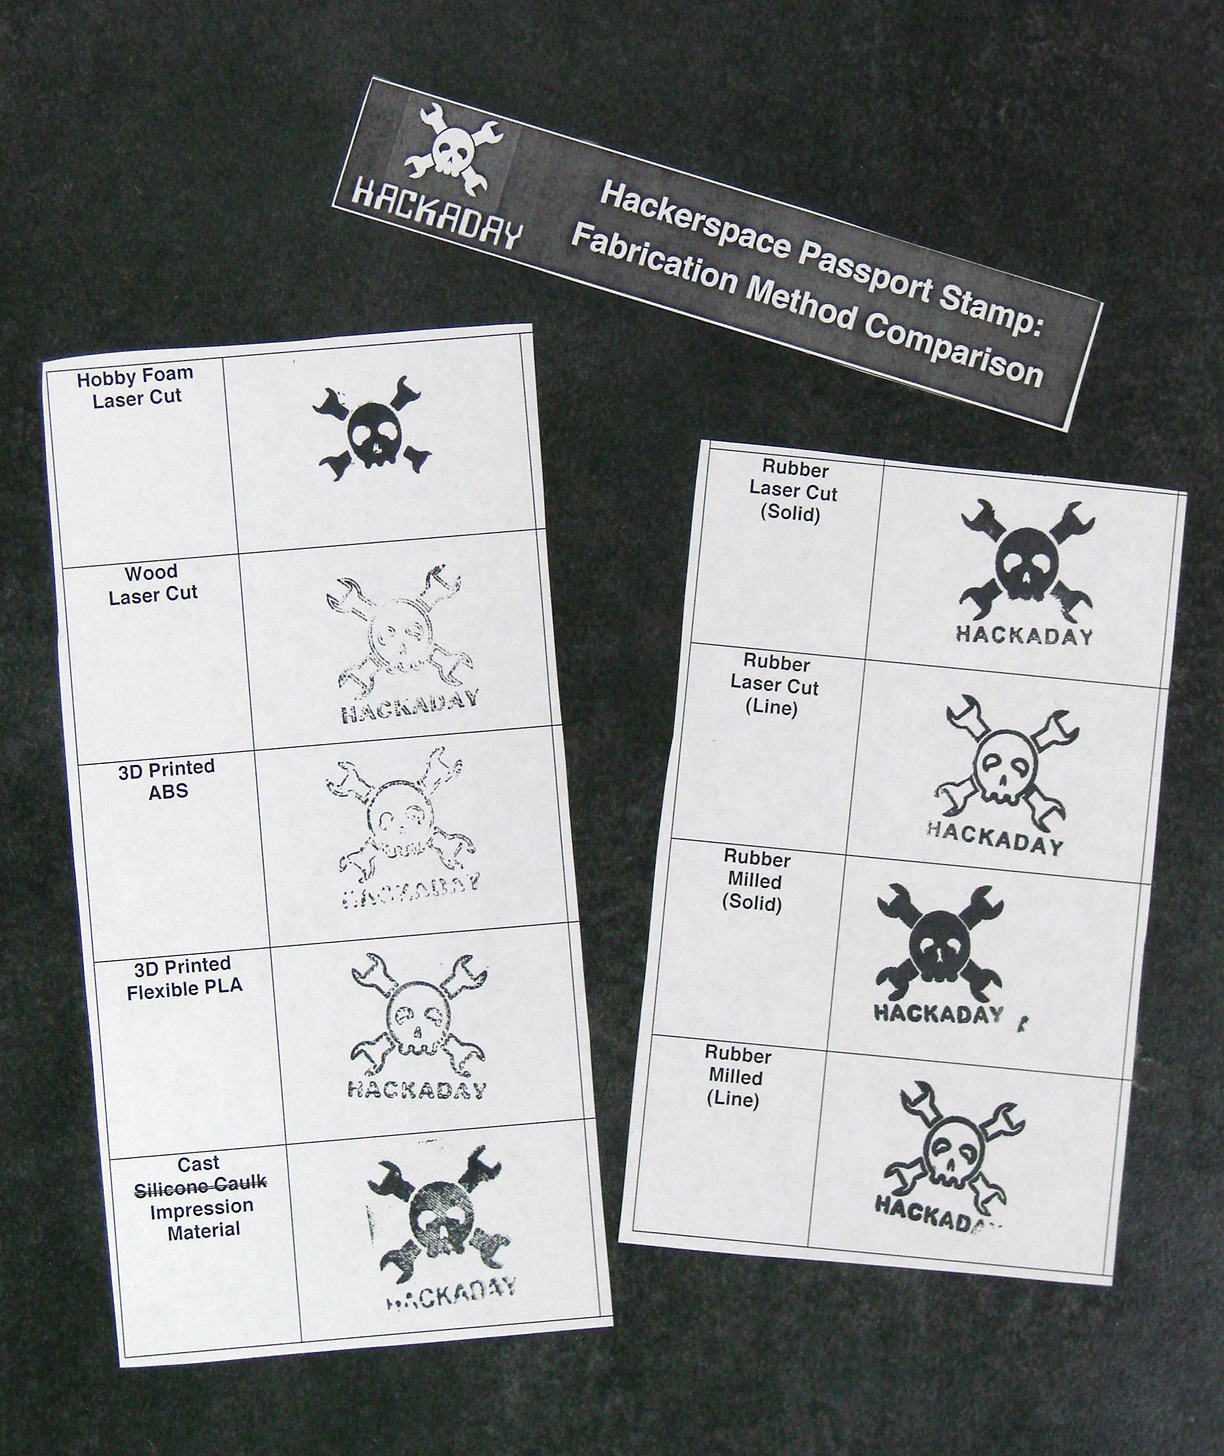
All of the rubber stamps came out very well, as you would expect since this material is made for ink stamping. They all look good, are very clear and the letters are easily readable. Both the Laser Cutter and CNC Router produced a very usable stamp with the stamp rubber.
The hobby foam transferred ink well but the laser melted away fine details, thin sections and all of the lettering. Plus, each of the 5 pieces had to be glued onto a backer plate individually which made it difficult to align the pieces correctly.
The wood and printed hard ABS are the worst at transferring ink even though the geometry came out well. The flexible PLA worked much better and would be a great option for hackerspaces that do not have access to a CNC Router or Laser Cutter.
Don’t try molding with caulk. Even though this was a complete failure, we also learned something in the process: don’t do it. The impression material worked okay but the textured stamping surface and the fact that impression material is not common make this not the best choice for stamp fabrication.
When making ink stamps (or anything!) experimentation and trying substitute materials is totally reasonable. We hope this post has shown there isn’t one way to get where you’re going. Feel free to mix and match stamping materials, methods and techniques. Let us know your experiences down in the comments. If we missed a method that has worked well for you, let everyone know!


tldr; yes stamping rubber as prooved through centuries of refinement is the best, who would have guessed. :P
potato. You can eat it afterwards.
Yep, tl;dr. Me needs to get coffee.
Using a wood block like a rubber stamp is not going to work very well; however, if you put the wood on a flat surface, ink the wood carving, and then press the paper onto the carving, it would be similar to woodblock printing, which has been used for centuries.
Also: HOW TO MAKE HACK-A-DAY SAND MOLDS FOR THIS BEACH SEASON
WHY ARE YOU YELLING?!
When moulding with caulc, try adding starch on order to cure it all the way through:
http://www.instructables.com/id/Using-Silicone-Caulking-to-Make-Molds/
Caulk, not caulc…
Luddite, not lodden…
I too, was wondering why they didn’t use corn starch to make the caulk cure all the way through. Hackaday has even covered the process before:
http://hackaday.com/2010/10/11/oogoo-a-home-made-sugru-substitute/
I’m surprised you didn’t try Sugru.
Mill out the negative in wax and push in Sugru. Pull out and let cure.
Or use Oogoo (cheap substitute for sugru)
– http://www.instructables.com/id/How-To-Make-Your-Own-Sugru-Substitute/step3/Mixing-Oogoo/
Make sure to use a mold release even if its just vaseline put on with a chip brush and then warmed with a heatgun, so its smooth.
HaD even covered Oogoo before. Link ^up there^. :)
FWIW, I tried making 3D printed ABS stamps of various Hogwarts houses for my daughter’s birthday party. They turned out pretty bad on paper, as yours did, but really really well when stamping skin.
This is an excellent review of hackable stamping methods. For a year or two until I got my own laser cutter I actually sent away for cheap (~$10) stamps from Simonstamp and discovered that most professionals use laser cutters to make their stamps. After the laser arrived I found a low odor etchable rubber that worked fantastically and haven’t looked back since. I did try making a stamp from a silicone casting, but found that it only really works if you use a high durometer (shore A 30 or above) rubber.
I like to think I know a good bit about stamping hackerspace passports – I designed and illustrated them.
What kind or rubber do you use, I have a laser and would like to try it out.
Real men use branding irons.
A block of linotype linoleum might be a worthwhile investment for a hackerspace. This is easily carved with hand tools and has a long history of being used in off-set press and hobby printing. It lasts a pretty long time and isn’t horrendously expensive at a well stocked art store (1-10 USD depending on size). Online too obviously.
If you’re in a jam or just impatient red rubber gasket material from the plumbing aisle also makes good stamp material, though it won’t make an heirloom piece like linoleum. You can get a 6″ x 6″ x 1/8″ sheet for ~$3 from your favorite big box store.
Both materials should be hard enough to set on a CNC router. I’ve used a dremel on gasket material, it just makes an unholy mess and fuzzy edges. A light sanding fixes that though.
Cool with dry ice as shown on a previous HAD feature and you’ll cut out the fuzzing.
http://hackaday.com/2014/09/22/cryogenic-machining-custom-rubber-parts/
Missed a huge one that works well. Fimo Polymer Clay.
Another one that works decently and was used for years before rubber. Leather. Laser cutting leather is unsettling, the smell of burning flesh freaks out a lot of people.
The nice folks at the LVL1 Hackerspace could not find their stamp pad during my visit, so they used machinist’s bluing on my passport. Cool!
One technique you missed that works very well is laser engraving the stamp rubber. I know it works because I’ve seen it done to make stamps. Faster and cheaper to engrave the stamp to insert into one of those push stampers that flips it upside down against an ink pad in the upper part, which also keeps the ink from drying out.
The type of stamp I’d like to find more info on is the kind where the ink is either saturated into the rubber or delivered through it from a pad behind it. The rubber looks kind of translucent, though that’s not readily apparent with black ink. That type usually has a plain cover with no pad and some of them have a spring loaded collar so the stamp can be set face down without getting ink on your desk if you are going to be doing a lot of stamping. Just don’t forget to put the cover back on when done.
No potato in a CNC? :(
Since all the comments seem to be on actual topic about stamps…
Guys, +1 on your cnc control software choice, but I am not sure, what do you mean by this sentence:
“Windows-only Mach3 ($175) is equally as functional”?
It certainly is not anywhere near of the same capabilities… Non-trivial kinematics and closing feedback loop for true servo controls are just two examples.
Love this style of article. Great to inspire a few hack and tease knowledge out of the rest of the community .
I wonder if freezing the rubber before CNC milling might improve the cut by preventing the rubber from flexing under the bit. (Just an idea. I’ve not seen any such technique.)
http://hackaday.com/2014/09/22/cryogenic-machining-custom-rubber-parts/
Another option that I tested out myself was to make a 3D print (I used PLA) and then coat it with layers of spray-on rubber/vinyl. I used Plasti Dip Liquid Electrical Tape spray, since that is what I had in the shop. The regular spray-on Plasti Dip might work as well.
http://www.plastidip.com/home_solutions/liquid_tape
I would imagine that your underlying material could be just about anything with plastidip on top.