There’s a pretty good chance that you’ve wanted to add a graphic or design to a t-shirt some time in your life. There are certainly ways to do it but most of us don’t have silk screening equipment or a steady enough hand to have the end product look cool. Lucky for us, [UrbanThreads] has put together a stenciling tutorial for personalizing garments. The process is easy and inexpensive. The results are good, although it can be time-consuming if the pattern is intricate.
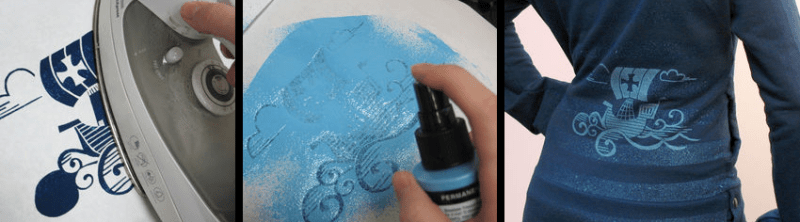
To get started, a black and white graphic is printed on a sheet of paper. The design is then taped to a sheet of the secret ingredient: freezer paper. The two sheets are then placed on a table with the freezer paper up. Since the freezer paper is semi transparent, the printed out design shows through. It’s now time to use an exacto knife and trace the design while cutting through the freezer paper. The two sheets are then removed from each other and the freezer paper is put wax-side-down on the garment and ironed into place. The wax melts and acts as a temporary adhesive to hold the stencil down. At this point, fabric paint can be sprayed or dabbed on with a brush (avoid brushing back and forth as it may lift the stencil). Once the paint is applied, the stencil is removed and the paint is allowed to dry. According to [UrbanThreads] the freezer paper doesn’t leave any wax or residue on the garment.
For more garment modding, check out t-shirt bleaching or get ambitious with this DIY screen printing setup.


Not wax, plastic. As old as this technique is, it is good to see it pop-up every few years given the short attention span of the internet.
well now i have a new project for my craft cutter:
Solder stencils, cutting copper antennas, and now tee shirts. not to mention all of the other stuff.
Wonder if you could laser-cut a stencil? Or if you could iron the paper to sheer fabric and use that for screen printing?
laser cutting would melt the plastic/wax.
1. Use the toner-transfer technique to apply toner to a sheet of thin aluminum. Mask the back.
2. Etch in HCl + H2O2
Viola! Stencil!
Laser cutting works rather nicely if you can keep the paper flat and the loosened pieces out of the beam. Reynold’s Freezer Paper is polystyrene backed (last I checked), so no special ventilation is needed beyond the usual safety measures.
Note that each stencil is one-use; reapplying it to another piece of fabric might work once, but not much more than that.
So basically, this awesome smart tip to print pattern on a shirt is:
1 – Print pattern
2 – Cut out pattern to obtain mask
3 – Apply mask on shirt
4 – Spray fabric paint.
As the internet would say: “No shit Sherlock!”. Oh, wait, but there’s the freezer paper thrown in. Yeah, still not impressed by the educational content.
Hey, got a super duper tip as well: maybe iron the shirt so that the mask lays well flat. Then you could probably just as well use normal paper and sellotape. Or this Post It glue in spray.
You need pressure holding the stencil against the facult fabric to get a clean edge.
What a great personality you have. So pleasant and enriching.
Even easier: just load the freezer paper into a hobby/craft cutter (like the type use to cut out vinyl decals).
That’s a few hundred dollars/quid/euros right? Then why not simply order the shirt?
I mean it’s obviously nice if you have a cutter like that, same way that it’s nice if you have a laser cutter many times, but those things all cost a bundle.
Could just skip some work and buy thermal vinyl and use a really hot clothes iron to stand in for a heat press…
I used to do something similar about 25 years ago but used the transparent adhesive sheets for covering books. Worked fine when brushing on the paint, which also gave you scope to not just have flat colours.
My issue with this and similar techniques is the skill with a knife required.
That’s why I like to see the various ideas people post to bypass that part. Now if only it didn’t so often require expensive equipment most of us don’t have.
If it is a very elaborated stencil this is nearly impossible. At least a stencil with 100 pieces would take how much time? and if pieces are small time gets even worse..
Here in Portugal, i can get an image printed in a shirt for 5euros on a printer shop, ~5bucks, and i even get the shirt for free, so with 5bucks i buy a shirt white or black with any photo/stencil/whatever i want (i draw the stencil/picture i like) on it in 2 minutes. I dont know other countries but here it doesn’t make up to make it by hand..