There’s a pretty good chance that you’ve wanted to add a graphic or design to a t-shirt some time in your life. There are certainly ways to do it but most of us don’t have silk screening equipment or a steady enough hand to have the end product look cool. Lucky for us, [UrbanThreads] has put together a stenciling tutorial for personalizing garments. The process is easy and inexpensive. The results are good, although it can be time-consuming if the pattern is intricate.
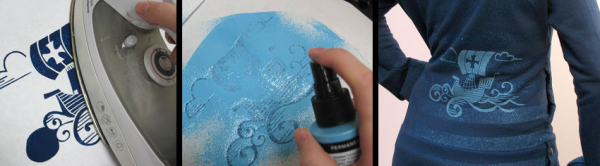
To get started, a black and white graphic is printed on a sheet of paper. The design is then taped to a sheet of the secret ingredient: freezer paper. The two sheets are then placed on a table with the freezer paper up. Since the freezer paper is semi transparent, the printed out design shows through. It’s now time to use an exacto knife and trace the design while cutting through the freezer paper. The two sheets are then removed from each other and the freezer paper is put wax-side-down on the garment and ironed into place. The wax melts and acts as a temporary adhesive to hold the stencil down. At this point, fabric paint can be sprayed or dabbed on with a brush (avoid brushing back and forth as it may lift the stencil). Once the paint is applied, the stencil is removed and the paint is allowed to dry. According to [UrbanThreads] the freezer paper doesn’t leave any wax or residue on the garment.
For more garment modding, check out t-shirt bleaching or get ambitious with this DIY screen printing setup.


