Hackaday Prize Entry: Ultimate Circuitbending

Circuit bending is the process of taking a small electronic toy or musical instrument, soldering wires to pads on the PCB, and hoping the sounds it produces will be cool. It’s not a science by any means, and any good, weird sounds you’ll get out of a Speak ‘N Spell or old MIDI keyboard are made entirely by accident or hours and hours of experimentation.

[Alpha Charlie]’s entry for the Hackaday Prize is the most technologically advanced circuit bending you’ll ever see. He’s using an old digital beat box, the Roland TR-626, with computer-controlled wires between random pads on the PCB.

Until now, you could tell how technically adept a circuit bender was simply by how many switches were on the circuit-bent instrument. [Alpha Charlie] doesn’t need switches. Instead, he’s using a few crosspoint switch ICs to connect different pins and pads on the TR-626’s PCB with an Arduino. All of this is controlled by a touchscreen display, and experimenting with the circuit is as simple as pushing a few buttons. Each ‘bend’ is computer controlled, and can be saved and recalled at will.

Of course, circuit bending doesn’t do anyone any good if it sounds like crap. [Alpha Charlie] doesn’t have to worry there. In the video below, he’s getting some very unique sounds that sound like a choir of angels to dorks like myself that listen to Nintendo music.

Continue reading “Hackaday Prize Entry: Ultimate Circuitbending”

Autonomous Drones Now Carry People

There are a handful of companies trying to build the first autonomous car, but this project makes us think that they all might be heading in the wrong direction. [Thorstin] wanted to use a quadcopter to transport people, and built a working prototype of an autonomous quadcopter-esque vehicle that is actually capable of lifting a person.

The device isn’t actually a quadcopter anymore; that wouldn’t be able to generate enough lift. It has sixteen rotors in total, making it a sexdecacopter (we suppose). This setup generates 282 pounds of static thrust, which as the video below shows, is enough to lift an average person off of the ground along with the aluminum alloy frame and all of the lithium ion batteries used to provide power to all of those motors.

With the PID control system in place, the device is ready for takeoff! We like hobby projects that suddenly become life-sized and rideable, and we hope to see this one fully autonomous at some point too. Maybe soon we’ll see people ferried from waypoint to waypoint instead of being driven around in their ground-bound autonomous cars.

Continue reading “Autonomous Drones Now Carry People”

Brass Clock Face Etched With PCB Techniques

Over the last few months, [Chris] has been machining a timepiece out of brass and documenting the entire process on his YouTube channel. This week, he completed the clock face. The clock he’s replicating comes from a time before CNC, and according to [Chris], the work of engraving roman numerals on a piece of brass would have been sent out to an engraver. Instead of doing things the traditional way, he’s etching brass with ferric chloride. It’s truly artisan work, and also provides a great tutorial for etching PCBs.

[Chris] is using a photoresist process for engraving his clock dial, and just like making PCBs, this task begins by thoroughly scrubbing and cleaning some brass with acetone. The photoresist is placed on the brass, a transparency sheet printed off, and the entire thing exposed to four blacklights. After that, the unexposed photoresist is dissolved with a sodium carbonate solution, and it’s time for etching.

The clock face was etched in ferric chloride far longer than any PCB would; [Chris] is filling these etchings with shellac wax for a nice contrast between the silvered brass and needs deep, well-defined voids.

You can check out the video below, but that would do [Chris]’ channel a disservice. When we first noticed his work, the comments were actually more positive than not. That’s high praise around here.

Continue reading “Brass Clock Face Etched With PCB Techniques”

Shirt Design Stencil

Shirt Printing With Freezer Paper

There’s a pretty good chance that you’ve wanted to add a graphic or design to a t-shirt some time in your life. There are certainly ways to do it but most of us don’t have silk screening equipment or a steady enough hand to have the end product look cool. Lucky for us, [UrbanThreads] has put together a stenciling tutorial for personalizing garments. The process is easy and inexpensive. The results are good, although it can be time-consuming if the pattern is intricate.

To get started, a black and white graphic is printed on a sheet of paper. The design is then taped to a sheet of the secret ingredient: freezer paper. The two sheets are then placed on a table with the freezer paper up. Since the freezer paper is semi transparent, the printed out design shows through. It’s now time to use an exacto knife and trace the design while cutting through the freezer paper. The two sheets are then removed from each other and the freezer paper is put wax-side-down on the garment and ironed into place. The wax melts and acts as a temporary adhesive to hold the stencil down. At this point, fabric paint can be sprayed or dabbed on with a brush (avoid brushing back and forth as it may lift the stencil). Once the paint is applied, the stencil is removed and the paint is allowed to dry. According to [UrbanThreads] the freezer paper doesn’t leave any wax or residue on the garment.

For more garment modding, check out t-shirt bleaching or get ambitious with this DIY screen printing setup.

Machine Metal With Electricity: An EDM Attachment For 3D Printers

[SuperUnknown] has revealed a secret project he’s been working on. He’s cooked up an EDM attachment for 3D printers, or any CNC machine for that matter. Electrical Discharge Machining (EDM) is a method of using sparks to machine metal. EDM isn’t a new technology, in fact commercial machines have been around since the 1960’s. If you’ve ever had an arc scar up your multimeter probes, you’ve unwittingly done a bit of EDM.

The theory behind EDM is simple: High voltage between the tool and workpiece causes sparks to jump between them. Each spark erodes the workpiece (and the tool). Big EDM machines perform their magic in a liquid which acts as both a dielectric and a flushing medium. This liquid can be anything from deionzed tap water to specially formulated oil. [SuperUnknown] is using good old-fashioned tap water.

edm-rough
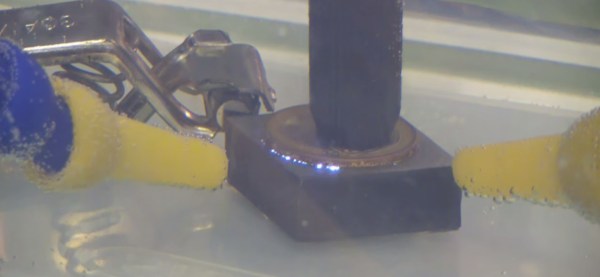
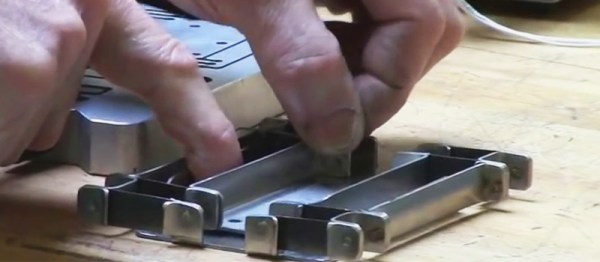
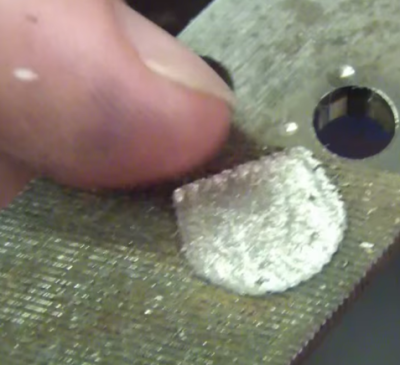
As you can imagine, a single spark won’t erode much metal. EDM machines fire tens of thousands of times per second. The exact frequencies, voltages, and currents are secrets the machine manufacturers keep close to their chests. [SuperUnknown] is zeroing in on 65 volts at 2 amps, running at 35 kHz. He’s made some great progress, gouging into hardened files, removing broken taps from brass, and even eroding the impression of a coin in steel.

While we’d love to say this is a free open source project, [superUnknown] needs to pay the bills. He’s going with crowdsourced funding. No, not another Kickstarter. This project is taking a different route. The videos of the machine will be uploaded to YouTube and visible to [superUnknown’s] Patreon supporters. They will also be available for rent using YouTube’s new rental system. [SuperUnknown] has pledged to figure out a way to make the content available for starving college students and others with limited incomes.

Based upon his previous adventures with lil’ screwy, his homemade 100 ton press, and various other projects on the Arduino verses Evil YouTube channel, we think [superUnkown] has a pretty good chance of making home EDM work. Click past the break to see two videos of the 3D printer EDM toolhead in action. We should mention that [SuperUnknown] is rather colorful with his dialogue, so make sure you’re using headphones if you’re at work.

Continue reading “Machine Metal With Electricity: An EDM Attachment For 3D Printers”

Inceptionism: Mind Blown By What Neural Nets Think They See

Dr. Robert Hecht-Nielsen, inventor of one of the first neurocomputers, defines a neural network as:

“…a computing system made up of a number of simple, highly interconnected processing elements, which process information by their dynamic state response to external inputs.”

These ‘processing elements’ are generally arranged in layers – where you have an input layer, an output layer and a bunch of layers in between. Google has been doing a lot of research with neural networks for image processing. They start with a network 10 to 30 layers thick. One at a time, millions of training images are fed into the network. After a little tweaking, the output layer spits out what they want – an identification of what’s in a picture.

The layers have a hierarchical structure. The input layer will recognize simple line segments. The next layer might recognize basic shapes. The one after that might recognize simple objects, such as a wheel. The final layer will recognize whole structures, like a car for instance. As you climb the hierarchy, you transition from fast changing low level patterns to slow changing high level patterns. If this sounds familiar, we’ve talked out about it before.

Now, none of this is new and exciting. We all know what neural networks are and do. What is going to blow your knightmind, however, is a simple question Google asked, and the resulting answer. To better understand the process, they wanted to know what was going on in the inner layers. They feed the network a picture of a truck, and out comes the word “truck”. But they didn’t know exactly how the network came to its conclusion. To answer this question, they showed the network an image, and then extracted what the network was seeing at different layers in the hierarchy. Sort of like putting a serial.print in your code to see what it’s doing.

They then took the results and had the network enhance what it thought it detected. Lower levels would enhance low level features, such as lines and basic shapes. The higher levels would enhance actual structures, such as faces and trees. ibisThis technique gives them the level of abstraction for different layers in the hierarchy and reveals its primitive understanding of the image. They call this process inceptionism.


Be sure to check out the gallery of images produced by the process. Some have called the images dream like, hallucinogenic and even disturbing. Does this process reveal the inner workings of our mind? After all, our brains are indeed neural networks. Has Google unlocked the mind’s creative process?  Or is this just a neat way to make computer generated abstract art.

So here comes the big question: Is it the computer chosing these end-product photos or a google engineer pawing through thousands (or orders of magnitude more) to find the ones we will all drool over?

Learn 40 Years Of Mech Prototyping At Lightspeed

So, what are you doing for the next five and a half hours?  If you’re as busy as we are, you might have to digest this amazing 18 part series of videos over the course of a week or so, but we can almost guarantee you’ll learn a lot. It’s a speedrun through the best collection of Mechanical Engineering knowledge we’ve every come across.

In this epic Youtube video series [Dan Gelbart] shares his knowledge of 40 years of prototyping mechanical designs in a way we’ve never seen before. Not only does he show you how to build things, but he gives away a life time of “tips and tricks” that only a veteran builder would know. There are so many little gems of wisdom in this video series, it’s hard to know where to start with our description. He covers all the usual topics: everything from materials, adhesives, coatings, and such. But the real value of this series is all the little trinkets of information he shares along the way.

Don’t be intimated by some of the tools he’s using – chances are there is a DIY version of the piece of equipment out there, and often you can find a hackerspace or enthusiast in the area who will help you out with their gear. We think this video series should be a must watch for any engineering student or hacker. We made a video playlist for you so you can start watching the videos after the break.

Continue reading “Learn 40 Years Of Mech Prototyping At Lightspeed”